
Can a Spirion Agent be set to run as "low priority"?
There are 2 distinct "low priority" settings available to ensure the scan does not negatively impact the end-user's experience, and 1 CPU setting. These settings are found on the approximately the 10th screen in the Create New (or Edit) Scan wizard on the "All Scans" page in Spirion Sensitive Data Platform.
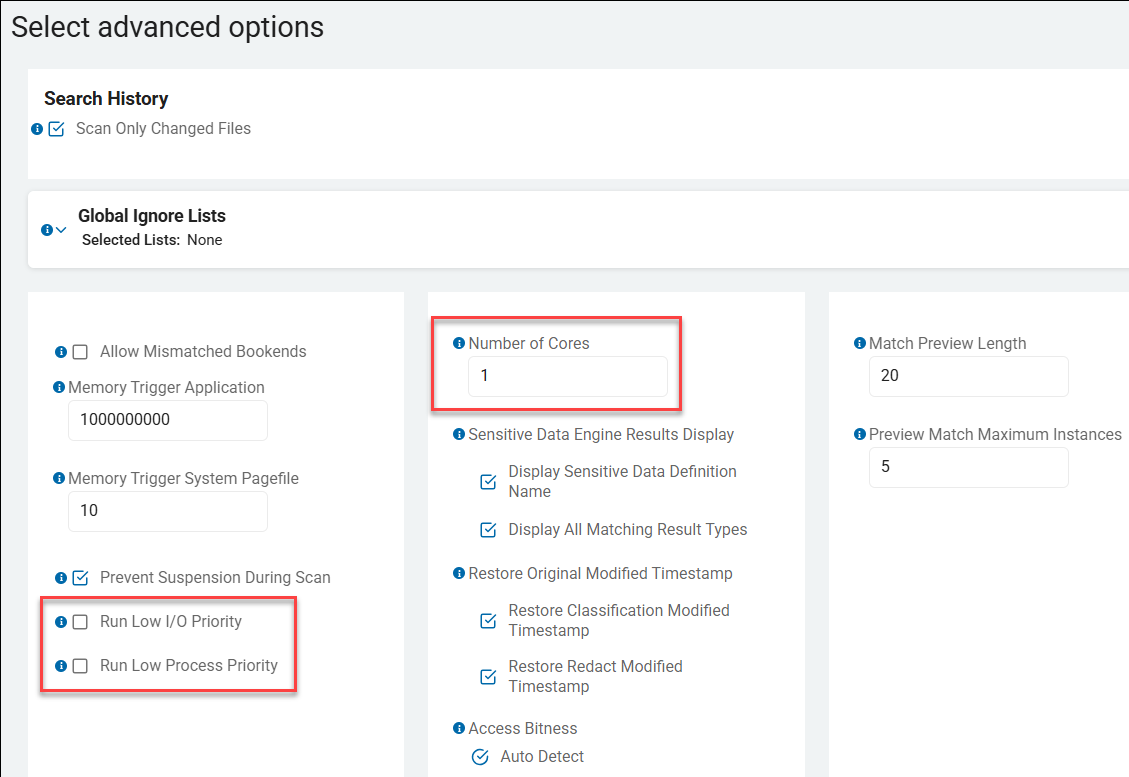
Run Low Process Priority
- What it does: Lower the priority of the endpoint application to give preference to other running, foreground applications.
- Benefit: Sets the CPU priority of the IDFCommandLine process to "Low" (or "Below Normal"). This ensures that if the user is running other applications (like Zoom or Excel), those applications get CPU cycles first.
- Availability: Supported on Windows and Mac platforms
Run Low I/O Priority
- What it does: Lowers the priority of disk read/write operations performed by the Agent.
- Benefit: Reduces the priority of disk read/write requests. This is critical for preventing the system from feeling "sluggish" while the Agent is indexing the file system.
- Availability: Primarily used on Windows and Mac (version 10.0 and later).
Number of Cores
Use all available or a specified maximum number of processor cores during the search.
- By default, the search uses all available CPU cores when searching for AnyFind and OnlyFind information within a location.
- Set this value to 0 to use only a single CPU core
- Valid values:
- 0: Use only a single CPU core
- 1: Default. Use all available cores
- 2 and up: Use no more than the number of processor cores set here, at maximum.
- Example: On a system with 8 cores, set this value to 4 to limit the search to a maximum of 4 cores.
How to Configure Spirion
In the Spirion Sensitive Data Platform perform the following steps:
- From the left side navigation menu select Scans > All Scans.
- For a new scan, click the + Add Scan button the top right corner.
- For an existing scan, select "Manage Scan" from the 3 veritcal dot more options menu.
- Navigate to the "Select advanced options" page of your Create New (or Edit) Scan wizard, approximately the 10th screen in the wizard. (See the screenshot below).
- Check the box "Run Low Process Priority".
- Check the box "Run Low I/O Priority".
- (Optional) You can further limit impact by setting "Number of Cores" to a specific value (for example: 1) rather than allowing the agent to use all available CPU cores.
Notes for Troubleshooting
Even when set to "Low Priority" or limited to 1 core, you may still see activity across multiple logical processors in the Windows Task Manager due to how the operating system distributes threads, though the overall CPU utilization percentage should remain significantly lower than a standard priority scan.
- Power/Fan Utilization: In some cases, even at low priority, a full computer scan can cause high power usage and trigger laptop fans.
- This is because the process is still performing constant work, which prevents the CPU from entering lower power states.
- Process Verification: To verify the setting is working on a Windows endpoint use the following steps:
- Open Task Manager > Details tab.
- Right-click the entry IDFCommandLine.exe
- Check Set Priority and I/O Priority
- Both values should be Low.
- Multi-Core Visuals: Even if you set the agent to use 1 core, you may still see activity across all logical processors in Windows Task Manager. This is due to how the Windows OS scheduler distributes threads; however, the total CPU utilization should still reflect the limit of a single core's capacity.