
How to Create a Policy Using the Wizard - Local Reporting Options
After completing the Additional Settings page of the Create Policy wizard, click Next to proceed to the Additional Settings page to input more detailed options.
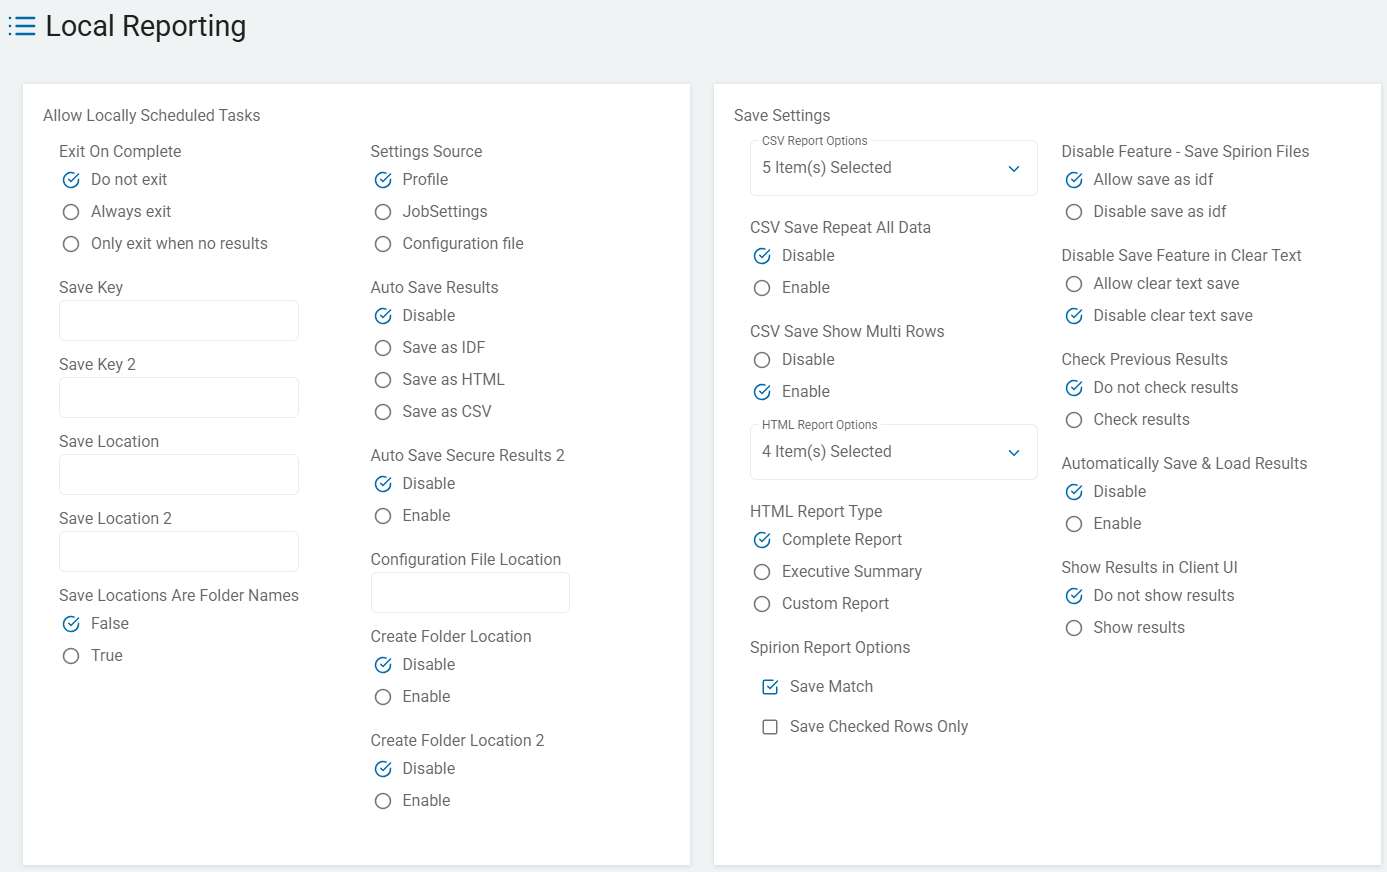
- Use the table below to help you fill in the Local Reporting page.
- Local Reporting settings control report options, paths to configuration files, where to store search results, and other reporting options.
- When complete, click Next to proceed, Previous to return to the previous screen, or Exit Without Saving
to discard. - See the Local Logging Options page to complete the Local Logging settings.
Exit on Complete
The “Exit on complete” setting (found on the Local Reporting or Scheduled Task pages) enables you to define the post-scan behavior of the Agent's interface based on what was found.
This setting controls the "final state" of the spirion.exe process after it has completed its search and reporting tasks.
These three options provide granular control over whether the Agent stays visible for user review or closes automatically to clean up the desktop.
- Do not exit (Default)
- The Spirion Agent window stays open on the desktop once the scan is finished, regardless of whether it found sensitive data or not.
- Behavior: The user is presented with the "Search Complete" summary screen. They must manually click "Close" or "Finish" to exit the application.
- Best Use Case: Use this for Interactive Training. If you want to ensure the employee acknowledges that the scan occurred and has the opportunity to review the findings immediately, this is the safest choice.
- Always exit
- The Spirion Agent window and process close immediately as soon as the scan and reporting tasks are finished.
- Behavior: The window disappears from the user's screen without any final interaction required. It does not matter if the scan found zero matches or 10,000 matches—the process simply terminates.
- Best Use Case: Use this for Silent/Automated Scans. This is ideal for background tasks where you don't want to leave "ghost" processes running in the background or distract the user with a final pop-up.
- Only exit when no results
- This is a conditional setting. The Agent will close itself only if the scan was "clean" (found zero matches). If the Agent found even one piece of sensitive data, it will stay open.
- Behavior:
- No Matches Found: The window closes automatically (seamless to the user).
- Matches Found: The window stays open, forcing the user to see the findings and potentially take remediation action (Shred/Scrub).
- Use Case: Use this for "Exception-Based" Monitoring. It rewards "clean" users by getting out of their way, but forces "at-risk" users to confront the sensitive data they have stored on their machines. It strikes a balance between automation and accountability.
Comparison Summary
Option | Behavior if Results Found | Behavior if NO Results Found | Ideal For... |
|---|---|---|---|
Do not exit | Stays Open | Stays Open | User Education/Training |
Always exit | Closes | Closes | Background/IT Maintenance |
Only exit when no results | Stays Open | Closes | Self-Remediation Enforcement |
How it works in the architecture
- Process Management: Once the search engine thread closes and the reporting thread confirms the data is saved, the application sends a "Close" command to the main UI thread.
- Registry/Policy Key: This is typically controlled by the
Settings\ScheduledTask\ExitOnCompletevalue in the policy XML.
Recommendations
- For High-Friction/Self-Remediation: Use Only exit when no results. It reduces "notification fatigue" for users who are already compliant, but ensures those with PII cannot ignore the problem.
- For Low-Friction/Reporting Only: Use Always exit. If your goal is just to gather data for the console and you don't want the user to touch the Agent, this ensures the desktop stays clean.
Summary
These options allow you to determine the "Interaction Threshold" for your employees. "Do not exit" is a full-stop, "Always exit" is a silent pass-through, and "Only exit when no results" acts as a smart filter that only interrupts the user when there is a problem to fix.
Save Key
The “Save Key” setting (found on the Local Reporting or Scheduled Task pages) is the encryption password used to protect a local results file (typically an .idf file) created by the Agent.
What it does
When the Spirion Agent is configured to save its findings to a local file (instead of, or in addition to, sending them to the SDP Console), it uses the Save Key to encrypt that file.
- Function: It acts as the "Master Password" for the results file.
- Result: Without this key, the resulting
.idf(Internal Data Format) file is unreadable. If a user or an unauthorized person tries to open that file in a text editor or even another copy of Spirion, they will be prompted for this password. - Note: This value must be created using the endpoint GUI.
- Reference documentation is available at Creating a Password Hash for Auto Saving Results During Scheduled Task Searches
Why it exists
This setting is a critical Security Control for "Data at Rest" on the endpoint:
- Protecting Findings: Since Spirion scan results contain a list of exactly where PII/PCI is located (and often includes "Match Evidence" or snippets of the sensitive data), the results file itself is highly sensitive. The Save Key ensures that if the results file is stolen or copied, the sensitive matches remain encrypted.
- Automated Reporting: In a scheduled task, you cannot have a human type in a password every time a report is saved. The "Save Key" in the policy enables the Agent to automatically encrypt the file using a pre-defined secret provided by the administrator.
- Secure Hand-off: If an IT admin needs to manually collect a results file from a remote machine to review it in their own "Sensitive Data Manager" console, they will use this Save Key to "unlock" the file for viewing.
How it works in the architecture
- Encryption: The Agent uses the string entered in the "Save Key" field to generate an encryption key (usually AES-256) to wrap the results data.
- Policy Delivery: The key is sent from the Console to the Agent as part of the XML policy. In transit, this key is encrypted via the Agent's secure communication channel (TLS).
- Storage: The key is stored in the Agent's local configuration in an obfuscated or encrypted format (it is not stored in plain text in the registry).
- Internal Key: In the policy XML, this maps to
Settings\ScheduledTask\SaveKey.
Recommendation
- Use Strong Passwords: Do not use "password" or "spirion." Use a complex string that aligns with your organization's internal secret management policy.
- Keep it Secret: Only authorized Spirion administrators should know the Save Key. If an end-user knows the key, they could potentially open and modify their own scan results.
- Standardization: Use the same Save Key across your entire organization (or at least within specific departments) to ensure that administrators don't have to guess which password belongs to which machine's report file.
- Note on SDP (SaaS): If you are primarily using the SDP Cloud Console to view results, you may not need to use local reporting or a Save Key at all, as the results are sent directly to the cloud via a separate secure channel. This setting is most common in "Hybrid" or "Air-gapped" environments.
Summary
The “Save Key” is the "Padlock" for your local report files. It ensures that the "map of your sensitive data" created by the scan is encrypted and accessible only to authorized personnel who possess the password.
Save Key 2
The “Save Key 2” setting (found on the Local Reporting page) is the secondary encryption password used to protect a secondary local results file.
This setting mirrors the primary "Save Key" but is specifically tied to the "Auto Save Results 2" (or "Secondary Results File") workflow.
- Note: This value must be created using the endpoint GUI.
- Reference documentation is available at Creating a Password Hash for Auto Saving Results During Scheduled Task Searches
What it does
Spirion enables an Agent to generate two separate local report files simultaneously at the end of a scan.
- Save Key 1: Encrypts the primary results file (typically a standard
.idfor.xml). - Save Key 2: Encrypts the secondary results file (often used for a different format or sent to a different backup directory).
Why it exists
The "Save Key 2" is used in complex "Dual-Reporting" or "Tiered Access" scenarios:
- Redundant Backups: An organization might save one report to a local folder (using Key 1) and a second report to a network share (using Key 2). If the network share is managed by a different team (e.g., Security vs. IT), they can have different passwords for those files.
- Format-Specific Security: Sometimes the primary file is a full forensic report, while the secondary file is a "Summary" report. You can use different keys to ensure that only the correct personnel can open the more sensitive "Full" report.
- Auditing and Proof of Scan: In highly regulated environments, the "Secondary" file might be an immutable record of the scan's completion. The "Save Key 2" ensures that even if the primary results are decrypted for remediation, the secondary "proof" file remains locked and tamper-evident.
How it works in the architecture
- Independent Encryption: The Agent performs two separate encryption passes. It does not simply copy the first file; it generates a second file and wraps it in the unique password defined in "Save Key 2."
- Policy Mapping: In the policy XML, this maps to the
Settings\ScheduledTask\SaveKey2value. - Format Flexibility: Usually, this is paired with the
AutoSaveSecureResults2setting, which dictates that the secondary file must be in the encrypted.idfformat.
Recommendations
- Keep them Different (If used): If you are going through the effort of generating two local reports, it is a best practice to use different keys. If you use the same key for both, you aren't gaining any security advantage—only redundancy.
- Standardization is Key: Just like with the primary Save Key, ensure that your administrative team has these keys documented in a secure vault (like a password manager). If you lose "Save Key 2," the secondary reports become useless "bricks" of data that cannot be recovered.
- When to Ignore: If you are only saving one local report (or if you are relying 100% on the SDP Cloud Console for your reporting), you can leave Save Key 2 blank.
Summary
The “Save Key 2” is the "Secondary Padlock" for your second local report file. It provides the flexibility to secure a backup or alternative version of your scan findings with a unique password, separate from your primary report.
Save Location
Specify the encrypted password to use when automatically saving a secondary IDF results file
the “Save Location” setting (found on the Local Reporting or Scheduled Task pages) specifies the exact file path or directory where the Agent should save its scan results at the completion of a search.
- Note: This value must be created using the endpoint GUI.
- Reference documentation is available at Creating a Password Hash for Auto Saving Results During Scheduled Task Searches
What it does
This setting tells the Agent where to write the results file (typically an .idf, .xml, or .html file) on the local endpoint or an accessible network drive.
- Function: It acts as the "Destination Address" for the report.
- Behavior: Once the scan hits 100%, the Agent generates the report and attempts to write it to the path specified in this field.
Key Capabilities
- Local Paths: You can point it to a local folder, such as
C:\ProgramData\Spirion\Reports\. - Network Shares (UNC Paths): You can point it to a centralized network location, such as
\\FileServer01\SecurityReports\%COMPUTERNAME%\. - Variable Support: Spirion often supports environment variables (like
%COMPUTERNAME%,%USERNAME%, or%DATE%) in this field. This is critical for preventing multiple agents from overwriting each other’s files if they are all saving to the same network share.
Why it exists
This setting is used for organizations that need a "Physical Paper Trail" of their scans outside of the SDP Console:
- Offline/Air-Gapped Scans: If an agent cannot talk to the Cloud Console, the "Save Location" ensures the data is captured locally so an admin can collect it later.
- Secondary Backups: Even if results are sent to the console, many organizations save a local copy as a "snapshot in time" for audit purposes.
- Integration with Third-Party Tools: Some organizations use other tools to ingest data. By pointing the "Save Location" to a specific folder, those tools can "pick up" the Spirion reports automatically.
Important Configuration Rules
- Permissions: The user account running the Spirion Agent (or the System account, if running as a service) must have Write permissions to the specified folder. If it doesn't, the report will fail to save, and the data may be lost.
- Folder Creation: Depending on other settings (like "Create Folder Location"), the Agent may or may not automatically create the folder if it doesn't exist. It is best practice to ensure the directory structure exists before the scan runs.
- Mapped Drives: It is strongly recommended to use UNC paths (e.g.,
\\server\share) rather than mapped drives (e.g.,Z:\Reports). Mapped drives are user-specific and often unavailable to the Agent when running in the background.
Recommendations
- Use Unique File Names: If saving to a central server, always include a unique identifier like
%COMPUTERNAME%in the path or filename to avoid data collisions. - Monitor Disk Space: If you are performing frequent scans on a server, these report files can accumulate. Ensure you have a "cleanup" script or policy to prune old reports from the "Save Location."
- Security First: Ensure the "Save Location" is a protected folder. Since these reports contain sensitive match data, only authorized security personnel should have "Read" access to that directory.
Summary
The “Save Location” is the "Final Destination" for your local scan results. It defines exactly where the Agent will "drop off" the data it has found, whether that is a folder on the local hard drive or a secure vault on your network.
Save Location 2
The “Save Location 2” setting (found on the Local Reporting page) specifies the file path or directory for a secondary local results file.
Just as "Save Key 2" provides a second password, "Save Location 2" provides a second destination. This enables the Agent to write two separate report files to different locations at the end of a single scan.
What it does
When the scan is complete, the Agent will generate a primary report (at "Save Location") and a secondary report (at "Save Location 2").
- Dual-Path Reporting: You can save one copy of the results to a local folder (e.g.,
C:\Scans\) for the end-user and a second copy to a hidden network administrative share (e.g.,\\SecurityServer\Archive\%COMPUTERNAME%\) for the security team. - Redundancy: It ensures that even if one storage location is unavailable (e.g., a network drive is offline), the other location (the local disk) still captures the data.
Why it exists
This setting is used in complex enterprise workflows that require multiple "records" of the same scan:
- Administrative Mirroring: Organizations often want a "User Copy" that the employee can see and a "Master Copy" that is stored in a secure, read-only repository for compliance auditing.
- Cross-Team Integration: Different departments may use different tools. You might save an
.xmlversion of the report in Location 1 for an automated ingestor and an.htmlversion in Location 2 for human reviewers. - VDI/Ephemeral Workflows: On non-persistent virtual machines, you might use Location 1 for a temporary log and Location 2 to push the actual PII findings to a persistent network storage area before the VM is wiped.
Key Configuration Details
- Variable Support: Like the primary location, you should use variables such as
%COMPUTERNAME%,%USERNAME%, or%DATE%in the path. This is especially important for Location 2 if it is a shared network directory, as it prevents agents from overwriting each other's files. - Independent Settings: Location 2 can have its own unique file format (IDF, XML, CSV, etc.) and its own encryption key (Save Key 2), making it completely independent of the primary Save Location.
- Permissions: The Agent must have Write access to this second location. If the Agent is running as "System" but the network share requires a specific user's credentials, the save to Location 2 will fail.
Recommendations
- Use for "Evidence" Storage: If your policy involves high-risk remediation (like Shredding or Deleting files), use Save Location 2 to store a "Pre-Remediation" report in a secure, restricted folder. This acts as your forensic backup in case a file is deleted in error.
- Verify the Path: Always test the path from a standard endpoint before deploying the policy. A typo in Save Location 2 will result in a "Failed to save results" error in the Agent logs.
Summary
The “Save Location 2” is the "Secondary Delivery Address" for your results. It gives the Agent the ability to "carbon copy" its findings to a second location, ensuring redundancy and supporting multi-departmental reporting needs.
Save Locations Are Folder Names
In the Spirion Sensitive Data Platform (SDP), the “Save Locations are folder names” setting (found on the Local Reporting page) determines how the Agent interprets the text entered in the "Save Location" and "Save Location 2" fields.
It essentially tells the Agent whether the path you provided is a specific filename or just a parent directory.
What it does
- Enabled (Checked): The Agent treats the path in the "Save Location" field as a folder.
- Behavior: The Agent examines the "Save Location" folder and automatically generates a unique filename for the report. Usually, the filename will be a combination of the computer name and a timestamp (e.g.,
DESKTOP-ABC_20231027_1030.idf). - Benefit: This prevents "File Collisions." If you run multiple scans on the same machine, or if multiple machines save to the same network share, the Agent will create new, unique files instead of overwriting the previous ones.
- Behavior: The Agent examines the "Save Location" folder and automatically generates a unique filename for the report. Usually, the filename will be a combination of the computer name and a timestamp (e.g.,
- Disabled (Unchecked/Default): The Agent treats the path as the exact filename.
- Behavior: The Agent attempts to name the file exactly what you typed. If you typed
C:\Reports\Results.idf, it will save exactly to that name. - Risk: If a file with that name already exists, the Agent will typically overwrite the old file with the new results, or the save may fail if the file is locked.
- Behavior: The Agent attempts to name the file exactly what you typed. If you typed
Why it exists
This setting is a "Safeguard" for automated reporting:
- Mass Deployment: When sending a policy to 5,000 machines that all report to one network share (for example,
\\Server\Reports\), you don't want to manually type 5,000 unique filenames. By checking this box, every machine creates its own uniquely named file within that folder automatically. - Historical Auditing: If you want to keep a history of every scan performed on a server over the last year, enabling this ensures that each scan generates its own distinct file rather than updating a single "CurrentStatus.idf" file.
- Simplicity: It removes the need for the administrator to use complex variables (like
%COMPUTERNAME%_%DATE%) in the path string, as the Agent handles the naming logic internally.
How it works in the architecture
- Naming Logic: When this is enabled, the Agent uses an internal template (MachineName + Date + Time) to finalize the file path before writing to disk.
- Policy Mapping: This corresponds to the
Settings\ScheduledTask\CreateFolderLocationlogic (though specifically referring to the naming convention of the leaf object in the path).
Recommendations
- Best Practice for Centralized Logging: Always Enable this setting if you are saving reports to a shared network drive. It is the easiest way to ensure that "Computer A" doesn't overwrite the findings of "Computer B."
- Best Practice for Local Single-Scan: Disable this setting if you have a very specific "Dashboard" or third-party tool that is programmed to look for one specific filename (e.g.,
C:\Spirion\latest_results.xml). In that case, you want the file to be overwritten so the latest data is always in the same place. - Pairing with "Create Folders": This setting works best when you also enable "Create Folder Location," ensuring the Agent builds the entire directory path and a unique file inside it in one go.
Summary
The “Save Locations are folder names” setting is the "Automatic Naming Toggle." When it's on, the Agent acts like a smart filing clerk, giving every report its own unique, time-stamped name within the folder you specified. When it's off, it's a strict "Overwrite" instruction for a single, specific file.
Settings Source
The “Settings Source” option (found on the Local Reporting or Scheduled Task pages) tells the Agent where to look for the configuration instructions (the "rules" of the scan) when it is triggered to run.
Since a Spirion Agent can have settings stored in multiple places, this setting establishes the "Source of Truth" for that specific task.
- Profile
- This refers to the locally stored user profile or the current active policy assigned to the Agent.
- How it works: When the task starts, the Agent looks at its own internal registry/database to see what search locations, data types (SSNs, CCs), and performance throttles are currently active.
- Use Case: This is the standard/default for most enterprise deployments. It ensures that the scheduled scan always uses the latest policy sent down from the SDP Console. If you update the policy in the Cloud, the Agent updates its "Profile," and the next scan automatically uses those new settings.
- JobSettings
- This refers to settings that are embedded directly within the scheduled task itself.
- How it works: Instead of looking at the general "Profile," the Agent uses a specific "Job" definition. In older versions of Spirion (and some legacy Windows Task Scheduler integrations), you could "package" a search definition into a standalone Job file.
- Use Case: Use this for "Special Purpose" Scans. For example, if you want an Agent to do a "Quick Scan" of the Desktop every day (Job A) but a "Deep Scan" of the entire C:\ drive once a month (Job B), you would use "JobSettings" to ensure each task stays unique and doesn't just pull the general "Profile" settings.
- Configuration file
- This tells the Agent to ignore its internal settings and instead read a physical file (usually an
.xmlor.configfile) located on the disk. - How it works: You must provide a file path (e.g.,
C:\ProgramData\Spirion\custom_scan_config.xml). The Agent will open that file, load the settings inside it, and execute the scan based strictly on that file's instructions. - Use Case: Use this for Air-Gapped or Highly Scripted Environments.
- If a machine is never connected to the Console, you can manually drop a config file on the machine and tell the Agent to use it.
- It is also used by Developers or Power Users who want to "inject" specific settings into a scan via an external script without changing the machine's main policy.
- This tells the Agent to ignore its internal settings and instead read a physical file (usually an
Comparison Summary
Source | Where the "Rules" come from | Best For... |
|---|---|---|
Profile | The current Policy/Registry on the machine. | Standard Cloud-managed enterprise scans. |
JobSettings | The specific definition of that individual task. | Running multiple, different types of scans on one machine. |
Configuration file | A standalone | Scripting, offline machines, or "One-off" custom scans. |
Recommendations
- For 95% of users: Stick with "Profile." It is the most reliable way to ensure your agents are following the global security policy you’ve defined in the SDP Console.
- For Troubleshooting: If an Agent isn't searching what you told it to, check this setting. If it's set to "Configuration file" but that file is old or missing, the scan will either fail or use outdated rules.
Summary
The “Settings Source” is the "Instruction Manual" selector. It tells the Agent whether to use its standard policy (Profile), a specific task definition (JobSettings), or an external document (Configuration file) to decide what sensitive data to look for.
Auto Save Results
The “Auto Save Results” setting (found on the Local Reporting or Scheduled Task pages) defines whether the Agent should automatically generate a local file at the end of a scan and, if so, what file format it should use.
This is the primary toggle for creating a "local copy" of findings.
- Disable (Default)
- The Agent does not save a local file of the scan results.
- Behavior: Findings are typically only sent to the SDP Console (if connected) or held in the Agent's volatile memory while the UI is open. Once the Agent closes, the results are gone from the endpoint.
- Use Case: Standard Cloud-managed environments where you want all data centralized in the SaaS Console and don't want sensitive "finding maps" cluttering up the local hard drives of your endpoints.
- Save as IDF
- Saves the results in Spirion’s proprietary Internal Data Format (.idf).
- Behavior: This is a highly secure, encrypted format. It is essentially a "database in a file."
- Compatibility: This file can only be opened by the Spirion Agent or the Spirion Management Console. It requires the Save Key (password) to be opened.
- Use Case: Forensic Backups. If you need a local copy that is tamper-proof and encrypted to protect the PII findings inside it, IDF is the only recommended format for security compliance.
- Save as HTML
- Generates a human-readable web page (.html) report.
- Behavior: When the scan finishes, a formatted report is created that can be opened in any web browser (Chrome, Edge, etc.). It usually contains summary charts and a list of the findings.
- Risk: These files are typically not encrypted by the Save Key. Anyone with access to the folder can see exactly what PII was found.
- Use Case: Executive/Manager Summaries. Use this when you need to hand a report to a non-technical manager or a department head who does not have the Spirion software installed but needs to see a summary of the risks found in their area.
- Save as CSV
- Exports the results into a Comma-Separated Values (.csv) spreadsheet.
- Behavior: Creates a raw data table that can be opened in Excel or ingested into other tools. Each row represents a finding with columns for Location, Data Type, and Match Count.
- Risk: Like HTML, CSV files are plain text and unencrypted. They are highly dangerous if left on an insecure endpoint because they provide a "treasure map" for attackers.
- Use Case: Data Integration & Bulk Analysis. Use this if you are feeding Spirion findings into a third-party tool like a SIEM (Splunk), a SOAR platform, or a custom internal database for advanced analytics.
Comparison Summary
Format | Encrypted? | Readable By... | Best For... |
|---|---|---|---|
Disable | N/A | No one (Local) | Standard SaaS/Cloud workflow. |
IDF | Yes (via Save Key) | Spirion Apps only | Secure local backups/Compliance. |
HTML | No | Web Browsers | Non-technical human reviewers. |
CSV | No | Excel / Data Tools | Automation and data ingestion. |
Recommendations
- Security First: If you must save local results, always use IDF whenever possible to ensure the sensitive data you just found isn't exposed in a plain-text report.
- Clean Up: If you use HTML or CSV for a specific project, ensure you have a process to delete those files as soon as they are no longer needed.
- Local Reporting vs. Console: Remember that "Auto Save Results" refers to the local disk. Even if this is "Disabled," your Agent will still ship results to the SDP Console if your "Result Shipping" settings are configured.
Summary
The “Auto Save Results” setting is the "Format Selector" for your local evidence. IDF is for security, HTML is for humans, and CSV is for machines. Use them sparingly to avoid creating new data risks on your endpoints.
Auto Save Secure Results 2
The “Auto Save Secure Results 2” setting (found on the Local Reporting page) is a checkbox that enables a secondary, encrypted backup of your scan results.
While the primary "Auto Save Results" enables you to choose between several formats (IDF, HTML, CSV), this secondary setting is specifically designed for a secure, forensic copy in Spirion's proprietary encrypted format.
What it does
When this box is checked, the Agent performs a "Dual Save" operation at the end of a scan:
- Primary Save: It saves the file defined in the "Auto Save Results" dropdown (to the "Save Location" using "Save Key").
- Secondary Save: It automatically generates a second file in the encrypted .idf (Internal Data Format) and saves it to "Save Location 2" using "Save Key 2."
Why it exists
This is a "Fail-Safe" and "Audit" feature used for high-compliance environments:
- Encrypted Redundancy: You might set your Primary save to "Save as HTML" so a manager can read it easily. However, because HTML is not encrypted, you check "Auto Save Secure Results 2" to simultaneously send an encrypted
.idfcopy to a secure server. This ensures you have a protected, tamper-proof record of the scan even if the HTML report is deleted or compromised. - Separation of Duties: You can save a "Remediation Copy" locally for an IT admin to work from, and use the "Secure Results 2" to send a "Compliance Copy" to a restricted-access Security folder that only the CISO can open.
- Air-Gapped Reliability: In environments where there is no Cloud Console, this ensures that the data is captured in at least two places, reducing the risk of data loss if one disk or network share fails.
Key Configuration Rules
- Format is Fixed: Unlike the primary setting, "Secure Results 2" always saves as an
.idffile. You cannot change this to CSV or HTML because the word "Secure" in the setting implies the use of Spirion's encrypted format. - Requires Save Location 2: For this to work, you must provide a path in the "Save Location 2" field. If that field is blank, the Agent will have nowhere to put the secure backup.
- Requires Save Key 2: To open this secondary file later, you will need the password defined in the "Save Key 2" field.
How it works in the architecture
- Sequential Writing: The Agent finishes the scan, writes the primary report, and then immediately initiates a second write-stream using the secondary key and location.
- Policy XML: This maps to the
Settings\ScheduledTask\AutoSaveSecureResults2boolean (True/False) value.
Recommendations
- Use for "Evidence of Remediation": If your policy enables users to Shred or Scrub files, use this setting to save a "Pre-Scan" or "Full-Result" snapshot to a hidden administrative share. If a user later claims they didn't have a specific file, you have the encrypted
.idf"receipt" to prove otherwise. - Don't Over-Encrypt: If you are already saving your Primary results as an IDF, you generally don't need "Secure Results 2" unless you specifically need the file in two different physical locations.
Summary
The “Auto Save Secure Results 2” setting is the "Black Box Recorder" for your scan. It ensures that a secondary, encrypted, and password-protected copy of your findings is stashed away in a safe location, regardless of what you do with the primary report.
Configuration File Location
*This option is specific to searches initiated from Windows Spirion Agent GUI. This is a Windows-only option. Mac/Linux are excluded.
The “Configuration File Location” setting (found on the Local Reporting or Scheduled Task pages) defines the specific file path to an external XML or configuration file that the Agent should read to determine its search parameters.
This setting is directly tied to the “Settings Source” drop-down.
What it does
When you set the Settings Source to "Configuration file," the Agent ignores its internal registry/policy and looks specifically at the path provided in "Configuration File Location" to find its "orders."
- Function: It acts as a "Pointer" or "Redirect" to an external instruction set.
- Content of the File: The configuration file typically contains XML data that defines what to search (drives, folders, cloud repositories) and what to look for (SSNs, Credit Cards, Custom Expressions).
Why it exists
This setting is used for advanced automation, air-gapped systems, and "one-off" custom tasks:
- Air-Gapped/Standalone Agents: If an Agent is not connected to the SDP Console, it cannot receive policy updates via the cloud. An administrator can manually place a
scan_config.xmlfile on the machine and use this setting to tell the Agent to follow those rules. - Highly Scripted Scans: If you are using a third-party deployment tool (like SCCM, Jamf, or a Python script) to trigger Spirion, you can dynamically generate a configuration file on the fly. You then point the "Configuration File Location" to that temporary file to run a highly specific, customized scan without changing the machine's permanent policy.
- Developer/QA Testing: When testing new custom search expressions, a QA engineer might point to a local config file rather than waiting for a global policy to sync from the Console.
How it works in the architecture
- Pre-Scan Loading: When the scheduled task or local report trigger is pulled, the first thing the Agent does is "check the source." If it sees "Configuration file," it attempts to open the file at the specified location.
- Fallback Behavior: If the "Configuration File Location" is blank, or if the file at that path is missing or corrupt, the scan will typically fail or revert to the default "Profile" settings, depending on the Agent version.
- Variable Support: You can often use system variables (like
%ProgramData%or%SystemDrive%) to make the path more portable across different machines.
Important Configuration Rules
- Permissions: The account running the Spirion process (e.g., the local "System" account or a specific "Service" account) must have Read permissions for the folder and the file.
- Full Path Required: It is best practice to use the full, absolute path (e.g.,
C:\ProgramData\Spirion\Configs\MonthlyAudit.xml) rather than a relative path. - UNC Paths: You can point this to a network share (e.g.,
\\Server\Configs\StandardScan.xml), allowing you to update the "Rules" for 1,000 machines by editing just one file on a server.
Recommendations
- Use for "Task Specificity": If you have a machine that needs to do three different types of scans (for example, a "Financial Scan," a "HR Scan," and a "System Scan"), create three different config files and three separate tasks, each pointing to a unique "Configuration File Location."
- Keep it Secure: Because this file tells the Agent what to do (and can potentially be used to "blind" the Agent to certain folders), the configuration file itself should be in a folder that only Administrators can access.
Summary
The “Configuration File Location” is the "External Instruction Manual" for the Agent. It tells the software, "Don't listen to the Console right now; go to this specific file on the disk and do exactly what it says."
Create Folder Location
The “Create Folder Location” setting (found on the Local Reporting or Scheduled Task pages) is a safety toggle that determines whether the Agent has permission to build a directory structure that does not yet exist.
What it does
This setting tells the Agent how to handle the "Save Location" (or "Save Location 2") if the specified folders are missing on the endpoint at the time the scan finishes.
- Enabled (Checked): If the Agent tries to save a report to
C:\Spirion\Reports\October\, but the\October\folder doesn't exist, the Agent automatically creates the folder and then saves the file inside it. It even creates multiple levels of nested folders (for example, creating both\Reports\and\October\) if needed. - Disabled (Unchecked/Default): The Agent does not create any new folders.
- Behavior: If the specified folder path does not already exist, the Agent will fail to save the local report. You will typically see an error in the Agent log stating "Failed to save results" or "Path not found."
Why it exists
This setting is essential for dynamic and automated reporting across a large fleet of computers:
- Variable-Based Folders: If you use a variable like
C:\Reports\%DATE%\, the folder name changes every day. Since that folder won't exist tomorrow, you must check "Create Folder Location" so the Agent can build the new date-stamped folder every time it runs. - Clean Deployments: When deploying Spirion to thousands of new machines, you don't want to manually create a "Reports" folder on every single C: drive. This setting enables the Agent to "self-provision" its own storage space the first time it runs a scan.
- Network Share Organization: If you are saving to a central server and using
\\Server\Reports\%COMPUTERNAME%\, checking this box ensures that when a new laptop joins the company and runs its first scan, the server automatically gains a new folder specifically for that laptop.
How it works in the architecture
- Pre-Save Check: Just before the "Auto Save" process begins, the Agent performs a "Directory Probe." If the probe returns "False" (folder missing) and this setting is "True," the Agent issues a system command to create the directory.
- Permissions: Even if this is checked, the Agent still needs the operating system permission to create folders. If the Agent is running as a limited user and you tell it to create a folder in
C:\Windows\, the operating system blocks it, regardless of this setting.
Recommendations
- Always Enable for Automation: If you are using any variables in your "Save Location" (like
%DATE%or%USERNAME%), always check this box. Without it, your automated reporting will break the moment a variable value changes. - Pair with "Save Locations are folder names": These two settings work perfectly together. One ensures the folder exists, and the other ensures the file inside it has a unique name.
- Verify Permissions: If you are saving to a network share, ensure the "System" account or the "Service Account" has "Modify" or "Full Control" permissions on the parent folder so it can successfully create sub-folders.
Summary
The “Create Folder Location” setting is the "Path Builder." It gives the Agent the "hammer and nails" it needs to build its own directory structure on the fly, ensuring your reports are never lost just because a folder was missing.
Create Folder Location 2
The “Create Folder Location 2” setting (found on the Local Reporting page) provides the exact same functionality as the primary "Create Folder Location" setting, but it is applied specifically to the “Save Location 2” path.
It is a safety toggle that determines if the Agent has permission to build a new directory structure for your secondary local report.
What it does
This setting tells the Agent how to handle the file path defined in "Save Location 2" if that folder does not yet exist on the endpoint or the network share.
- Enabled (Checked): If the Agent is instructed to save a secondary report to a path like
\\SecurityServer\Archive\%COMPUTERNAME%\, but the folder for that specific computer hasn't been created yet, the Agent will automatically create the folder before saving the results. - Disabled (Unchecked): The Agent does not create any new folders for the secondary report. If the folder path in "Save Location 2" is missing, the secondary save operation fails (though the primary save may still succeed if its own path is valid).
Why it exists
This setting is critical for Centralized Administrative Archiving:
- New Asset Onboarding: When you deploy Spirion to a new department, you don't want to manually create 500 new folders on your central storage server. By checking "Create Folder Location 2," each new machine will automatically "carve out" its own folder on the server the first time it completes a scan.
- Date-Based Archiving: If your secondary save location uses a date variable (for example,
C:\AuditLogs\%DATE%\), the folder name changes every day. This setting ensures the Agent can build that "New Day" folder every morning without administrative intervention. - Redundancy Protection: It ensures that your "Backup" or "Forensic" copy (often tied to "Auto Save Secure Results 2") isn't lost simply because of a missing directory.
Key Configuration Rules
- Independent Logic: This setting is completely independent of the first "Create Folder Location." You can choose to have the Agent create the primary folder but not the secondary one (though this is rare in practice).
- Permissions are Mandatory: Even if "Create Folder Location 2" is checked, the Agent needs Operating System-level "Write/Modify" permissions to the parent directory. If the Agent is blocked by Windows or Linux permissions, it cannot create the folder.
- Variable Support: This setting is most powerful when used with variables like
%COMPUTERNAME%or%USERNAME%, allowing for a dynamic, self-organizing file structure.
Recommendations
- Always Enable for Network Shares: If "Save Location 2" points to a central network share, always check this box. It prevents "orphan" reports that fail to save because a specific machine-name folder was never manually created by an IT admin.
- Pair with "Save Location 2": There is almost no reason to use a secondary save location without also enabling this setting, unless you are 100% certain that your directory structure is static and will never change.
- Check Your Logs: If your primary report is saving but your secondary one isn't, check if this box is unchecked. It is a common "silent failure" point in complex policies.
Summary
The “Create Folder Location 2” setting is the "Secondary Path Builder." It ensures that your backup or administrative reports always have a "home" to go to, even if the Agent has to build that home from scratch on its first run.
CSV Report Options
the “CSV report options” setting (found on the Local Reporting page) enables you to customize the structure and content of the spreadsheet generated when you select "Save as CSV" in the Auto Save Results setting.
Since CSV files are often used for automated ingestion into other tools (like SIEMs or BI platforms), these options ensure the data is in the exact format your downstream systems require.
Key Options and What They Do
While the exact list can vary slightly by version, the standard CSV options typically include:
- Save Location Type
- Determines whether the generated CSV file includes a column identifying the Category of the Search Target.
- When this option is enabled, the Agent adds a column to the CSV that specifies the type of repository where the match was found.
- Instead of just showing the path (e.g.,
C:\Documents\File.docx), it provides the context of the source system. Common values in this column include: - Files: For local drives or network file shares.
- E-mail: For findings within Outlook (PST/OST) or cloud mailboxes.
- Database: For findings within SQL, Oracle, or other structured data sources.
- Browsers: For sensitive data found in browser history or cache.
- Cloud: For findings in SaaS repositories like M365 or Google Drive.
- Recommendations
- Always Enable for Multi-Target Scans: If your policy searches both files and emails (or any other combination), you should always check this box. It is the only way to reliably filter your spreadsheet later.
- Exclude for Single-Purpose Scans: If you have a policy that only scans the C: drive, this column is redundant because every single row will just say "Files." In that case, you can uncheck it to keep the CSV file slightly smaller and cleaner.
- Save Location
- Determines whether the generated CSV file includes the Full Path or URL to the sensitive data finding.
- When this option is enabled, the Agent adds a column to the CSV containing the unique address of the finding. Depending on what was scanned, this column will show:
- For Files: The full directory path and filename (e.g.,
C:\Users\JohnDoe\Documents\TaxReturn.pdf). - For Email: The mailbox, folder, and subject line (e.g.,
jdoe@company.com\Inbox\Subject: Financial Report). - For Databases: The server, database name, table name, and column name (and sometimes the primary key).
- For Cloud: The site collection or drive URL (e.g.,
https://sharepoint.com/sites/finance/budget.xlsx).
- For Files: The full directory path and filename (e.g.,
- Recommendations
- Keep it Enabled: There are almost no scenarios where you would want to disable this. A report without locations is merely a "count" of problems with no way to solve them.
- Pair with "Quote all fields": File paths frequently contain spaces, commas, and special characters. Always enable quoting to ensure your "Save Location" column remains clean and readable by Excel or other scripts.
- Privacy Consideration: Be aware that file paths can sometimes contain sensitive information themselves (like a person's name or a project code). Since CSVs are plain text, ensure the report is saved to a folder with restricted access.
- Save Match
- Determines whether the generated CSV file includes the actual sensitive value (the match string) that was discovered.
- When this option is enabled, the Agent adds a column to the CSV containing the raw data that triggered the match.
- For SSNs: It shows the actual 9-digit number (e.g.,
123-45-6789). - For Credit Cards: It shows the full 16-digit card number.
- For Custom Rules: It shows the specific text string (like an Employee ID or a Secret Key) that matched your regex or dictionary.
- For SSNs: It shows the actual 9-digit number (e.g.,
- Why it exists
- This setting is used for Forensic Validation and False Positive Analysis:
- Verification: It enables a security analyst to look at the CSV and confirm that the finding is a "True Positive." Without the match string, you only know that something was found, but you can't verify if it's a real piece of sensitive data.
- Snippet Context: It provides the immediate "evidence" needed to prove to a data owner that their file is non-compliant.
- Refining Rules: If your custom search is finding a lot of "junk," seeing the actual "Save Match" values helps you tweak your regex to exclude those patterns in the future.
- SECURITY WARNING (Critical): This is the highest-risk setting in the Local Reporting policy.
- Plain Text Exposure: CSV files are unencrypted, plain-text files. If you enable "Save Match," you are writing a list of your company's most sensitive secrets (SSNs, Passwords, etc.) directly to the hard drive in a format that anyone with access to the folder can read.
- Compliance Risk: Storing a plain-text CSV of credit card numbers on an endpoint may violate PCI-DSS or GDPR regulations, creating a new security vulnerability out of a tool meant to find them.
- Recommendations
- Default to Disabled: For standard automated reporting, keep this box unchecked. It is much safer to view match snippets inside the secure, encrypted SDP Console or via an encrypted .idf file.
- Temporary Use Only: Only enable "Save Match" for short-term troubleshooting or "tuning" of a new custom data type.
- Secure the Destination: If you must enable this, ensure the "Save Location" is a folder with NTFS permissions restricted to only the Security Admin, or save it to an encrypted volume.
- Save Data Type
- Determines whether the generated CSV file includes a column identifying which sensitive data definition was triggered.
- When this option is enabled, the Agent adds a column to the CSV that names the specific "AnyFind" or "Custom Data Type" (SDD) that matched the data.
- Instead of just getting a list of locations and counts, your CSV displays labels such as:
- Social Security Number
- Credit Card Number
- Drivers License
- Employee ID (if using a custom SDD)
- MIP Label: Highly Confidential (if searching for classification tags)
- Why it exists
- This setting is fundamental for Risk Classification and Compliance Reporting:
- Categorization: It enables you to sort your findings by the type of risk they represent. For example, a "Credit Card" finding falls under PCI-DSS compliance, while a "Social Security Number" falls under PII/Privacy regulations.
- Remediation Prioritization: Security teams often prioritize certain data types over others. You might want to address all "Passwords" found in plain text before you worry about "Phone Numbers." This column enables you to filter the spreadsheet to focus on the highest-priority risks first.
- Policy Tuning: If you are testing a new custom search rule, this column confirms that your rule is actually the one finding the data, rather than a built-in Spirion rule.
- Recommendation
- Always Enable: There is almost no reason to have this disabled. A report that says "You have 50 matches in this file" is not helpful if it doesn't tell you what those matches are.
- Use for Pivot Tables: If you open the CSV in Excel, the "Data Type" column is the perfect field to use for a Pivot Table. You can quickly create a chart showing the "Count of Findings by Data Type" to give leadership a high-level view of company risk.
- Consistency is Key: If you have renamed your Data Types in the Console, the CSV typically uses those custom names. Ensure your naming conventions are clear so that the CSV remains readable by other departments.
- Save Number of Instances
- Determines whether the generated CSV file includes a column showing the Total Count of Matches for each finding. The “Save Number of Instances” option is the "Risk Magnifier." It tells you the volume of sensitive data in any given location, allowing you to prioritize your cleanup efforts based on the actual quantity of sensitive records at risk.
- When this option is enabled, the Agent adds a column to the CSV (usually labeled "Match Count" or "Count") that provides a numerical value for how many times a specific data type was found in a specific location.
- Example: If a single Excel file contains 45 Credit Card numbers, the CSV row for that file will have the number 45 in the "Instances" column.
- Relationship with "Detailed Report":
- If you are running a Summary Report (Detailed unchecked), this column shows the total count for that file/location.
- If you are running a Detailed Report (Detailed checked), this column is usually redundant (or shows "1") because every single instance already has its own individual row.
- Why it exists
- This setting is the primary tool for Risk Weighting and Prioritization:
- Quantifying the Blast Radius: A file with 1 Social Security Number is a compliance issue, but a file with 10,000 Social Security Numbers is a major data breach risk. This column enables you to sort the CSV by the highest number of instances to identify your "Toxic Data" hotspots immediately.
- Trend Analysis: By comparing the "Number of Instances" from last month's scan to this month's scan, you can see if the volume of sensitive data is growing or shrinking in a specific department.
- Remediation Efficiency: If a security team only has time to fix 10 files today, they will use this column to find the 10 files that contain the most sensitive records, providing the highest "Risk Reduction" for the least amount of effort.
- Recommendation
- Always Enable for Summary Reports: This is the most important metric for any high-level risk report. Without it, you cannot distinguish between a minor "incidental" finding and a massive database export sitting on someone's desktop.
- Use for "Top 10" Reporting: When presenting to leadership, use this column to generate a "Top 10 Most Risky Files" list. It creates a very clear and compelling picture of where the organization's greatest exposure lies.
- Watch for Large Numbers: In some environments, a single log file might contain millions of matches. If you see an extremely high "Number of Instances," it is often a sign that you should either quarantine that file or refine your search rules to exclude that specific log path.
- Save Checked Rows Only
- Determines whether the generated CSV includes all findings from the scan or only the ones that have been explicitly "checked" or "selected" by a user. This option is the "Final Filter." It ensures that your CSV report only contains the specific findings that you have manually verified and "checked," preventing unverified data or "noise" from cluttering your official audit spreadsheets.
- This setting acts as a filter for the final export.
- Disabled (unchecked): Default. The Agent exports every single finding discovered during the scan into the CSV file.
- Enabled (checked): The Agent only includes rows in the CSV that have a "Checked" status.
- Why it exists
- This setting is primarily used for Interactive and User-Driven Reporting:
- Manual Review Workflow: In a scenario where an administrator or a data owner is manually reviewing scan results in the Spirion interface before generating a final report, they can "check" only the items they want to include in a "Remediation List" or a "Final Audit Report."
- Filtering Out Noise: If a scan finds 1,000 items but 900 of them are known "False Positives" or "Low Risk," the user can check only the 100 "True Positives" and then save the CSV. This ensures the resulting spreadsheet is clean and actionable for the team responsible for cleanup.
- Selective Remediation: If you are preparing a CSV to be imported into another tool for a specific task (e.g., "Only move these 50 files to the secure server"), this setting enables you to cherry-pick the exact files for that task.
- Recommendations
- Leave Disabled for Automation: If you are scheduling a scan to run automatically on 1,000 laptops, do not check this box. Since no one will be there to manually "check" the rows as the scan runs, your CSV report will likely come out completely empty.
- Use for "Clean" Audits: This is a great tool for a Security Analyst who needs to present a "Final Findings" spreadsheet to an executive. You can perform your investigation, check the valid risks, and export a professional, "noise-free" CSV.
- Check Your Results: If you ever find that your CSV reports are suddenly empty despite the scan showing findings in the UI, check to see if this box was accidentally enabled in your policy.
- Save Parent Rows Only
- This setting controls the "depth" of the information in your CSV.
- Determines whether the report displays individual data matches or just the top-level container (the file/location) that holds them. This option is the "File-Only Filter." It collapses all the individual sensitive findings into a single row for the file or location, giving you a simplified "Hit List" of non-compliant files without the clutter of specific data-type details.
- Disabled (Default): The CSV includes "Child" rows. For example, if a file contains 5 Social Security Numbers and 2 Credit Card Numbers, you will see a detailed breakdown of those specific findings.
- Enabled: The CSV will roll up the results. It will only show one row for the "Parent" (the file or location itself) and suppress the specific "Child" details (the individual data types).
- Why it exists
- This setting is used for High-Level Inventory and Simplified Remediation:
- "Is it Dirty?" Reporting: Many security teams only care about one question: "Does this file contain sensitive data or not?" They don't need to know if it has 5 SSNs or 10 CCs; they just need a list of files that need to be deleted. Enabling this creates a clean, one-line-per-file list.
- Reducing "Row Bloat": In complex files (like a large database export or a log file), a single file could contain 20 different data types. Without this setting, that one file would take up 20 rows in your CSV. Enabling "Save Parent Rows only" collapses that into a single, manageable row.
- Privacy/Compliance Simplification: By only saving the Parent row, you avoid listing the specific data types (SSN, PCI, etc.) in the plain-text CSV. This can be helpful if you want to notify a user that "File X is sensitive" without specifically telling them (or anyone reading the CSV) why it is sensitive.
- Relationship with "Detailed Report"
- If "Detailed Report" is ON: This setting is essentially ignored or will contradict it, as a Detailed Report's entire purpose is to show child-level detail.
- If "Detailed Report" is OFF (Summary): This is where "Save Parent Rows only" is most powerful. It takes a "Summary" report and simplifies it even further to just a file list.
- Recommendations
- Use for "Toss/Keep" Lists: If you are giving a spreadsheet to an end-user and telling them, "Here is a list of 50 files you need to delete," use this setting. It's much less confusing for a non-technical user to see one row per file.
- Disable for Risk Assessment: If you are trying to calculate the total financial risk or the total number of records at risk, you must leave this disabled. You need the "Child" data (the data types and counts) to perform that analysis.
- Check for Empty Columns: Note that if you enable this, columns like "Data Type" or "Match Count" may be empty or show a generic "Multiple" label, because the row now represents a collection of different data types rather than just one.
- Mask all but the last 4 characters of the match
- This is a security control that protects sensitive data within the generated CSV file by redacting the majority of any "Match Strings" that are included.
- When this option is enabled, any sensitive data that is written to the "Match" column in the CSV is obscured, leaving only the final 4 digits or characters visible.
- Social Security Number: A match of
123-45-6789is written to the CSV file as*****6789. - Credit Card: A match of
4111 1111 1111 4444is written to the CSV file as************4444. - Custom Data: A secret key like
AB12345678is written to the CSV file as******5678.
- Social Security Number: A match of
- Why it exists
- This setting is the primary safety valve for using the "Save Match" feature:
- Risk Mitigation: CSV files are plain-text and unencrypted. If you need to see the "Match" evidence for verification but don't want to create a new security vulnerability, this setting enables you to see part of the data without exposing the entire sensitive value.
- Compliance Alignment: Many regulations (like PCI-DSS) explicitly permit the storage of the "Last 4" digits of a card number but forbid the storage of the full number. This setting enables your local reports to stay compliant with those standards.
- Validation without Exposure: A security analyst can look at
*****6789and often tell if it’s a real SSN or a false positive based on the context, without having to handle the actual raw PII.
- Interaction with other settings
- Must be paired with "Save Match": This setting only does something if you also have the "Save Match" (or "Include Match Information") checkbox enabled. If you aren't saving the matches to the CSV, there is nothing for this setting to mask.
- Agent-Side Redaction: This masking happens on the Agent before the CSV is written to the disk. This ensures that the full, unmasked PII never even hits the local file system in a plain-text format.
- Recommendations
- The "Golden Rule" for CSV Matches: If you have a business requirement that forces you to include raw matches in a CSV report, you should always enable this masking option. There are very few legitimate reasons to have a full, unmasked SSN or Credit Card number sitting in a plain-text spreadsheet.
- Human Readability: Remind your users that while the data is masked in the CSV, they can still view the full, unmasked match inside the SDP Console or the secure .idf file (provided they have the correct permissions). The CSV should only be used for high-level tracking.
- Test Custom Regex: If you are using custom search rules (SDDs), verify how they look when masked. If your custom string is very short (e.g., only 5 characters), masking all but the last 4 might not provide much protection.
- Save Item Size
- Determines whether the generated CSV includes a column showing the physical size of the file or object where the sensitive data was found.
- The “Save Item Size” option is the "Storage Metric." It provides the physical footprint of the files containing sensitive data, helping you plan your remediation storage needs and identify large "toxic" data stores that represent the greatest volume of exposure.
- When this option is enabled, the Agent adds a column to the CSV (usually labeled "Size" or "File Size") that displays the numerical size of the target.
- For Files: It shows the size in Bytes (for example,
1048576for a 1 MB file). - For Emails: It shows the size of the specific message or attachment.
- For Databases: It may show the size of the specific field or blob, depending on the connector.
- For Files: It shows the size in Bytes (for example,
- Why it exists
- This setting is used for Resource Management and Forensic Context:
- Storage Impact Analysis: If you are planning to "Quarantine" or "Move" sensitive files to a secure server, you need to know how much disk space you will need. Sorting by "Item Size" helps you estimate the total storage requirements for your remediation project.
- Identifying "Toxic" Large Files: Very large files (like 500 MB CSV exports or SQL dumps) often contain the highest concentration of sensitive records. "Item Size" acts as a proxy for "Risk Volume" when combined with the "Match Count."
- Remediation Performance: Large files take longer to shred, encrypt, or move. Security teams use this column to identify "heavy" files that might need to be processed during off-peak hours to avoid impacting network or system performance.
- Recommendation
- Use for "Clean-up" Projects: If your goal is to reduce your "Data Footprint" (shrinking the amount of sensitive data stored), this column is your best friend. It enables you to prove to leadership exactly how many Gigabytes of "at-risk" data you have removed from the environment.
- Convert to MB/GB in Excel: Since Spirion typically reports this in Bytes, you will likely want to use an Excel formula (for example,
=A1/1024/1024) to convert the column into a more human-readable "Megabytes" format for your final report. - Identify Anomalies: Look for very small files (under 1KB) that have high match counts—these are often "Secret Keys" or "Password Lists" which are high-priority risks.
- Save Date Created
- Determines whether the generated CSV includes a column showing the timestamp of when the file or object was originally created.
- The “Save Date Created” option is the "Age Detector." It tells you how long a piece of sensitive data has existed in your environment, allowing you to enforce data retention schedules and prioritize the cleanup of old, "stale" information that no longer serves a business purpose.
- When this option is enabled, the Agent adds a column to the CSV that retrieves the "Creation Date" attribute from the file system or target repository.
- For Files: It shows the date and time the file was first written to that specific volume (for example,
2023-05-12 14:30:05). - For Emails: It typically reflects the date the message was received or created in the mailbox.
- For Databases: Depending on the target, it may show the creation date of the record or table if that metadata is available.
- For Files: It shows the date and time the file was first written to that specific volume (for example,
- Why it exists
- This setting is essential for Data Retention Policy enforcement and Stale Data identification:
- Retention Compliance: Many organizations have a policy to delete sensitive data after a certain period (e.g., "Delete all PII after 7 years"). This column enables you to filter the CSV for any file created before a specific date, making it easy to identify records that are legally required to be purged.
- Identifying "Legacy Risk": Security teams use this to distinguish between "New Risk" (files created this week) and "Legacy Risk" (sensitive files from 10 years ago that have been forgotten). Legacy data is often the easiest to "Shred" because it is rarely still in active use.
- Forensic Timelines: In the event of an audit or investigation, knowing when a sensitive file first appeared in the environment helps establish a timeline of exposure.
- Recommendations
- Use for "Clean Slate" Projects: If you are overwhelmed by thousands of findings, use this column to filter for files created in the last 90 days. Focus your remediation on "New" data first to stop the bleeding, then go back and clean up the "Legacy" data.
- Identify "Ownerless" Data: Very old creation dates (e.g., from 2012) often indicate data that belonged to employees who have since left the company. This "Zombie Data" is a high-priority target for automated shredding.
- Watch for "Copy" Behavior: Be aware that on some file systems, copying a file to a new location can sometimes reset the "Date Created" to the current time. Always compare this with the "Date Modified" to get the full story of the file's history.
- Save Date Modified
- Determines whether the generated CSV includes a column showing the timestamp of when the file or object was last edited or changed.
- The “Save Date Modified” option is the "Activity Monitor." It tells you how recently a sensitive file has been used or updated, allowing you to separate your "Active" security risks from "Stale" archival data that can be safely deleted or moved to long-term storage.
- When this option is enabled, the Agent adds a column to the CSV that retrieves the "Last Modified" attribute from the file system.
- For Files: It shows the last time the content of the file was saved or altered (e.g.,
2024-01-15 09:15:00). - For Databases/Cloud: It reflects the last time the specific record, row, or document was updated.
- For Files: It shows the last time the content of the file was saved or altered (e.g.,
- Why it exists
- This setting is one of the most important tools for distinguishing between "Active" and "Stale" risk:
- Determining Data Activity: If a file contains 1,000 SSNs but hasn't been modified since 2016, it is likely "stale" or "archival" data. If it was modified 10 minutes ago, it is "active" data being used in a current business process.
- Prioritizing Remediation: Security teams often prioritize "Active" data for encryption or movement, while "Stale" data (not modified in 3+ years) is prioritized for shredding or deletion.
- Change Tracking: If you run regular scans, comparing the "Date Modified" across different reports helps you see if users are still actively adding sensitive information to insecure locations.
- Recommendations
- The "3-Year Rule": A common industry practice is to use this column to find sensitive files that haven't been modified in over 3 years. These are prime candidates for automated "Cleanup" or "Quarantine" because they are rarely needed for day-to-day operations.
- Identify "Active" Leaks: If you find sensitive data in a "Public" folder and the "Date Modified" is very recent, it indicates an ongoing broken business process that needs to be addressed immediately (e.g., a script or a user incorrectly exporting data).
- Compare with "Date Created": If the "Date Created" and "Date Modified" are identical, the file was likely copied there and never touched again. If they are different, it shows the file has a "life cycle" of active use.
- Save Date Accessed
- Determines whether the generated CSV includes a column showing the timestamp of when the file was last opened or read.
- The “Save Date Accessed” option is the "Usage Indicator." It helps you determine if sensitive files are still being used by the business or if they have been forgotten, providing the evidence needed to safely decommission or delete old, unused "toxic" data.
- When this option is enabled, the Agent adds a column to the CSV that retrieves the "Last Accessed" attribute from the file system.
- For Files: It shows the last time a user or a process (like a backup or a virus scan) opened the file, even if they didn't make any changes (e.g.,
2024-04-20 11:00:00). - Behavioral Note: On many modern operating systems (especially Windows 10/11), "Last Access" updates are often disabled or delayed by the OS to improve performance. Therefore, this date may not always be 100% real-time.
- For Files: It shows the last time a user or a process (like a backup or a virus scan) opened the file, even if they didn't make any changes (e.g.,
- Why it exists
- This setting is primarily used for Data Lifecycle Management (DLM) and Impact Analysis:
- Validating "Stale" Data: While "Date Modified" tells you if someone changed the data, "Date Accessed" tells you if anyone is even looking at it. If a sensitive file hasn't been accessed in 5 years, it is a perfect candidate for deletion because it is clearly no longer part of any business workflow.
- Risk Assessment: If a file with 5,000 Social Security Numbers was accessed yesterday, it means that data is "in play" and represents a high-probability risk. If it hasn't been accessed in years, the risk is lower because the data is "cold."
- Justifying Deletion: When a business user asks, "Why did you delete my sensitive file?" the Security Admin can use this column to say, "The file hasn't been opened by anyone in three years, so it was purged per our security policy."
- Recommendation
- Use with Caution: Because of how modern Windows and Linux handle "Last Access" (often updating it in bulk or disabling it entirely), this column can sometimes be misleading. Always use it as a secondary indicator alongside "Date Modified."
- Identify "Abandoned" Data: This is the best metric for identifying "Abandoned" data. If you have a folder full of sensitive files that haven't been modified OR accessed in several years, you can safely move them to an encrypted archive without disrupting anyone's work.
- Check OS Settings: If you see that all your "Date Accessed" values are identical or blank, it may be because the
NtfsDisableLastAccessUpdateregistry key is enabled on your endpoints, preventing the OS from tracking this data.
- Save File Owner
- Determines whether the generated CSV includes a column identifying the user account that "owns" the file in the eyes of the operating system.
- The “Save File Owner” option is the "Accountability Mapper." It identifies the specific individual or system account responsible for a sensitive file, enabling security teams to direct remediation efforts and policy training to the correct person.
- When this option is enabled, the Agent queries the file system's security descriptor to find the Owner attribute.
- On Windows: This usually displays the Domain\Username (e.g.,
CORP\jdoe) or a system account (e.g.,NT AUTHORITY\SYSTEM). - On Mac/Linux: This displays the UID or the Username associated with the file's ownership.
- On Windows: This usually displays the Domain\Username (e.g.,
- Why it exists
- This setting is the most critical tool for Accountability and Remediation Routing:
- Assigning Responsibility: If a scan finds sensitive data on a shared network drive, the "File Owner" column tells you exactly who put it there or who is responsible for it. You can then route the remediation task to that specific person.
- Automated Notifications: Security teams use this column to perform "Mail Merges" or automated alerts. For example: "Dear [File Owner], our scan found a file you own named 'Customer_List.csv' that contains unencrypted Credit Card numbers. Please move this to a secure location."
- Behavioral Coaching: Identifying "Repeat Offenders" (users who consistently own the most sensitive data in insecure locations) enables the IT security team to provide targeted training to those specific individuals.
- Recommendations
- Essential for Shared Drives: This setting is optional for local "C:" drive scans (where the owner is almost always the person logged in), but it is mandatory for scans of File Servers, NAS devices, or SharePoint. Without it, you have no way of knowing which of the 500 department employees is responsible for a specific sensitive file.
- Watch for "System" Owners: If the owner is listed as
SYSTEMorAdministrators, the file was likely created by an automated process, a script, or an installation package. This helps you distinguish between "User Error" and "System Misconfiguration." - Data Privacy Considerations: Be aware that in some highly regulated regions (like those under GDPR), exporting a list of usernames alongside their "sensitive findings" may be considered a privacy issue itself. Ensure your CSV reports are stored in a secure, restricted folder.
- Save File Attributes
- Determines whether the generated CSV includes a column displaying the OS-level file system flags (attributes) for each finding.
- The “Save File Attributes” option is the "Technical Status Flag." It reveals the underlying operating system properties of a file, helping you understand if a file is hidden, protected, or read-only, which is essential for both identifying suspicious behavior and troubleshooting remediation failures.
- When this option is enabled, the Agent adds a column to the CSV that lists the specific attributes assigned to the file by the operating system. These are typically represented by a string of characters or codes.
- Common attributes included are as follows:
- R (Read-Only): The file cannot be modified or deleted easily.
- H (Hidden): The file is not visible to the user in a standard file browser view.
- S (System): The file is used by the operating system.
- A (Archive): The file is marked for backup or has been changed since the last backup.
- C (Compressed): The file is being compressed by the file system to save space.
- E (Encrypted): The file is encrypted at the file-system level (e.g., via Windows EFS).
- Why it exists
- This setting is used for Technical Context and Remediation Planning:
- Identifying Hidden Risks: Users often hide sensitive files (using the "Hidden" attribute) thinking it makes them secure. This column alerts security teams to files that were intentionally obscured from view.
- Remediation Troubleshooting: If a remediation playbook fails to "Shred" or "Move" a file, a security admin can check this column. If the file is marked "R" (Read-Only) or "S" (System), it explains why the Agent was unable to modify or delete the file.
- Detecting File System Encryption: If a file is marked "E" (Encrypted), it might mean the data is already protected by the OS (EFS), which may lower the priority of that finding compared to a plain-text file.
- Identifying Compressed Containers: Attributes can indicate if a file is compressed, which might explain why a scan took longer or why the "Item Size" on disk differs from the actual data volume.
- Recommendations
- Use for Debugging: If you are seeing "Access Denied" errors in your scan logs or failed remediation attempts, enable this setting. It is the fastest way to see if "Read-Only" or "System" status is blocking your security actions.
- Scan for "Hidden" PII: Create a report filter in Excel to find any row where "Attributes" contains "H". Files containing PII that are also "Hidden" are often a sign of Data Hoarding or an attempt to bypass security audits.
- Context for Archives: The "A" (Archive) attribute is very common on Windows; don't be alarmed if most of your files have it. Focus your attention on "H", "S", and "R" for meaningful security insights.
- Mask all but the last 4 characters (and first six for CCNs)
- This is an advanced privacy setting specifically designed to balance data validation with strict financial compliance standards (like PCI-DSS).
- The “Mask all but the last 4 characters (and first six for CCNs)” option is the "PCI-Standard Mask." It provides a specialized redaction format that complies with international financial security standards, allowing you to identify the bank and the account holder's last 4 digits while keeping the sensitive "core" of the data hidden.
- This setting redacts the middle section of a sensitive string, leaving the "ends" visible for identification purposes. It treats Credit Card Numbers (CCNs) differently than other data types:
- For Credit Card Numbers (CCNs): It preserves the first 6 digits (which identify the Bank/Issuer, known as the BIN/IIN) and the last 4 digits (which identify the specific account). Everything in the middle is replaced with asterisks.
- Example:
4111 1122 3344 5555becomes411111******5555
- Example:
- For All Other Data (SSN, etc.): It preserves only the last 4 characters, similar to the standard masking option.
- Example (SSN):
123-45-6789becomes*****6789
- Example (SSN):
- Why it exists
- This is the "Compliance Standard" setting for organizations that handle financial data:
- PCI-DSS Compliance: The PCI Security Standards Council allows the display of the first 6 and last 4 digits of a primary account number (PAN). This setting enables Spirion reports to be fully compliant with PCI standards while still providing enough info for a human to verify the card brand (Visa, Mastercard, etc.) and the account.
- Fraud and Issuer Analysis: By keeping the first 6 digits (the BIN), a security analyst can identify which bank issued the card. This is helpful for determining if a data leak involves corporate purchasing cards or personal consumer cards.
- High-Fidelity Validation: It provides more "visual evidence" for a Credit Card than standard "Last 4" masking, making it much easier to distinguish a real credit card from a false positive (like a long tracking number or a parts serial number).
- Interaction with other settings
- Requires "Save Match": This setting only applies if you have enabled "Save Match" (or "Include Match Information"). If you aren't saving the actual finding strings to the CSV, there is nothing for the Agent to mask.
- Agent-Side Processing: The masking occurs locally on the Agent before the CSV file is generated. The full, unmasked Credit Card number is never written to the CSV file.
- Recommendations
- The Default for Finance/Retail: If your organization is subject to PCI audits, this is the recommended masking setting. It provides the maximum allowable information under PCI-DSS without failing an audit.
- BIN Lookup: If you see a match like
411111******5555, you can use an online "BIN Checker" to confirm that411111belongs to "JPMorgan Chase - Visa." This helps you understand the scope of the risk. - Reporting Safety: Even with this masking, a CSV is still a plain-text file. Ensure that these reports are saved to a location with restricted NTFS permissions, as even masked PII/PCI should not be accessible to the general employee population.
- Save Classification
- This setting tells the Agent to include a column in the CSV report showing the current classification status or metadata labels of the discovered files.
- The “Save Classification” option is the "Governance Audit" tool. It enables you to see the "Status" of a file (its label) alongside the "Risk" of the file (its sensitive matches), helping you identify unprotected data and verify that your classification policies are being enforced correctly.
- When this option is enabled, the resulting CSV will include a dedicated column (typically titled "Classification") that captures any existing labels attached to the file at the time of the scan. This includes the following:
- MIP/AIP Labels: Microsoft Information Protection (formerly Azure Information Protection) labels like "Confidential," "Internal," or "Secret."
- Spirion Persistent Training/Tags: Any classifications previously applied by Spirion via a Playbook or manual action.
- Visual/Metadata Markers: Information stored in the file's properties or NTFS Alternate Data Streams (ADS) that indicate its sensitivity level.
- Why it exists
- This setting is used to bridge the gap between Discovery (finding the data) and Governance (protecting the data):
- Validation of Protection: It enables you to see if your automated classification rules are actually working. If a file is found to contain 500 Social Security Numbers but the "Classification" column is empty (or says "Public"), you have identified a critical security gap where a label failed to apply.
- Audit Reporting: For compliance audits (like SOC2 or HIPAA), you can use this report to prove that your sensitive data is properly marked according to company policy.
- Prioritization: It helps you prioritize remediation. A file with PII that is already labeled "Confidential" is at lower risk than a file with PII that has no label or a "Public" label.
- Recommendations
- Critical for MIP Users: If your organization uses Microsoft Information Protection labels, you should always enable this setting. It is the only way to generate a report that shows "The data we found" right next to "How we have it labeled."
- Use for "Misclassification" Hunting: After the scan, sort your CSV by the Classification column. Look for files with high "Match Counts" that have "Low" or "No" classification values. These are your highest priority targets for remediation.
- Label Consistency: Be aware that if a file is stored in a location that doesn't support metadata (like some legacy Linux volumes or certain cloud storage configurations), this column may return a blank value even if you believe a label should be there.
- Save Database Column Name
- This setting is used when scanning structured data sources like SQL Server, Oracle, MySQL, or other database connectors.
- The “Save Database Column Name” option is the "DBA's Map." It provides the exact "coordinates" of sensitive data within a database structure, enabling technical teams to identify precisely which fields contain high-risk information for remediation or architectural fixes.
- When this option is enabled, the Agent adds a column to the CSV report that identifies the specific Database Column where the sensitive data was discovered.
- Without this setting: The CSV might only show the Database Name and Table Name (e.g.,
HR_Database > Employees_Table). - With this setting: The CSV provides the exact location (e.g.,
HR_Database > Employees_Table > SSN_Field).
- Without this setting: The CSV might only show the Database Name and Table Name (e.g.,
- Why it exists
- This setting is essential for Database Remediation and Data Mapping:
- Precise Identification: Databases can have hundreds of columns. If a scan finds 10,000 Social Security Numbers in a table, a Database Administrator (DBA) needs to know which column contains them (e.g., is it
SocialSecurityNumber,Tax_ID, or a mislabeled column likeComments?). - Schema Cleanup: It helps identify "Shadow Data"—sensitive information that has leaked into columns where it doesn't belong (like finding Credit Card numbers in a
User_Notescolumn). - Targeted Masking/Encryption: If you plan to use a database encryption tool (like Transparent Data Encryption or Application-Level Encryption), this report tells you exactly which columns need to be targeted for protection.
- Precise Identification: Databases can have hundreds of columns. If a scan finds 10,000 Social Security Numbers in a table, a Database Administrator (DBA) needs to know which column contains them (e.g., is it
- Recommendations
- Mandatory for DB Scans: If your Policy includes any database targets (SQL, Oracle, etc.), always enable this box. A database report without column names is almost impossible for a DBA to act upon.
- Identify Misconfiguration: Use this to find "Column Name" anomalies. If you see a column named
Password_Plaintextthat contains sensitive matches, you have discovered a major architectural flaw that needs more than just data deletion—it needs a code change. - Pair with "Save Table Name": Ensure you are also saving the Table Name. The Column Name alone (for example,
ID_Number) isn't helpful if you don't know which of the 50 tables in the database it belongs to.
Summary
The “CSV report options” setting is the "Format Architect" for your spreadsheet exports. It gives you control over how much detail is included, how the data is separated, and whether or not the raw PII matches are written to the disk in plain text.
CSV Save Repeat All Data
This setting determines how the CSV file handles information when a single file or location contains multiple sensitive matches.
- This setting controls whether the "Location" information (like the File Path, Owner, and Date Modified) is repeated on every single row of the CSV, or if it is only written once for the first match found in that file.
- Enabled (checked): Every sensitive match gets its own row, and all metadata (File Path, Owner, etc.) is duplicated for every row.
- Example: If
C:\Docs\Passports.pdfhas 3 matches, you will see 3 identical rows showing the pathC:\Docs\Passports.pdf, each followed by the different match details.
- Example: If
- Disabled (unchecked): The metadata is only written for the first match in a file. Subsequent matches in the same file will have blank columns for the File Path, Owner, and Dates, only showing the new match data.
Why it exists
This setting is primarily about Data Analysis vs. Human Readability:
- Spreadsheet Filtering and Sorting: If you want to open your CSV in Excel and use Filters or Pivot Tables, you must enable this setting. If the File Path is only on the first row, Excel's filter won't know that the blank rows below it belong to the same file, making your analysis inaccurate.
- Importing into Third-Party Tools: If you are importing this CSV into a SIEM (like Splunk), a database, or a BI tool (like PowerBI), those systems require "Flat" data. They need every row to be a complete record. "Repeat All Data" ensures the CSV is in a "flat" format.
- Reducing Report Size (If Disabled): Disabling this setting can significantly reduce the file size of the CSV if you have files with thousands of matches, as it avoids repeating long file paths thousands of times. However, this is rarely done today due to the difficulty it creates in analyzing the data.
How it works in the architecture
- Agent Logic: As the Agent writes to the local CSV during the "Auto Save" process, it checks this flag.
- Row Construction: If enabled, the Agent pulls the "Parent Metadata" (the file info) from memory for every "Child Match" and writes it to the disk.
Recommendations
- Always Enable It: In 99% of use cases, you should leave this checked. The ability to sort and filter your results in Excel is far more valuable than the small amount of disk space saved by leaving the columns blank.
- SIEM Integration: If this CSV is being ingested by an automated process, "Repeat All Data" is mandatory. Most ingestion scripts will fail or produce "orphan" records if the location data isn't repeated.
- Audit Readiness: Auditors prefer "Repeat All Data" because it makes every line of the report a "Standalone Evidence" record that doesn't require looking at the rows above it for context.
Summary
The “CSV Save Repeat All Data” option is the "Flat File" setting. It ensures that every row in your CSV is a complete, self-contained record by duplicating the file path and metadata for every match found, which is essential for sorting, filtering, and importing results into other tools.
CSV Save Show Multi Rows
This setting determines how the CSV handles files that contain different types of sensitive data (for example, a file that has both Social Security Numbers and Credit Card Numbers).
- This setting controls whether the CSV creates a new row for every individual match found, or if it tries to consolidate findings.
- Enabled (checked): Every single sensitive "match" or "hit" is given its own dedicated row in the CSV. If a file has 10 SSNs and 5 Credit Cards, you will see 15 separate rows for that one file.
- Disabled (unchecked): The Agent may attempt to consolidate findings for a single file into a more compact view. (Note: In modern versions of SDP, this is almost always kept enabled to ensure data granularity).
Why it exists
This setting is about the level of detail you want in your report:
- Granular Analysis: By showing multiple rows, you can see the specific context and value of every match. This is vital for high-assurance environments where you need to know exactly how many individual instances of sensitive data exist, not just that "the file contains PII."
- Accurate Match Counts: If you are trying to calculate the total "Risk Score" of a server, you need a row for every match so that your Excel formulas (like
COUNTorSUM) accurately reflect the total number of sensitive strings discovered. - Remediation Evidence: If you are performing a manual review, seeing each match on its own row enables you to verify each one individually, marking some as "False Positives" while keeping others as "Confirmed" risks.
Interaction with "CSV Save Repeat All Data"
These two settings are almost always used together:
- Show Multi Rows creates the rows for each match.
- Repeat All Data fills in the file path and metadata for those rows.
- Result: A perfectly "Flat" CSV where every row is a complete record of one sensitive match and its location.
Recommendations
- Leave it Enabled: For almost all Security, Compliance, and Audit use cases, you want this enabled. Disabling it makes it much harder to perform a deep-dive analysis of what was actually found inside the files.
- Beware of "Large" Reports: The only reason to consider disabling this is if you are scanning a location with millions of matches and are worried about hitting the 1,048,576 row limit in Microsoft Excel. However, even in those cases, it is usually better to split the reports into multiple CSVs rather than losing the granularity of the "Multi Rows" view.
- Use with "Save Match": This setting is most effective when "Save Match" (Masked) is also enabled, as it enables you to see the unique (masked) string for every row created.
Summary
The “CSV Save Show Multi Rows” option is the "Granularity Toggle." It ensures that every instance of sensitive data found is represented by its own row in the report, providing the maximum level of detail for risk assessment, auditing, and remediation planning.
HTML Report Options
- Save Location Type
- This setting determines whether the generated HTML report includes a column or metadata field identifying the category of the storage medium where the sensitive data was found.
- The “Save Location Type” option is the "Source Labeler." It adds a clear, human-readable category to every finding in the HTML report, allowing users to quickly distinguish between files, emails, database records, and cloud objects for easier analysis and remediation.
- When this option is enabled, the HTML report explicitly labels the "Type" of storage for every finding. This helps distinguish between different architectural layers of the scan.
- Common Location Types include the following:
- File: A standard file on a local or network drive (e.g.,
.docx,.pdf). - Email: A message found within a mailbox (Outlook/Exchange, PST, or O365).
- Database: A record within a structured table (SQL, Oracle, etc.).
- Cloud: Data found in a cloud repository (SharePoint Online, OneDrive, Google Drive).
- Browser: Data found in browser history, cache, or stored form data.
- File: A standard file on a local or network drive (e.g.,
- Why it exists:
- Since HTML reports are designed to be human-readable summaries (often shared with department heads or data owners), this setting provides essential context:
- Immediate Context: A file path like
C:\Users\jsmith\AppData\...can be confusing to a non-technical manager. Seeing a "Location Type" of "Browser" or "Email" immediately tells them how the data got there (e.g., "This was a web download" vs. "This was an email attachment"). - Remediation Guidance: The steps to remediate an Email finding (delete the email) are different from a Database finding (run a SQL script) or a File finding (shred the file). This column tells the person reviewing the report which set of instructions they should follow.
- Risk Categorization: Security teams use this to identify "Channel Risk." If 90% of your findings have a Location Type of "Email," your primary security problem is likely your email retention policy, not your file server permissions.
- Immediate Context: A file path like
- How it works in the architecture:
- Agent Classification: As the Spirion Agent performs its search, it internally tags every finding with a "Location Type" based on the Search Path it is currently traversing.
- Report Generation: When the scan completes and the "Local Reporting" task triggers, the Agent pulls this tag and formats it into the HTML table for the end user.
- Recommendations:
- Highly Recommended for Non-Technical Users: HTML reports are the "Executive Summary" version of Spirion's data. Including the Location Type makes the report much easier for a non-technical manager to understand at a glance.
- Filter and Group: If you are using the HTML report for a "Manual Review," use this column to group your tasks. Handle all "Files" first, then all "Emails," as the workflow for each is different.
- Verify Connector Usage: If you are scanning complex targets (like SharePoint or Exchange), this column confirms that the Spirion Agent correctly identified the source as a "Cloud" or "Email" source rather than just a "File" on a drive.
- Save Location
- This setting determines whether the report includes the exact path or address where the sensitive data was found.
- The “Save Location” option is the "Map to the Risk." It provides the full, actionable path to every sensitive finding, ensuring that the person reviewing the report knows exactly where to go to investigate, encrypt, or delete the sensitive data.
- When this option is enabled, the HTML report provides the specific "coordinates" for every finding. Without this setting, the report might tell you what was found, but it won't tell you where it is.
- The output depends on what was scanned:
- For Files: It shows the full directory path (for example,
C:\Users\jdoe\Documents\Tax_Returns\2023_Financials.xlsx). - For Emails: It shows the mailbox name, folder, and subject line (e.g.,
jdoe@company.com> Inbox > Subject: Re: Wire Transfer). - For Databases: It shows the server, database name, and table name (e.g.,
SQLServer01 > HR_Prod > Employee_Profiles). - For Cloud: It shows the site or drive URL and file name (e.g.,
SharePoint > Finance Site > Shared Docs > Payroll.pdf).
- For Files: It shows the full directory path (for example,
- Why it exists:
- This is the most critical setting for Remediation and Validation:
- Enabling Action: If a user receives an HTML report stating they have 50 Social Security Numbers but the "Location" is missing, they have no way to find and delete those files. This setting provides the "Address" needed to take action.
- Determining Exposure: Seeing the location helps a security analyst understand the severity. A sensitive file in a
C:\Users\Publicfolder is a much higher risk than one located in aD:\Encrypted_Backupsfolder. - Auditing and Proof: For compliance audits, you must be able to prove exactly which files were flagged and subsequently cleaned. The "Location" serves as the unique identifier for the evidence.
- Recommendations:
- Always Enable for Local Reporting: Since HTML reports are often sent to end-users for "Self-Remediation," this box is mandatory. Without the location, the end-user cannot perform their task.
- Watch for Path Length: In some very deep folder structures, long file paths can make the HTML report look "stretched" or difficult to read. However, accuracy is more important than aesthetics—the full path is necessary for the user to find the file.
- Privacy Consideration: Be aware that the "Location" might contain sensitive information itself (e.g., a folder name that includes a project code-name or a person's name). Ensure the HTML report is delivered securely.
- Save Match
- This setting determines whether the report includes the actual string of sensitive data that triggered the finding.
- The “Save Match” option is the "Visual Evidence" setting. It provides the specific sensitive string found (ideally masked) so that users and admins can verify findings, distinguish real risks from false positives, and take accurate remediation actions.
- When this option is enabled, the HTML report will include a "Match" column displaying the specific data found (for example, the actual Social Security Number or Credit Card Number).
- Interaction with Masking: It is almost always used in conjunction with the Masking settings. If masking is enabled, the "Match" column will show the redacted version (e.g.,
***-**-6789). If masking is not enabled, the report will display the clear-text sensitive information. - Context: It enables the person reviewing the report to see exactly what Spirion flagged as sensitive.
- Interaction with Masking: It is almost always used in conjunction with the Masking settings. If masking is enabled, the "Match" column will show the redacted version (e.g.,
- Why it exists:
- This setting is primarily used for Validation and False Positive Identification:
- Human Verification: It enables a user or admin to look at the match and immediately determine if it is "Real" or a "False Positive." For example, a 9-digit part number might look like an SSN to the algorithm; seeing the match allows a human to say, "That's just a tractor part number, not a person's identity."
- Building Trust: End-users are more likely to cooperate with remediation if they can see the proof. Showing them
4111-XXXX-XXXX-1111is much more convincing than simply telling them "a credit card was found" without showing what it looks like. - Refining Search Policies: If an admin sees many "Matches" that are clearly not sensitive (like a specific repeated internal ID number), they can use that information to create an Ignore Rule or a Regular Expression (Regex) exclusion to clean up future scans.
- Recommendations:
- Always Use Masking: Never enable "Save Match" without also enabling a masking option unless you have a very specific technical reason and the report is being saved to a highly encrypted, restricted location. Saving clear-text PII into an HTML report creates a new security vulnerability.
- Best for Self-Remediation: If you are asking employees to clean up their own machines, "Save Match" (Masked) is essential. It gives them the context they need to find the specific data within a large document.
- Privacy Compliance: Some organizations' privacy officers may forbid "Save Match" entirely to minimize the "footprint" of sensitive data. In those cases, the report will only show that a file contains PII without showing any part of the data itself.
- Save Data Type
- This setting determines whether the generated report includes a column identifying the category of sensitive information found.
- The “Save Data Type” option is the "Risk Categorizer." It tells the reader exactly what kind of sensitive information was found, allowing for better prioritization, easier compliance reporting, and clearer instructions for the individuals responsible for cleaning up the data.
- When this option is enabled, the HTML report explicitly labels what kind of sensitive data was discovered in each file or location. Instead of just seeing that a file was "found," the user sees exactly what Spirion was looking for.
- Common Data Types listed in this column include:
- Social Security Number (SSN)
- Credit Card Number (CCN)
- Date of Birth (DOB)
- Bank Account Number
- Drivers License
- Custom Types: Any proprietary "AnyData" or Regex-based definitions you have created (for example, "Internal Project Code" or "Employee ID").
- Why it exists:
- This setting is the "Classification Label" for the findings, providing essential context for risk assessment:
- Prioritization: Not all data types carry the same risk. A file containing Credit Card Numbers might require immediate "Shredding" to maintain PCI compliance, while a file containing Dates of Birth might only require "Encryption" or "Moving." This column enables users to prioritize their workload based on the severity of the data type.
- Compliance Mapping: If an organization is preparing for a specific audit (like PCI-DSS for credit cards or HIPAA for healthcare info), this column enables them to filter the report to show only the findings relevant to that specific regulation.
- Remediation Clarity: When an employee is told to clean up a file, knowing the "Data Type" helps them search for the right information within the document. If they know they are looking for a "Credit Card Number," they won't waste time looking for "Social Security Numbers."
- Recommendations:
- Essential for All Reports: This is one of the most important settings to enable. A report that shows locations without the "Data Type" is of very little value, as the reviewer won't know why the file is considered a risk.
- Use with "Save Match Count": It is often helpful to see the Data Type next to the Match Count. For example: "Data Type: Social Security Number | Count: 500." This tells the admin that the file is a high-density identity risk.
- Review Custom Types: If you have created custom search definitions, ensure they have clear, descriptive names. These names are exactly what will appear in the "Data Type" column of the HTML report.
- Save Number of Instances
- This setting determines whether the report displays the total count of sensitive matches found within a single file or location.
- The “Save Number of Instances” option is the "Risk Magnitude" indicator. It provides the mathematical weight of the finding, enabling you to distinguish between minor policy violations and major data exposure risks so you can prioritize your remediation efforts effectively.
- When this option is enabled, the HTML report includes a column (often titled "Match Count" or "Instances") that shows the quantity of sensitive items found for each data type in a specific location.
- Example: If a spreadsheet contains 500 different Social Security Numbers, the report will show "500" in this column for that file.
- Without this setting: The report might only indicate that the file contains the data type, without telling you if there is one instance or one million.
- Why it exists:
- This setting is the primary metric for Risk Scoring and Prioritization:
- Quantifying Risk: A file with 1 Social Security Number is a "incident." A file with 10,000 Social Security Numbers is a "data breach." This column enables security teams to immediately identify the "Crown Jewels" or the most dangerous files in the environment.
- Identifying Data Silos: High instance counts often point to "shadow databases"—places where employees have exported large amounts of data from secure systems into insecure files (like Excel or CSV exports).
- Remediation Effort: It helps a user understand the scale of the cleanup task. Deleting a single accidental SSN in a Word document is a 10-second task; cleaning up an export with 5,000 instances likely requires deleting the entire file or running a specialized script.
- Recommendations:
- Critical for "Triage": If you are dealing with thousands of findings, sort your report by the "Number of Instances" in descending order. Always fix the files with the highest counts first, as these represent the greatest liability to the organization.
- Detecting False Positives: If you see a "Match Count" of exactly 1,000 or some other perfectly round number in a text file, it might be a sign of a "False Positive" caused by a specific formatting character or a repeated serial number.
- Pair with "Data Type": This setting is most effective when paired with "Save Data Type." Seeing "SSN: 5,000" provides much more urgency than just seeing "5,000" or "SSN."
- Save Number of Instances
- This setting instructs the Agent to include a column showing the total count of matches found within each file or location.
- The “Save Number of Instances” option is the "Risk Magnitude" setting. It provides the numerical count of sensitive findings in each file, allowing you to measure the severity of data exposure and prioritize your remediation efforts on the files that contain the most sensitive information.
- When this option is enabled, the HTML report will include a numerical value (often in a column titled "Count" or "Matches") for every sensitive item discovered.
- Example: If a PDF contains 12 different Credit Card Numbers, the row for that PDF will display the number "12" next to the "Credit Card" data type.
- Without this setting: The report will tell you that a file contains sensitive data, but it won't tell you how much.
- Why it exists:
- This setting is essential for Risk Triage and Quantifying Exposure:
- Prioritization: It enables you to distinguish between a "Low Risk" finding (for example, a single accidental SSN in a letter) and a "High Risk" finding (for example, a spreadsheet with 5,000 Social Security numbers). Security teams use this to decide which files to remediate first.
- Identifying Data Dumps: High instance counts are a primary indicator of "Shadow Data"—situations where a user has exported a large chunk of a database into an unencrypted Excel or CSV file.
- Audit Metrics: Compliance officers use the "Number of Instances" to report on the total volume of sensitive data residing on the network, which is a key metric for many regulatory frameworks.
- Recommendations:
- Mandatory for "Crown Jewel" Discovery: If your goal is to find the biggest concentrations of sensitive data in your organization, you must enable this setting.
- Sorting for Action: When you open the HTML report, sort by the "Number of Instances" column in descending order. This ensures the most dangerous files are at the top of your list.
- Detection Tuning: If you see an unusually high number of instances (for example, 50,000 matches in a very small file), it is often a sign of a False Positive (such as a serial number being mistaken for a sensitive string). This tells you that your search policy may need to be tuned with an "Ignore Rule."
- Save Checked Rows Only
- This is a specialized setting that controls which findings are included in the report based on their selection status in the Spirion interface.
- The “Save Checked Rows Only” option is a "Manual Filter." It ensures that the HTML report only contains the specific findings that a human user has manually selected (checked) in the results list, making it an ideal tool for creating verified, noise-free reports after a manual review process.
- This setting instructs the Agent to generate a report containing only the items that have been manually "checked" (selected) by a user within the Spirion results view.
- Enabled (checked): The HTML report will exclude any findings that do not have a checkmark next to them. If you found 100 files but only checked 5 of them in the UI, the resulting HTML report will only contain those 5 files.
- Disabled (unchecked): The HTML report will include all findings from the scan, regardless of whether they were manually selected or not.
- Why it exists:
- This setting is used for Selective Reporting and Manual Triage:
- Manual Verification: An auditor or admin might scan a machine and find 500 potential matches. After reviewing them, they may determine that only 10 are "Real Risks" and the rest are "False Positives." By checking those 10 and using this setting, they can generate a "Clean" report for management that only shows the verified risks.
- Targeted Remediation: If a technician is assigned to fix only specific files on a server (e.g., "only the files in the Finance folder"), they can check those specific rows and generate an HTML "Work Order" report that contains only their assigned tasks.
- Reducing Noise: Large scans can produce massive HTML files that are difficult to open or navigate. This setting enables a user to "filter" the findings manually and export only the most relevant data.
- Recommendations:
- Use with Caution in Automation: If you are running a fully automated/scheduled policy, you leave this setting disabled. In an automated scan, no one is there to manually "check" the rows, so enabling this would result in an empty (0-byte) HTML report.
- Best for "Ad-Hoc" Scans: This setting is most powerful when a technician is sitting at a machine, runs a manual scan, reviews the results, and wants to save a "Proof of Work" report for just the items they investigated.
- False Positive Management: This is the best way to create a "Remediation List" that has been pre-scrubbed of any false positives, ensuring that the person receiving the report doesn't waste time on non-sensitive files.
- Save Parent Rows Only
- This is a formatting setting that controls the level of detail shown for files containing multiple types of sensitive data.
- The “Save Parent Rows Only” option is the "Consolidation Toggle." It simplifies the HTML report by ensuring each file or location is listed only once, providing a clean, high-level summary that is ideal for quick reviews and location-based remediation tasks.
- This setting consolidates the report so that each unique Location (the "Parent") appears only once, rather than having a separate row for every individual match or data type found within that location.
- Enabled (checked): The report shows one row per file/location. If a file contains both SSNs and Credit Card numbers, they are typically listed together in the "Data Type" column of a single row.
- Disabled (unchecked): The report will show "Child" rows. If a file has three different types of sensitive data, that file path will be repeated on three separate lines to show the details for each specific data type found.
- Why it exists:
- This setting is used to create a concise, location-focused view of the scan results:
- Reducing Report Length: In large-scale scans, a single file might contain dozens of different data types or thousands of matches. "Save Parent Rows Only" prevents the HTML report from becoming hundreds of pages long by collapsing those details into a single summary line per file.
- Location-Based Remediation: If the goal is simply to "delete the file," the user doesn't necessarily need to see five different rows for that one file. They just need to know the file path once so they can take action on it.
- Executive Summaries: This creates a cleaner, more readable table for non-technical managers who just want to know which files are at risk, rather than the granular technical breakdown of every match inside those files.
- Recommendations:
- Use for "Action Lists": If you are giving a list to a system administrator and saying "Delete these 50 files," enable this setting. It makes the list much easier to read and prevents them from seeing the same file path repeated over and over.
- Disable for "Audits": If you are providing a report for a compliance audit (like a PCI-DSS audit), you should disable this setting. Auditors usually want to see the granular "Child" rows to prove exactly what was found (e.g., distinguishing between a Credit Card match and a Social Security match).
- Pair with "Save Match Count": Even when saving only parent rows, you can often still see the total "Number of Instances" for that file, providing a summary of the risk without the clutter of multiple rows.
- Save Summary Information
- This setting adds a high-level executive overview to the beginning of the generated HTML report.
- The “Save Summary Information” option is the "Executive Dashboard" for your report. It provides a concise, high-level snapshot of the scan’s results, scope, and health, making it the most important section for auditors, managers, and administrators to review first.
- When this option is enabled, the HTML report starts with a summarized breakdown of the entire scan before listing the individual file findings. This summary typically includes:
- Scan Statistics: The total number of files/locations searched, the number of files that contained sensitive data, and the total number of items skipped (due to permissions or encryption).
- Match Totals: A roll-up of how many total instances of each Data Type were found across the entire scan (for example, "Total Social Security Numbers: 450").
- Time and Scope: Details on when the scan started, how long it took to complete, and the specific search paths (targets) that were included in the policy.
- Agent Information: The name of the computer scanned and the version of the Spirion Agent used.
- Why it exists:
- This setting provides the "Big Picture" context that is often missing from a raw list of file paths:
- Management Reporting: Executives and department heads usually don't want to scroll through thousands of rows of file paths. They want to see the first page of the report to understand the overall risk posture (for example, "We have 10,000 sensitive matches across 50 computers").
- Audit Logs: For compliance purposes, you often need to prove not just what you found, but that you performed the search. The summary info serves as a "Certificate of Completion," proving the scan ran on a specific date against a specific set of folders.
- Troubleshooting: If the summary shows that 90% of the locations were "Skipped," it alerts the admin that there might be a permissions issue or a credential problem that prevented a thorough search.
- Recommendations:
- Always Enable This: There is almost no reason to disable this setting. The summary section adds very little to the file size but adds immense value for anyone reviewing the report.
- Use for "Health Checks": When reviewing reports from multiple machines, check the "Summary Information" first to ensure the "Files Searched" count looks correct for that system. If a server that should have 1 million files only shows 1,000 searched, the summary info will immediately highlight that the scan was incomplete.
- Formatting for PDF: If you plan to "Print to PDF" your HTML report to share with stakeholders, the "Summary Information" provides a professional-looking cover page for the document.
- Mask all but the last 4 characters
- This option is a privacy and security setting that controls how sensitive data is displayed in the generated report.
- This option ensures that your sensitive data reports are actionable and verifiable for remediation purposes without creating a secondary data breach risk by exposing full, clear-text sensitive information.
- This option acts as a "Privacy Shield." It ensures that your sensitive data reports are actionable and verifiable for remediation purposes without creating a secondary data breach risk by exposing full, clear-text sensitive information.
- When this option is enabled, the Spirion Agent redacts the majority of any sensitive string found (like a Social Security Number or Credit Card Number) and only reveals the final 4 digits.
- Example (Credit Card): A discovered number like
4111 1111 1111 1234would be written to the HTML report as************1234. - Example (SSN): A Social Security Number like
999-00-6789would appear as*****6789.
- Example (Credit Card): A discovered number like
- Why it exists:
- This setting is the industry standard for balancing security with usability:
- Data Minimization: It follows the principle of "Least Privilege." A person reviewing the report needs to know which record was found, but they do not need to see the full, actionable sensitive data. By masking the first part of the string, the report itself does not become a new security risk if it is lost or stolen.
- Verification and Remediation: The last 4 digits are usually enough for a human to verify the finding. For example, an employee looking at the report can check their own files and say, "Yes, I recognize those last 4 digits; that is my old tax return," without the report ever exposing their full SSN.
- Compliance Alignment: Many regulations (like PCI-DSS for credit cards) specifically require that no more than the last 4 digits of a primary account number be displayed. Enabling this setting helps keep your internal reporting processes in compliance with these standards.
- How it works in the architecture
- On-the-Fly Redaction: The masking happens locally on the Agent during the report generation phase. The full clear-text string is never written to the HTML file.
- Memory-Only Processing: The Agent identifies the match in memory, applies the mask (replacing characters with asterisks), and then writes the masked version to the report on the disk.
- Dependency: This setting only takes effect if the "Save Match" option is also enabled. If you aren't saving the match at all, there is nothing to mask.
- Recommendations:
- The "Gold Standard" Setting: For almost every internal use case, this is the recommended masking level. It provides enough information for a user to find and fix the data while providing 100% protection against the data being stolen from the report.
- Avoid "Clear Text": You should never save matches in clear text (unmasked) unless you are in a highly controlled, air-gapped environment and have a specific forensic requirement to do so.
- Consistency with Console: If you use this masking level in your Local Reporting, it is a good practice to ensure your SDP Cloud Console masking settings match, so that the "Match" column looks the same whether you are looking at the local HTML file or the central dashboard.
- Save Item Size
- Windows-only setting
- This option determines whether the report includes the file size of each location where sensitive data was found.
- The “Save item size” option is the "Physical Context" setting. It adds the file size to each finding in the HTML report, helping users and admins understand the scale of the files they are remediating and providing an extra layer of detail for identifying and prioritizing data risks.
- When this option is enabled, the HTML report adds a column (typically labeled "Size") that displays the size of the file or object (for example, in KB, MB, or GB).
- Example: A row for a sensitive Excel file might show
C:\Finance\Payroll.xlsx | 4.2 MB. - Context: This applies to standard files on disk, but can also represent the size of email attachments or database blobs depending on the target being scanned.
- Example: A row for a sensitive Excel file might show
- Why it exists:
- This setting provides technical context that is useful for Remediation Planning and Forensic Analysis:
- Identifying Large Data Sets: Very large files (e.g., a 2GB
.csvor.sqlfile) that contain sensitive data are often "database dumps" or "log files." Knowing the size helps an admin realize they are dealing with a massive export rather than a single document. - Remediation Logistics: If a user needs to move or encrypt files as part of their remediation, knowing the size helps them understand how long the process might take or if they have enough disk space in the destination "Quarantine" folder.
- Distinguishing Between Files: If there are multiple files with similar names in different folders, the "Item Size" can serve as an additional identifier to help the user ensure they are looking at the correct version of a document.
- Identifying Large Data Sets: Very large files (e.g., a 2GB
- Recommendations:
- Useful for "Cleanup" Workflows: If you are tasking a user with cleaning up their drive, the file size helps them quickly spot large, old archives that they might have forgotten about, which often contain the highest volume of sensitive data.
- Low Overhead: This setting has negligible impact on scan performance or report size. It is generally recommended to leave it enabled as it provides helpful context for very little "cost."
- Pair with "Number of Instances": Seeing a small file size with a huge number of instances is a classic indicator of a "False Positive" (for example, a small system log file where every line is being misidentified as a sensitive string).
- Save Date Created
- Windows-only setting
- This option determines whether the generated report includes the original creation timestamp for every file or location where sensitive data was found.
- The “Save date created” option is the "Historical Marker" for your findings. It provides the age of the sensitive data which enables you to enforce data retention policies, investigate the duration of data exposure, and prioritize the remediation of old, high-risk files.
- When this option is enabled, the HTML report adds a column (typically labeled "Created") that displays the date and time the file was first written to the disk or storage system.
- Example:
C:\Users\jdoe\Documents\Old_Taxes.pdf | Created: 2018-04-15 10:30 AM. - Context: This metadata is pulled directly from the operating system's file system (Windows, Mac, or Linux) or the specific cloud/database connector being scanned.
- Example:
- Why it exists:
- This setting is a critical tool for Data Lifecycle Management and Forensic Analysis:
- Identifying "Stale" Data: Security teams use the creation date to find old, forgotten files that should have been deleted years ago according to the company's Data Retention Policy. If a file was created in 2015 and contains SSNs, it is a prime candidate for "Shredding."
- Incident Investigation: If a data breach is suspected, knowing when a sensitive file was first created helps investigators determine the "window of exposure." It tells them how long that sensitive information has been sitting unprotected on the network.
- Distinguishing Versions: Users often have multiple versions of the same document (for example,
Project_Alpha_v1.docx,Project_Alpha_v2.docx). The creation date helps the user identify which file is the original source of the sensitive data.
- Recommendations:
- Essential for "Cleanup" Projects: If your goal is to reduce the organization's "Data Footprint," you must enable this setting. It enables you to sort the HTML report by date so you can focus on deleting the oldest, most unnecessary sensitive files first.
- Watch for "Copy" Behavior: Be aware that on some operating systems, copying a file to a new location can sometimes reset the "Date Created" to the time of the copy. Always use this in conjunction with "Save date modified" for a more accurate picture of the file's history.
- Low Performance Impact: Like other metadata settings, enabling this has almost no impact on scan speed or report size, so it is generally recommended to keep it enabled.
- Save Date Modified
- This option is for Windows Agents only
- This option determines whether the report includes the last time the file was changed or updated.
- The “Save date modified” option is the "Activity Indicator." It tells you how recently a sensitive file has been touched which enables you to distinguish between active business risks and old archives, helping you prioritize your remediation efforts based on how "fresh" the data is.
- When this option is enabled, the HTML report adds a column (typically labeled "Modified") that displays the timestamp of the most recent change made to the file or object.
- Example:
D:\Shared\Project_Plan.xlsx | Modified: 2024-02-10 03:45 PM. - Context: This metadata is retrieved from the file system (e.g., NTFS, APFS) or the specific application/cloud storage API being scanned.
- Example:
- Why it exists:
- This setting is one of the most important metadata fields for Risk Assessment and Remediation:
- Identifying "Active" vs. "Archive" Data: A file that was modified yesterday is likely part of an active business process. A file that hasn't been modified in five years is likely "dark data" or an archive. This helps admins decide whether to Encrypt (active data) or Shred/Quarantine (stale data).
- Verifying Remediation: If a user claims they have "cleaned up" a file by removing sensitive strings, an admin can check the "Date Modified" in a follow-up scan. If the date hasn't changed since the last scan, it’s a sign that the file hasn't actually been edited.
- Forensic Context: In the event of a security incident, the modification date helps investigators understand if sensitive data was recently added to a location or if an existing sensitive file was recently accessed and saved by an unauthorized user.
- Recommendations:
- The "Most Valuable" Date: If you only have room for one date column in your report, choose "Save date modified." It is generally more accurate for determining the current relevance of a file than the "Date Created," which can be reset by simple file copies.
- Use for Sorting: When you open your HTML report, sort by the "Modified" column. This enables you to quickly identify which sensitive files are currently being used by your employees, helping you prioritize remediation that won't disrupt active work.
- Detecting Automated Processes: If you see a large number of sensitive files all modified at the exact same second, it often indicates that an automated script or backup process touched those files, rather than a human user.
- Save Date Accessed
- This option is for Windows Agents only
- This option determines whether the report includes the last time the file was opened or read.
- The “Save date accessed” option is the "Usage Meter." It tells you how recently a sensitive file was opened which helps you identify "Dark Data" that can be safely deleted and distinguish between files that are actively being used for reference and those that are truly abandoned.
- When this option is enabled, the HTML report adds a column (typically labeled "Accessed") that displays the timestamp of the most recent time a user or process opened the file.
- Example:
C:\HR\Employee_List.csv | Accessed: 2024-04-20 09:15 AM. - Context: This metadata is retrieved from the file system (e.g., NTFS on Windows).
- Example:
- Why it exists:
- This setting is primarily used for Data Retention and "Dark Data" Analysis:
- Identifying Truly "Dead" Data: A file might have been modified three years ago, but if it was accessed yesterday, it is still being used for reference. If a file hasn't been accessed in years, it is a prime candidate for Shredding or Archiving because it is clearly not part of any current business process.
- Risk Assessment: Files that are accessed frequently represent a higher "active" risk because they are being moved through memory and viewed on screens regularly.
- Compliance Auditing: Some regulations require organizations to track not just who changed data, but who viewed it. While Spirion is not a full File Activity Monitoring (FAM) tool, this field provides a snapshot of the last known viewing.
- Recommendations:
- Use for "Cleanup" Decisions: This is the best metric for deciding whether to delete a file. If "Date Accessed" is more than 3 years old, the business likely doesn't need that file anymore.
- Verify OS Settings: If you notice that every single file in your report has an "Accessed" date that matches the "Scan Date," your operating system is likely updating the access time when Spirion reads the file. In this case, the column becomes less useful for historical analysis.
- Pair with "Date Modified": Comparing these two dates is powerful. A file with a very old "Modified" date but a very recent "Accessed" date tells you that the file is a "Reference Document"—something people look at often but never change.
- Save File Owner
- This option is for Windows Agents only
- This option determines whether the report includes the identity of the user who owns the file on the file system.
- The “Save file owner” option is the "Accountability" setting. It identifies the person responsible for each sensitive file, allowing security teams to route findings to the correct individuals for remediation and ensuring that data ownership is clearly documented for audit and governance purposes.
- When this option is enabled, the HTML report adds a column (typically labeled "Owner") that displays the username or security identifier (SID) of the person who has ownership rights to that file.
- Example (Windows):
C:\Users\Public\Documents\Export.csv | Owner: AD\jdoe - Example (Linux/Mac):
/home/data/records.txt | Owner: root - Context: This information is pulled directly from the Access Control List (ACL) or file system metadata of the operating system.
- Example (Windows):
- Why it exists:
- This setting is the primary tool for Accountability and Remediation Routing:
- Assigning Responsibility: If a scan finds 1,000 sensitive files on a shared server, the "Owner" field tells the administrator exactly which employee is responsible for those files. This enables the admin to send the report to the specific individuals who need to perform the cleanup.
- Identifying "Shadow IT": If a file is owned by "Administrator" or "System" but is located in a user's folder, it might indicate an automated process or a software installation that is improperly storing sensitive data.
- Data Governance: It helps organizations enforce policies regarding who is allowed to store sensitive data. For example, if a "Marketing" user is the owner of a file containing "Credit Card" data, it may trigger a policy violation if only "Finance" users are authorized to handle that data type.
- Recommendations:
- Essential for Shared Drives: This setting is "nice to have" for individual workstations, but it is mandatory for scanning File Servers and NAS devices. Without the "Owner" column, a report on a shared drive is just a list of problems with no one to fix them.
- Watch for "Generic" Owners: Be aware that on many systems, the "Owner" might be listed as "Administrators" or "SYSTEM." This often happens when files are moved or created by automated scripts. In these cases, you may need to look at the File Path to guess the true owner.
- Privacy Considerations: In some highly regulated regions (like those under GDPR), including the "Owner" name in a report that is shared widely might be considered a privacy concern. Ensure your reporting workflow aligns with your local privacy laws.
- Save File Attributes
- This option is for Windows Agents only
- This option determines whether the report includes the operating system-level flags assigned to each file.
- The “Save file attributes” option is the "Technical Status" setting. It reveals the underlying file-system properties (like Hidden, Read-Only, or System) for each finding, helping administrators understand the nature of the file and anticipate potential obstacles during the remediation process.
- When this option is enabled, the HTML report adds a column (typically labeled "Attributes") that displays the specific properties assigned to the file by the file system (such as NTFS on Windows). These are represented by a string of letters.
- Common Windows Attributes include:
- R (Read-Only): The file cannot be modified or deleted easily.
- H (Hidden): The file is not visible to the user in standard folder views.
- S (System): The file is a critical operating system file.
- A (Archive): The file is ready for backup (often set when a file is created or modified).
- C (Compressed): The file is compressed to save space.
- E (Encrypted): The file is encrypted at the file-system level (e.g., via Windows EFS).
- Example Report Entry:
C:\Users\jdoe\Secret.txt | Attributes: RHA(This indicates the file is Read-only, Hidden, and "marked for Archive").
- Why it exists:
- This setting provides technical context that is vital for Troubleshooting and Remediation Planning:
- Explaining Remediation Failures: If a user tries to "Shred" or "Quarantine" a file from the Spirion results but the action fails, the "Attributes" column might reveal why (e.g., the file is marked Read-Only or is a System file).
- Identifying Hidden Risks: Malicious actors or negligent users sometimes set the Hidden attribute on files containing sensitive data to avoid detection. This setting ensures those files are clearly flagged in the report.
- Detecting Existing Encryption: If a file is already marked as Encrypted (E) by the operating system, a security admin might consider it a lower priority for remediation than a "Plain Text" file, as it already has a layer of protection.
- Recommendations:
- Useful for IT/Admin Teams: This setting is highly valuable for the technical staff who will be performing the actual cleanup. It warns them ahead of time if they will need administrative permissions to modify a "System" or "Read-Only" file.
- Audit Trail: For compliance audits, showing the attributes can prove that certain files were properly "Archived" or "Compressed" according to company policy.
- Low Noise: This column takes up very little space in the report and has no impact on scan performance, so it is generally recommended to leave it enabled for technical reports.
- Mask all but the last 4 characters of the match (and first six for CCNs)
- Supported by Agents of all operating systems
- This setting is an advanced privacy setting specifically designed to align with PCI-DSS (Payment Card Industry Data Security Standard) requirements.
- The “Mask all but the last 4 (and first 6 for CCNs)” option is the "PCI-Compliant Mask." It provides the specific level of visibility required for financial auditing—revealing the issuer and the account suffix for credit cards—while maintaining standard "Last 4" privacy for all other sensitive data types.
- This setting applies a "smart mask" to sensitive data findings in the HTML report. It behaves differently depending on the type of data found:
- For Credit Card Numbers (CCNs): It reveals the first 6 digits (the Issuer Identification Number or BIN) and the last 4 digits, while masking everything in the middle.
- Example:
4111 1122 3344 1234becomes411111******1234.
- Example:
- For All Other Data Types (SSNs, Passports, etc.): It reveals only the last 4 characters, masking everything else.
- Example (SSN):
999-00-6789becomes*****6789.
- Example (SSN):
- Why it exists:
- This setting is the "Compliance Standard" for organizations that handle financial data:
- PCI-DSS Compliance: The PCI standard allows for the display of the first 6 and last 4 digits of a Primary Account Number (PAN). The first 6 digits identify the bank/issuer, which is critical for financial auditing and troubleshooting, while the last 4 identify the specific account.
- Enhanced Identification: For financial teams, knowing the "First 6" is often necessary to identify which type of card was used (for example, a corporate Visa vs. a personal Mastercard) without exposing the full, usable card number.
- Risk Mitigation: By masking the middle digits, the report remains "non-sensitive." Even if the HTML report were intercepted by a malicious actor, they would not have enough information to perform a fraudulent transaction.
- Recommendations:
- The Best Choice for Finance/Retail: If your organization processes payments, this is the recommended setting. It provides the maximum amount of legally allowed information to your auditors while maintaining strict security.
- Consistency is Key: If you use this setting for Local Reporting, you should ensure your SDP Cloud Console display settings are configured similarly so that administrators see the same level of detail in both places.
- Verification: This setting is particularly helpful when dealing with "Potential" matches. Seeing the first 6 digits can help a human quickly determine if a number is a real credit card or just a random string that happens to pass the Luhn validation algorithm.
- Save Classification
- Supported by Agents of all operating systems
- This option determines whether the report includes the Classification Label assigned to each file where sensitive data was found.
- The “Save Classification” option is the "Governance Check" setting. It includes the file's security label in the report, allowing you to verify that sensitive data is properly categorized and helping you identify discrepancies between the actual content of a file and its assigned sensitivity level.
- When this option is enabled, the HTML report adds a column (typically labeled "Classification") that displays the current classification status of the file.
- Example:
C:\Finance\Q4_Results.xlsx | Classification: Confidential - Context: This refers to the persistent metadata labels (like "Public," "Internal," "Confidential," or "Restricted") that Spirion or other classification tools (like Microsoft Purview/MIP) have applied to the file's metadata or header.
- Example:
- Why it exists:
- This setting is essential for Data Governance and Policy Validation:
- Verifying Policy Alignment: It enables security teams to see if the classification of a file matches the data inside it. For example, if a file contains "Social Security Numbers" but is classified as "Public," the report highlights a major governance failure that needs immediate correction.
- Prioritizing Remediation: Files that are unclassified or misclassified but contain high-risk data are often prioritized for remediation over files that are already correctly labeled and protected.
- Audit and Compliance: Many regulations (such as CMMC or ISO 27001) require organizations to prove that they are classifying sensitive data. This column serves as an audit trail showing that the organization is identifying and labeling its data correctly.
- Recommendations:
- Critical for "Maturity" Programs: If your organization is moving beyond just "finding" data and into "governing" data, you should always enable this setting. It is the only way to see if your automated classification rules are working correctly.
- Use for Cross-Referencing: When reviewing the report, look for "Confidential" data in "Public" locations. This is the fastest way to identify data "leakage" where sensitive files have been moved to insecure folders.
- Pair with "Classification" Actions: This setting is most useful when your Policy also includes a "Classification" task. The report will then show you the result of that task (e.g., "This file was found and is now labeled as Restricted").
- Save Database Column Name
- Supported by Agents on all operating systems
- This option specifically used when the scan target is a structured database (such as SQL Server, Oracle, MySQL, etc.).
- The “Save Database Column Name” option is the "Schema Identifier." It provides the exact location of sensitive data within a database's structure, making it an essential tool for DBAs to perform precise remediation and for security teams to audit database integrity.
- When this option is enabled, the HTML report adds a column that identifies the specific database column where the sensitive data was discovered.
- Example: If Spirion finds a Social Security Number in a database, the report will not just list the table; it will specify:
Database: Production_DB | Table: Employees | Column: SSN_Number. - Context: This setting is only relevant for database searches. If you are only scanning flat files (like Word or Excel docs), this setting will have no effect on the report.
- Example: If Spirion finds a Social Security Number in a database, the report will not just list the table; it will specify:
- Why it exists:
- This setting is critical for Database Administrators (DBAs) and Developers who need to perform remediation:
- Pinpoint Accuracy: Databases can have hundreds of tables and thousands of columns. Simply knowing that a "Table" contains sensitive data isn't enough. Knowing the exact column name enables a DBA to immediately identify the schema element that needs to be encrypted, masked, or deleted.
- Schema Auditing: It helps organizations identify "Shadow Data" in databases—for example, finding credit card numbers stored in a column named
CommentsorNoteswhere they don't belong. - Remediation Scripting: If you are planning to run a SQL script to mask data, you need the exact column name to target your
UPDATEorALTERstatements.
- Recommendations:
- Mandatory for DB Scans: If your policy includes any database targets, always enable this setting. Without it, the report is significantly less useful for the technical teams responsible for fixing the database.
- Identify Misconfigurations: Use this to find "Data Sprawl." If you see sensitive data appearing in columns like
Temp_FieldorUser_Input_1, it indicates a software bug or a business process that is improperly handling sensitive information. - Pair with "Save Database Row": To be truly effective, this should be used alongside settings that identify the specific row (like a Primary Key), so the DBA knows exactly which record in which column contains the sensitive data.
HTML Report Type
The options for saved Web Page Report.
*This option is specific to Windows and Mac Agents only.
Complete Report
This option determines the level of detail and the structure of the generated HTML file.
What it does
When “Complete Report” is selected, the Spirion Agent generates a comprehensive, standalone HTML document that includes every single finding (match) discovered during the scan, along with all the metadata columns you have enabled (such as File Owner, Date Modified, and the Masked Match itself).
- Format: It is typically a single, self-contained
.htmlfile. - Content: It includes a summary header (scan time, duration, total matches) followed by a detailed table listing every individual location where sensitive data was found.
Why it exists
This report type is designed for End-User Remediation and Detailed Auditing:
- Actionable Data for Users: This is the standard report sent to an employee (e.g., a professor or a manager) so they can see exactly which files on their computer contain sensitive data. They can click the links in the report to open the files and begin cleaning them up.
- Full Transparency: Unlike a "Summary Report" (which might only show the number of files found), the Complete Report shows the "Who, What, Where, and When" for every piece of sensitive data.
- Offline Review: Because it is a standalone HTML file, it can be opened in any web browser without needing a connection to the Spirion Console or the internet. This makes it ideal for air-gapped environments or for users working remotely.
How it works in the architecture
- Data Aggregation: After the scan finishes, the Spirion Agent queries its local SQLite results database for all "Matches" that met the policy criteria.
- Template Rendering: The Agent uses an internal HTML template to format these results into a clean, sortable table.
- Local Writing: The file is written to the path specified in your "Save Settings" (usually a local folder on the Agent's machine or a network share).
Recommendations
- The "Standard" Choice: For 90% of "Local Reporting" use cases, Complete Report is the correct choice. It provides the user with everything they need to take action.
- Watch for File Size: If a scan finds an enormous amount of data (e.g., 100,000+ matches), a "Complete Report" can become a very large HTML file that might be slow to open in a browser. In those rare cases, you might consider a "Summary" report or using the Console for review instead.
- Security Tip: Since this report contains masked versions of sensitive data, ensure the folder where the report is saved has restricted permissions so only the intended user can see it.
Summary
The “Complete Report” option is the "Full Detail" setting. It produces a comprehensive list of every sensitive finding, providing the end-user with a complete roadmap for remediation and giving administrators a detailed audit trail of the scan's results.
Executive Summary
This option is a reporting configuration designed to provide a high-level overview of scan results rather than a granular list of every single finding.
What it does
When “Executive Summary” is selected, the Spirion Agent generates a condensed HTML report that focuses on statistical totals and risk distribution. Instead of listing every individual file and every specific match (like the "Complete Report" does), it aggregates the data to show the "big picture."
- Format: A concise, single-page HTML document.
- Content: It typically includes:
- Scan Metadata: Start/end times, duration, and the name of the policy used.
- Total Counts: The total number of files scanned vs. the number of files containing sensitive data.
- Data Type Breakdown: A summary of how many instances of each data type (e.g., SSNs, Credit Cards, Birth Dates) were found across the entire scan.
- Location Summary: A list of the top locations (folders or drives) where the highest concentrations of sensitive data were found.
Why it exists
This report type is intended for Management, Compliance Officers, and Quick Risk Assessment:
- High-Level Reporting: It is designed for stakeholders who don't need to know the specific file names but need to know the volume of risk. For example, a Department Head might use this to see that their team has 5,000 SSNs on their shared drive without seeing the private details of those files.
- Performance and Readability: On systems with a massive number of findings (e.g., a file server with millions of matches), a "Complete Report" would be too large to open. The Executive Summary remains small and easy to read regardless of the number of matches.
- Privacy Protection: Because it does not list individual file paths or masked matches, it is a "safer" report to share with broader audiences who may not have the authorization to see exactly where sensitive files are located.
How it works in the architecture
- Data Aggregation: After the scan, the Spirion Agent performs "COUNT" and "GROUP BY" queries on its local SQLite results database.
- Summarization: It calculates the totals for each data type and identifies the most "heavily loaded" directories.
- Report Generation: The Agent writes these totals into a simplified HTML template and saves it to the designated local or network path.
Recommendations
- Use for "Progress Tracking": This is an excellent report to run weekly to show leadership how the total volume of sensitive data is decreasing over time as remediation efforts continue.
- The "First Look": For large-scale discovery projects, start with an Executive Summary to identify the "hot spots" of sensitive data, then run a "Complete Report" on those specific high-risk areas for actual cleanup.
- Not for Remediation: Do not provide this report to an end-user who is expected to clean up their own computer. They will not have enough information (like file paths) to actually find and fix the issues.
Summary
The “Executive Summary” option is the "Dashboard View" of your scan. It provides a statistical snapshot of your sensitive data footprint, making it the ideal tool for reporting risk to leadership and identifying high-concentration areas without the clutter of individual file details.
Custom Report
This option is a configuration that enables you to use a user-defined HTML template to control exactly how the scan results are displayed.
What it does
When “Custom Report” is selected, the Spirion Agent ignores its built-in "Complete" or "Executive" layouts and instead uses an external .html or .xslt template file provided by the administrator.
- Branding: You can add your company’s logo, specific colors, and legal disclaimers to the report.
- Filtering: You can design the template to only show specific columns or to hide certain data types that might be irrelevant to a specific department.
- Formatting: You can change the table structure, font sizes, or even add interactive elements (like JavaScript-based sorting) that aren't present in the standard reports.
Why it exists
This setting is designed for Enterprise Branding and Specialized Workflows:
- Corporate Identity: Large organizations often require all internal documents to follow strict branding guidelines. A Custom Report ensures that the Spirion findings look like an official company security document.
- Legal and Privacy Requirements: You can hard-code specific legal warnings or "Instructions for Remediation" directly into the report header, ensuring that every employee who receives a report also receives the necessary guidance on how to handle the data.
- Integration with Other Tools: If you have an automated system that "scrapes" these HTML reports to feed data into another dashboard, you can use a Custom Report to ensure the HTML tags are formatted in a way that your external tool can easily read.
How it works in the architecture
- Template Selection: When you select "Custom Report," a file browser or path field becomes active, allowing you to point the Policy to your custom
.htmlor.xsltfile. - Variable Injection: During the report generation phase, the Spirion Agent takes the results from its local SQLite database and "injects" them into specific placeholders (variables) within your custom template.
- Local Rendering: The Agent then saves the final, populated HTML file to the destination path defined in the "Save Settings."
Recommendations
- Advanced Users Only: Creating a custom template requires knowledge of HTML and Spirion’s specific variable syntax (e.g., knowing which tags represent "File Path" or "Match Count"). Most organizations find the "Complete Report" sufficient.
- Use for "Call to Action": The best use of a Custom Report is to add a large, clear button or link at the top that says "Click here to report these files as False Positives" or "Click here to view our Data Handling Policy."
- Test Thoroughly: Always run a test scan on a single machine after applying a Custom Report. If there is a syntax error in your template, the Agent may fail to generate the report entirely, leaving the user with no feedback.
Summary
The “Custom Report” option is the "White-Label" setting. It gives you total control over the visual presentation and content of the scan results, allowing you to align the report with corporate branding, include specific instructional text, and format the data for specialized internal processes.
Spirion Report Options
Save Match
- This setting is supported by Spirion Windows Agents only.
- This option is a critical security and privacy setting that determines whether the actual sensitive string found during a scan is recorded in the report.
What it does
When this option is enabled, the report includes the "Match"—the specific piece of sensitive data that triggered the finding (e.g., the actual Social Security Number or Credit Card Number).
- Enabled: The report shows the sensitive value (usually masked based on your masking settings).
- Example:
Match: 4111-XXXX-XXXX-1234
- Example:
- Disabled: The report shows that a match was found at a specific location, but it does not display the value itself.
- Example:
Match: [Not Saved]or the column is simply omitted.
- Example:
Why it exists
This setting enables organizations to balance "Proof of Finding" with "Data Minimization":
- Verification (The "Why"): Security teams often need to see the match to verify that it is a "True Positive." Without the match, an admin only knows that a file is sensitive, but they can't quickly double-check why the software flagged it.
- Privacy Compliance: In highly regulated environments (or under strict privacy laws like GDPR), storing even a masked version of sensitive data in a secondary report file might be considered an unnecessary risk. Disabling "Save Match" ensures that the report contains only metadata (file paths, owners, dates) and no actual sensitive content.
- Reducing Report Sensitivity: By not saving the match, the HTML report itself becomes a "non-sensitive" document. This makes it much safer to email the report to department heads or store it on a general-purpose file share.
How it works in the architecture
- Agent-Side Logic: As the Spirion Agent's search worker identifies a sensitive string, it checks this policy setting.
- Memory Handling: If "Save Match" is disabled, the Agent identifies the location, increments the match count, and then immediately flushes the sensitive string from its memory without ever writing it to the local results database or the final HTML report.
- Masking Interaction: If "Save Match" is enabled, the Agent will then apply whatever masking rules you have configured (e.g., "Mask all but the last 4") before writing the data to the report.
Recommendations
- Enable for Initial Discovery: When you are first setting up Spirion, you should enable "Save Match" (with strong masking). This helps you tune your policies and identify False Positives.
- Disable for "Clean" Environments: Once your policies are highly accurate and you are in a "maintenance" phase, you may choose to disable this setting to further reduce your internal data footprint.
- Mandatory for "Self-Remediation": If you are sending this report to an end-user and asking them to clean up their files, they usually need to see the "Match" (masked) so they can find the specific spot in a large document where the sensitive data is located.
Summary
The “Save Match” option is the "Evidence" setting. It controls whether the report includes the actual sensitive string found. Enabling it provides the proof needed for verification and user remediation, while disabling it maximizes privacy by ensuring the report contains only location metadata and no sensitive content.
Save Checked Rows Only
- This setting is supported by Spirion Windows Agents only.
This setting is a specialized setting used to filter the final report based on user interaction or manual validation.
What it does
This setting instructs the Spirion Agent to only include findings in the final report that have been "checked" (selected) in the Agent's local results interface.
- The Workflow: Typically, a scan runs and displays results in the local Agent UI. A user or administrator then reviews those results and manually checks the boxes next to the items they want to act upon or document.
- The Result: When the report is generated, any finding that was not checked is ignored, resulting in a "curated" report containing only the specific items the user deemed relevant.
Why it exists
This setting is designed for Manual Review and Selective Reporting:
- False Positive Filtering: If a scan finds 100 items but 20 of them are clearly false positives (for example, test data or public phone numbers), a user can check only the 80 "True Positives." By enabling "Save Checked Rows Only," the final HTML report will be clean and contain only the 80 real risks.
- Phased Remediation: An administrator might find thousands of sensitive files but only want to send a report to a manager regarding a specific subset (e.g., "just the files in the Finance folder"). They can check those specific rows and generate a targeted report.
- User-Driven Cleanup: In some workflows, an employee is asked to review their own scan results. They check the files they intend to delete or move, and then generate this report as a "receipt" or "work log" to prove to the IT department which files they addressed.
How it works in the architecture
- State Tracking: The Spirion Agent maintains a "Checked" state for every match stored in its local SQLite results database.
- Query Filtering: When the report generation process begins, the Agent adds a filter to its internal database query (for example,
WHERE isChecked = 1). - Report Generation: Only the records matching that "Checked" state are pulled into the HTML template and written to the final file.
Recommendations
- Use with Interactive Scans: This setting is only useful for Interactive Scans where a human is actually looking at the Agent's local results window. If you are running a "Silent" or "Unattended" scan via a scheduled policy, this setting should generally be disabled, as no rows will be manually checked, which could result in an empty report.
- Audit Trail: This is an excellent way to create a "Final Action Report." After a technician has gone through a machine and remediated the data, they can check the rows they fixed and generate a report that serves as an audit trail of their work.
- Caution: If you enable this by mistake in a fully automated policy, you may find that your reports are consistently empty, even if the scan found thousands of matches.
Summary
The “Save Checked Rows Only” option is the "Manual Filter" setting. It ensures that the final report only contains the specific findings that a human reviewer has manually selected, making it the ideal tool for removing false positives or creating targeted remediation lists after a manual review of scan results.
Disable Feature - Save Spirion Files
Allow save as idf
The “Allow save as idf” option is a security and workflow control that determines whether a user can save their scan results into a proprietary, encrypted Spirion file format called an Identity Finder File (.idf).
What it does
When this option is enabled (checked), it permits the Windows Agent to export the current scan results into a .idf file.
- The .idf Format: This is a password-protected, encrypted file that contains the full details of a scan, including file paths, metadata, and (if configured) the sensitive matches themselves.
- Portability: A
.idffile can be moved to another computer and opened with another Spirion Agent, provided the user has the correct password.
Why it exists
This setting is designed for Offline Review and Technical Support:
- Air-Gapped Environments: In highly secure environments where an agent cannot communicate with the SDP Cloud Console, saving a
.idffile is the only way to "export" the results so they can be reviewed by a security officer on a different machine. - Support and Troubleshooting: If a scan is behaving unexpectedly or finding false positives, a Spirion administrator might ask a user to "Save as .idf" and send the file to them. The administrator can then open the file in their own console to see exactly what the agent saw.
- Snapshotting: It enables a user to take a "point-in-time" snapshot of their findings. They can save the
.idffile, perform remediation, and then open the file later to compare their progress.
Recommendation
- Security Risk: Because a
.idffile contains sensitive data (even if encrypted), many organizations disable this feature to prevent "data sprawl." They don't want users saving copies of their sensitive findings onto USB drives or emailing them. - Use for Admins Only: It is common practice to create a "Technician Policy" where this feature is enabled for IT staff, while keeping it disabled for general employees in their standard "User Policy."
- Console is Preferred: In a modern SDP environment, you should rarely need
.idffiles. All results should be shipped directly to the SDP Cloud Console, which provides a much more secure and centralized way to review and manage findings.
Summary
The “Allow save as idf” option is the "Encrypted Export" setting. It enables or restricts the ability to save scan results into a portable, password-protected file format. While useful for offline troubleshooting and air-gapped systems, it is often disabled in standard environments to maintain strict control over where sensitive scan data is stored.
Disable save as idf
This setting is a security restriction that prevents users from saving their scan results into Spirion's proprietary, encrypted file format, the Identity Finder File (.idf).
What it does
When this option is enabled (checked), it explicitly removes the ability for a user to export their findings into a .idf file from the Windows Agent interface.
- Menu Restriction: The "Save" and "Save As" options in the Agent's File menu will be disabled (greyed out) or hidden entirely.
- Prevention of Local Copies: It ensures that the only way to view or interact with the scan results is through the live Agent UI or the centralized SDP Cloud Console.
Why it exists
This is a Data Loss Prevention (DLP) and Governance setting:
- Preventing "Finding Sprawl": Even though
.idffiles are password-protected and encrypted, they still contain sensitive data (the results of the scan). Security teams often use this setting to prevent users from creating "mini-databases" of their sensitive findings on their desktops or moving them to unmanaged locations like personal USB drives. - Enforcing Centralization: By disabling local saving, organizations force the workflow into the SDP Cloud Console. This ensures that all findings are audited, tracked, and managed in one secure, central location rather than being scattered across the environment in individual files.
- Compliance Alignment: Many regulatory frameworks (like SOC2 or HIPAA) require strict "Chain of Custody" for sensitive information. Allowing users to save local files of sensitive findings can complicate audit trails and increase the organization's attack surface.
Recommendations
- Standard for General Users: For the vast majority of employees, this should be enabled (checked). Users should be encouraged to remediate their data directly in the Agent or follow instructions in an HTML report, rather than saving
.idffiles. - Exception for Technicians: You might disable this restriction for a small group of "Power Users" or IT Technicians who need to save
.idffiles for offline analysis or for sending to Spirion Support for troubleshooting. - Pair with "Disable Print": To truly lock down the results, this setting is often used in conjunction with "Disable Print" to ensure that sensitive findings cannot leave the managed Agent environment in any format.
Summary
The “Disable Save as idf” option is a "Security Lockdown" setting. It prevents users from exporting sensitive scan results into portable files, ensuring that data findings remain within the controlled environment of the Spirion Agent and the Cloud Console.
Disable Save Feature in Clear Text
Allow clear text save
This option is a security control that determines whether a user is permitted to export scan results into unencrypted, human-readable formats like CSV or TXT.
What it does
When this option is enabled (checked), it enables the Windows Agent to export the current list of findings into common file formats that do not have built-in encryption.
- Supported Formats: Typically includes CSV (Comma Separated Values), TXT (Plain Text), and sometimes XML.
- Accessibility: These files can be opened by any standard application (like Microsoft Excel, Notepad, or a web browser) without requiring a password or the Spirion Agent.
Why it exists
This setting is used for Data Portability and Integration:
- External Analysis: Users or admins may want to export results to Excel to perform advanced sorting, filtering, or to create custom pivot tables and charts that aren't available in the standard Spirion UI.
- Importing into Other Tools: A CSV export is the easiest way to move Spirion findings into other security tools, such as a SIEM (like Splunk), a ticketing system (like ServiceNow), or a GRC platform.
- Custom Scripting: Developers may need a plain-text list of file paths to feed into a custom script that performs automated remediation (e.g., a script that changes folder permissions or moves files to a secure archive).
How it works in the architecture
- UI Control: This setting controls the "Export" or "Save As" options in the Windows Agent's File menu specifically for non-proprietary formats.
Recommendations
- High Security Risk: This is one of the most sensitive settings in a policy. If "Save Match" is also enabled, a "Clear Text Save" will create a file containing actual sensitive data (like SSNs or Credit Cards) in a completely unprotected format.
- Default to Disabled: For standard employees, this should almost always be disabled. There is rarely a business reason for a regular user to have an unencrypted list of their sensitive data on their desktop.
- Use for Admins Only: Limit this capability to a "Technician Policy." Even then, technicians should be instructed to delete these clear-text files immediately after they have finished their analysis or import.
- Check Masking Settings: If you must allow clear-text saves, ensure that your Masking settings are very aggressive (for example, "Mask all characters") so that the exported file contains file paths but no actual sensitive values.
Summary
The “Allow clear text save” option is the "Unprotected Export" setting. It enables the ability to save scan results into common formats like CSV or TXT. While highly useful for data analysis and system integration, it poses a significant security risk and should be strictly controlled to prevent the accidental creation of unencrypted files containing sensitive information.
Disable clear text save
This option is a security restriction that prevents users from exporting scan results into unencrypted, non-proprietary formats such as CSV, TXT, or XML.
What it does
When this option is enabled (checked), it explicitly blocks the Windows Agent from saving findings into any format that is not encrypted by Spirion.
- Blocked Formats: The user will be unable to save results as CSV (Excel), TXT (Notepad), or XML files.
- UI Enforcement: The "Export" options or specific "Save As" file types in the Agent's File menu will be greyed out, hidden, or restricted.
- Mandatory Encryption: If saving is allowed at all, the user would be forced to use the encrypted
.idfformat (provided that feature isn't also disabled).
Why it exists
This is a Critical Data Protection setting designed to prevent the accidental or intentional creation of "Shadow Data":
- Preventing Unprotected Findings: The biggest risk in a data discovery project is that the tool used to find sensitive data accidentally creates a new security hole. If a user exports 1,000 Social Security Numbers into an unencrypted CSV file on their desktop, they have created a massive new liability. This setting prevents that scenario.
- Enforcing Security Policy: Many organizations have a policy that sensitive data must never exist in "clear text" on an endpoint. Disabling clear text saves ensures that Spirion findings remain within the "protected bubble" of the Spirion Agent or the encrypted
.idfformat. - Compliance and Auditing: For regulations like PCI-DSS or HIPAA, allowing a user to create an unencrypted list of credit card numbers or patient records would be a major compliance failure. This setting acts as a technical "guardrail" to ensure compliance.
Recommendations
- The "Safe" Default: This should be enabled (checked) for almost every policy in your organization. It is the single best way to ensure that your Spirion scan results don't become a security risk themselves.
- Technician Exceptions: Only disable this restriction for highly trusted IT or Security personnel who need to move data into a SIEM or an analytics tool. Even then, those users should be trained on how to handle and delete those files securely.
- Pair with "Save Match" Awareness: If you have "Save Match" enabled in your policy, it is doubly important to have "Disable clear text save" enabled, as the exported file would otherwise contain raw (or partially masked) sensitive values in plain text.
Summary
The “Disable clear text save” option is the "Anti-Leak" setting. It prevents users from creating unencrypted, unprotected files (like CSVs) containing their scan results, ensuring that sensitive findings are never stored in a way that could be easily accessed by unauthorized users or malware.
Check Previous Results
Do not check results
This is a configuration that determines how the Windows Agent handles findings from previous scans when displaying or reporting on a new scan.
What it does
When “Do not check results” is selected, the Spirion Agent treats every scan as a completely fresh event. It does not look at the history of what was found, ignored, or remediated in the past.
- No Historical Context: The Agent will not automatically "check" (select) rows in the results list just because they were checked in a previous scan.
- Clean Slate: Every time a scan runs, the results window starts with all findings "unchecked," requiring the user to manually review and select them again if they wish to perform an action or generate a report.
Why it exists
This setting is designed for Independent Auditing and High-Accuracy Workflows:
- Fresh Validation: In some compliance environments, it is a requirement that every scan be treated as a new audit. By not "checking" previous results, you force the reviewer to look at every finding again to ensure it hasn't changed or that a previously ignored item hasn't become a risk.
- Avoiding "Review Fatigue": If a previous scan had thousands of checked rows, automatically checking them again in a new scan might clutter the UI and make it harder for a user to see new findings that appeared since the last run.
- Stateless Scanning: For automated systems or "one-off" scans where you don't care about the history of the machine, this setting ensures the Agent doesn't waste resources querying its local history database to match up old results with new ones.
Recommendations
- Use for "Clean Up" Projects: If you are starting a brand-new data reduction initiative, use this setting to ensure your team is looking at the current state of the machine without being biased by what was done months ago.
- Contrast with "Check Previous": If your goal is incremental remediation (where a user fixes a few files every day), you should not use this setting. Instead, use "Check previous results" so the user can see what they already identified as a risk in their last session.
- Performance Tip: On machines with very large scan histories (for example, a file server scanned daily for a year), selecting "Do not check results" can slightly speed up the time it takes for the results window to appear after a scan finishes, as the Agent has less data to process.
Summary
The “Do not check results” option is the "Fresh Start" setting. It ensures that each scan's results are presented without any pre-selected rows from previous sessions, forcing a manual re-validation of all findings and preventing historical "checked" states from carrying over into new reports.
Automatically Save & Load Results
This is a workflow automation feature for the Spirion Windows Agent. It ensures that scan results are preserved and re-opened automatically, providing a seamless experience for users who perform multi-session remediation.
What it does
When this setting is enabled, the Spirion Agent performs 2 primary automated actions:
- Automatic Saving: As soon as a scan completes, the Agent automatically saves the results into its local, encrypted database (and/or a designated
.idffile if configured). The user does not need to manually click "Save." - Automatic Loading: The next time the Spirion Agent is opened, it automatically "loads" the results from the most recent scan back into the results grid. This enables the user to pick up exactly where they left off without having to re-run a scan or manually open a saved file.
Why it exists
This setting is designed for User-Driven Remediation and Persistence:
- Multi-Day Cleanup: If a scan finds 5,000 sensitive files, a user likely cannot clean them all in one sitting. This setting allows them to close the Agent at the end of the day and return the next morning to find their list of findings (and their progress) still visible.
- Resilience: If the computer restarts or the Agent crashes, the results are not lost. Because they were "Automatically Saved," they will be "Automatically Loaded" when the Agent is restarted.
- Simplified User Experience: It removes the technical burden from the end-user. They don't have to worry about "managing files" or "saving their work"; the Agent handles the data lifecycle in the background.
How it works in the architecture
- Local SQLite Storage: The Windows Agent uses a local SQLite database to store its state. When this setting is active, the Agent commits the "Finding" metadata and the "Checked/Unchecked" status to this database in real-time or immediately upon scan completion.
- Startup Trigger: Upon launch, the Agent's executable checks the policy configuration. If "Automatically Load" is enabled, it queries the local database for the most recent
SessionIDand populates the UI grid with those records. - Policy Sync: This behavior is governed by the policy sent from the SDP Cloud Console, ensuring that all machines in a specific group (for example, "Finance Department") have the same persistent experience.
Recommendations
- Best for "Self-Service" Remediation: This is the recommended setting for any policy where employees are expected to manage their own data. It prevents the frustration of "losing" scan results.
- Use with "Check Previous Results": This setting works best when paired with "Check previous results." Together, they ensure that not only are the results loaded, but the user's previous "Check" marks are also preserved.
- Caution on Shared Machines: Be careful using this on shared workstations (like kiosk PCs). If User A scans the machine and leaves, and then User B opens Spirion, User B might be able to see the metadata of the files User A was working on. In shared environments, it is often safer to disable this setting so results are cleared when the session ends.
Summary
The “Automatically Save & Load Results” option is the "Persistence" setting. It automates the lifecycle of scan results on the endpoint, ensuring that findings are never lost and are always ready for the user to review, providing a consistent and reliable workflow for long-term data remediation projects.