How to Quarantine SharePoint Site Files
Before You Begin
- If you quarantine from a SharePoint site to a file server, you must authenticate with SharePoint first.
- The Azure application used for authentication must have:
- Read/Write permissions to the entire tenant or to the specific SharePoint sites being scanned
- Manage permissions enabled
Supported Quarantine Scenarios
Spirion supports the following data flows when quarantining SharePoint files:
- SharePoint site to SharePoint site
- In this scenario files from your SharePoint site Target are quarantined to another SharePoint site
- This method works only when done to a “Quarantine” folder within the same document library.
- SharePoint site to Spirion Agent machine
- In this scenario files from your SharePoint site Target are quarantined to the Spirion Agent machine scanning your SharePoint site Target
- SharePoint site to Windows File Server
- In this scenario files from your SharePoint site Target are quarantined to a local or remote Windows file server
- To quarantine from your SharePoint site Target to a Windows file server, the Spirion Agent must authenticate to the Windows File server.
- This requires your Windows File server be configured as a Target in Spirion Sensitive Data Platform
- This is described in the steps below.
SharePoint Site to SharePoint Site Quarantine
Step 1: Set the Quarantine Path on the Scan Settings Page
Use the following steps to configure your SharePoint quarantine path found on the Scan Settings page (Settings > Application Settings > Scan Settings).
- From the left side navigation menu navigate to "Settings > Application Settings > Scan Settings"
- Expand the section Remediation.
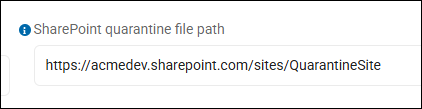
- In the Remediation section, enter the SharePoint quarantine path.
- Example: https://acmedev.sharepoint.com/sites/QuarantineSite
- In this example, <acmedev> is your domain
- <QuarantineSite> is the SharePoint site that will house your quarantined files
- This quarantines all files to the specified SharePoint site and folder.
Step 2: Configure a Playbook for SharePoint Site Quarantine
Use the following procedure to instruct a Scan Playbook (used by 1 or more scans) to quarantine sensitive data, (such as Social Security numbers, Credit Card numbers, etc.) to a SharePoint site:
- From the left-side navigation menu navigate to Scans > Scan Playbooks.
- Select an existing playbook or create a new one.
- In the top-left corner, click the Actions button.
- Select Manage Quarantine Paths from the drop-down list.
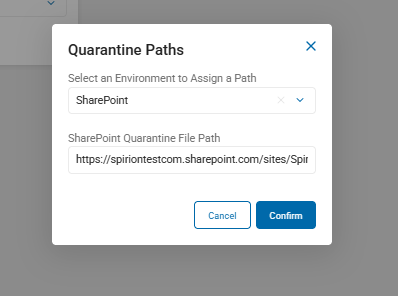
- From the Select an Environment to Assign a Path drop-down list, choose SharePoint.
- In the field "SharePoint quarantine file path" enter the SharePoint quarantine file path.
- In your playbook’s decision tree, ensure one of the actions is set to Quarantine.
- Note: At least one Classification or Shred action must be set in a playbook (either "Yes" or "No" path).
- Ensure the decision tree in your Scan Playbook includes a Quarantine action. A Quarantine action can be performed after another action, such as a Classification. See How to Manage Quarantine Paths for an Individual Playbook.
SharePoint Site to Spirion Agent Machine Quarantine
Step 1: Set the Quarantine Path on the Scan Settings Page
Use the following steps to configure your Spirion Agent machine quarantine path. This is configured on the Scan Settings page:
- From the left side navigation menu open the Scan Settings page:
Settings > Application Settings > Scan Settings - Expland the Remediation section.
- In the field Windows quarantine file path, enter the path to the quarantine folder on the Spirion Agent machine you want to use.
- Uses standard file system paths
- Example: E:\Quarantine
- Note: Spirion Agents can reside on a local workstations, servers, VMs, etc.
- In this scenario, pay careful attention to the Spirion Agent you use to scan SharePoint site Targets
- Any path in the field "Sharepoint quarantine file path" on this page is ignored.
- Next you configure the scan playbook which will be used by the scan which searches the SharePoint site Target.
Step 2: Configure a Scan Playbook to Quarantine to a Spirion Agent Machine
Use the following procedure to instruct a Scan Playbook (used by 1 or more scans) to quarantine the sensitive data, (such as Social Security numbers, Credit Card numbers, etc.) found on a SharePoint site to a Spirion Agent machine:
- From the left side navigation menu navigate to the Scan Playbooks page:
Scans > Scan Playbooks. - Select or create your quarantine playbook. See How to Add a New Scan Playbook.
- In the top left corner select the Actions button.
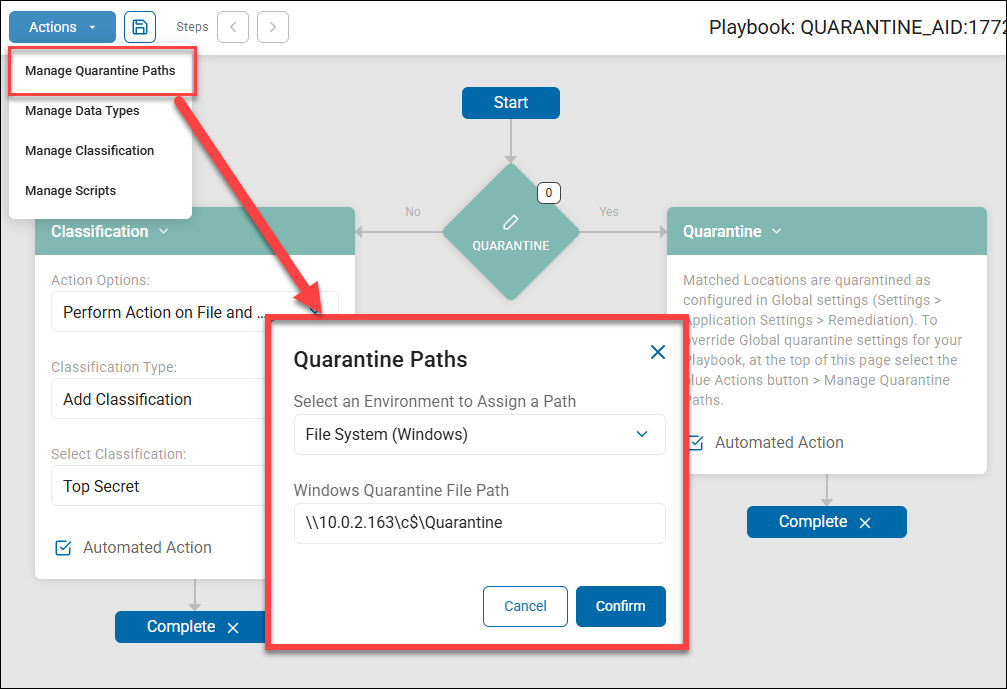
- Click "Manage Quarantine Paths."
- The "Quarantine Paths" window opens.
- From the "Select an Environment to Assign a Path" drop-down menu select the Windows File Server - called "File System (Windows)".
- Enter the appropriate local file path in the field "Windows Quarantine File Path." This is the path on your Spirion Agent where sensitive data will be stored.
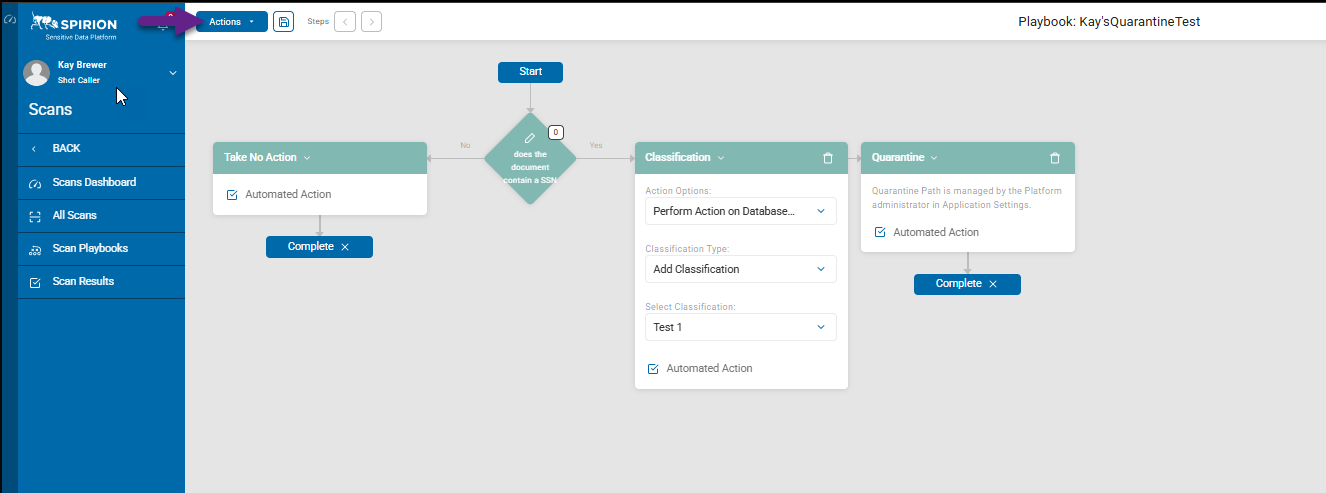
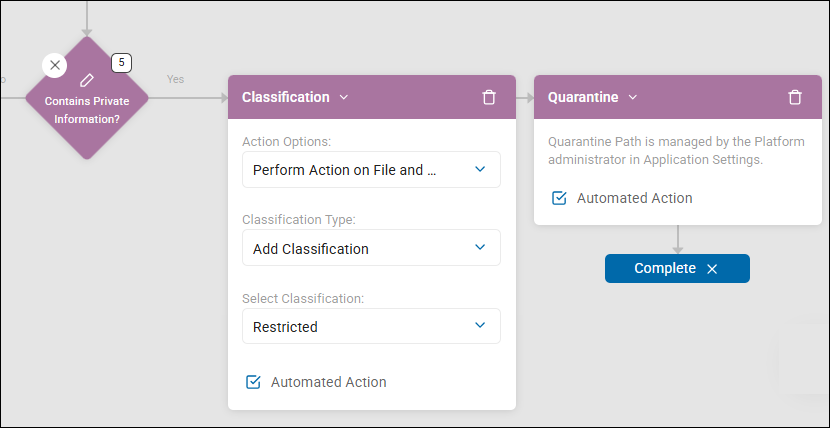
- Note: At least one Classification or Shred action must be set in a playbook (either "Yes" or "No" path). In the example above, the "No" path of the playbook contains the Classification action. In the example below, the Classification action is on the "Yes" path, followed by the Quarantine action. These examples are the 2 most commonly used Playbook scenarios involving the Quarantine action.

How to Quarantine from a SharePoint Site to a Windows File Server
Step 1: Set the Quarantine Path on the Scan Settings Page
Use the following steps to configure your Windows file server quarantine path. This is configured on the Scan Settings page:
- From the left side navigation menu open the Scan Settings page:
Settings > Application Settings > Scan Settings - Expland the Remediation section.
- If the SharePoint site Target is local use the following steps:
- In the field Windows quarantine file path, enter the file server path.
- For example: \\FileServer\Quarantine
- If the SharePoint site Target is remote use the following steps:
- Click the blue gear icon next to the Windows quarantine path.
- Select the remote server.
- If the server is not listed, select Add Target and enter the necessary information to configure the SharePoint site as a Target.
Step 2: Configure a Scan Playbook to Quarantine to a Windows File Server
Use the following procedure to instruct a Scan Playbook (used by 1 or more scans) to quarantine sensitive data, (such as Social Security numbers, Credit Card numbers, etc.) to a local or remote file server:
- From the left side navigation menu navigate to the Scan Playbooks page:
Scans > Scan Playbooks. - Select or create a playbook. See How to Add a New Scan Playbook.
- In the top left corner select the Actions button.
- Click "Manage Quarantine Paths."
- The "Quarantine Paths" window opens.
- Select the appropriate File Server (called "File System") from the "Select an Environment to Assign a Path" drop-down menu.
- Enter the appropriate local or remote file path in the field "Windows Quarantine File Path."
- Note: At least one Classification or Shred action must be set in a playbook (either "Yes" or "No" path). In the example above, the "No" path of the playbook contains the Classification action. In the example below, the Classification action is on the "Yes" path, followed by the Quarantine action. These examples are the 2 most commonly used Playbook scenarios involving the Quarantine action.
- Ensure the decision tree in your Scan Playbook includes a Quarantine action. A Quarantine action can be performed after another action, such as a Classification. See How to Manage Quarantine Paths for an Individual Playbook.
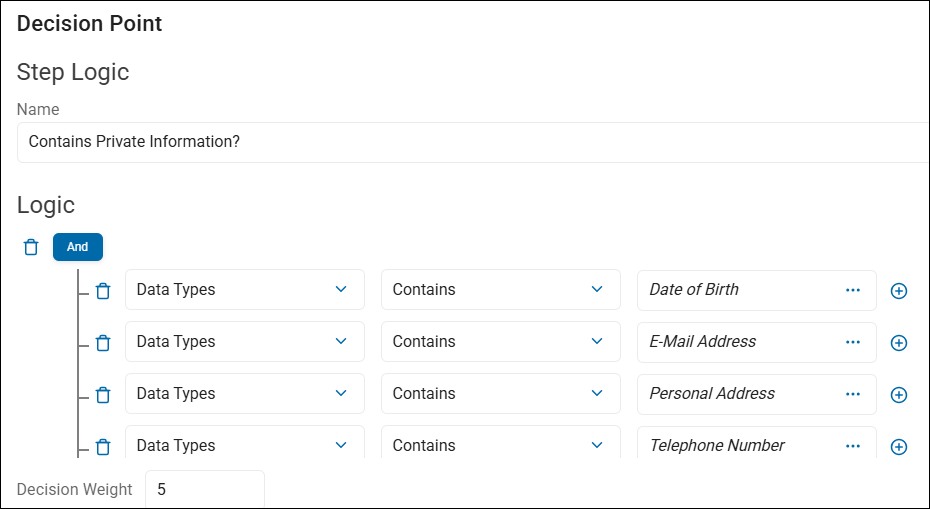
- In the example below, if private information (4 data types: Date of Birth, E-Mail Address, Personal Address, Telephone Number) is discovered by a Spirion Agent in a file or email, it is automatically classified as "Restricted" and quarantined to the specified local or remote Windows file server.