
How to Use the SPIglass™ Dashboard
Overview
The SPIglass™ Dashboard is the executive-level reporting interface within the Spirion Sensitive Data Platform.
- While the Scans Dashboard focuses on operational management, SPIglass is designed to provide a high-level view of an organization's overall risk posture and ROI.
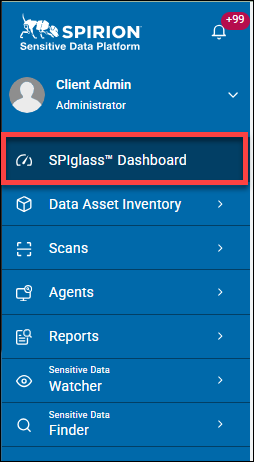
- The SPIglass™ Dashboard is the default view in Spirion Sensitive Data Platform; it is shown in the example image below, at the top of the left-side navigation menu.
- It can be found at the path: "/dashboard"
- For example: "https://subdomian.moniker-domain/dashboard"
- For example: "https://subdomian.moniker-domain/dashboard"
What does the SPIglass™ Dashboard do?
The SPIglass™ Dashboard translates raw scan data into financial and risk-based metrics using the following key components:
- Risk Quantification: It calculates the "Total Potential Risk (Cost)" by multiplying the number of sensitive data findings by the estimated cost of a data breach (often based on industry standards like the Ponemon Institute report).
- Comparison Metrics: It features data cards that show percentage changes in risk over time (e.g., Compensating Controls and Remediated Risk). These are updated on a weekly basis (Sunday to Sunday).
- Visual Analytics: It provides several charts to help identify "hot spots" of sensitive data:
- Risk by Location: Shows which storage areas (SharePoint, File Servers, etc.) hold the most risk.
- Risk by Classification: Breaks down risk by data type (e.g., PII, PHI, PCI).
- Data Age: Identifies how much sensitive data is "stale" or hasn't been modified in years.
- Executive Reporting: It is designed to be shared with CISOs and stakeholders to demonstrate the value of data cleanup and remediation efforts. Findings of interest can be presented to board members or executives such as current and future sensitive data security plans as well as the current amount and value of sensitive data which is protected or exposed.
The dashboard highlights Key metrics:
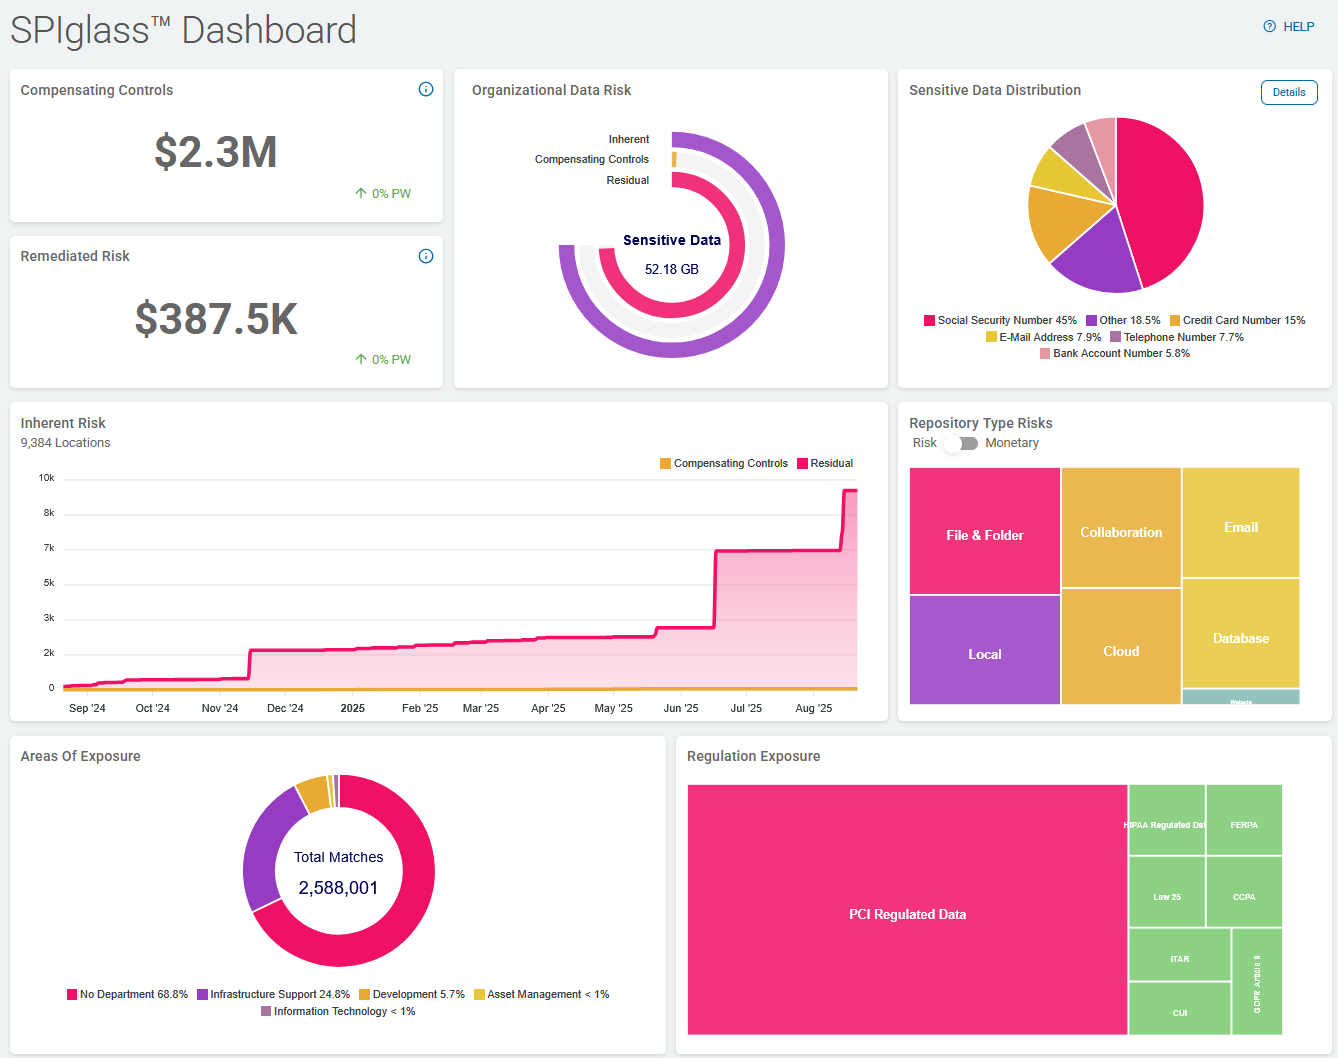
- The Alert Pink color is used to highlight high risk areas, at-risk sensitive data types and data repositories, company departments with the most at-risk data, and the cost of exposed sensitive data. archTIS recommends you focus on the data highlighted in Alert Pink first and foremost.
Each chart depicts a high-level roll up of data that reveals insights into your sensitive, personal, and private data, and where to focus when managing this data as well as the risk it poses to your organization.
Dashboard Refresh Interval
The SPIglass™ dashboard doesn’t refresh in real time—it updates on a scheduled ingestion cycle.
- After each scan, data caches to the "CachedDashboardCharts" table
- The dashboard is updated by Service Task Type 10, which is managed by the
TasksSchedulerservice. - Frequency: This task is typically scheduled to run once per day.
- Timing: In most production environments, it is configured to run during off-peak hours (overnight) to avoid the performance impact of recalculating massive datasets (like the Data Footprint or Inherent Risk charts) during the workday.
However, there is an "Event-Based Refresh (The "Automatic" Trigger)." While it has a daily schedule, certain system events are designed to trigger a refresh of the cache more frequently:
- After a Scan Job: The dashboard data refreshes automatically after a job run completes. However, in some environments, this automatic trigger may fail due to the amount of data, leaving the data "stale" until the next daily scheduled run or manual intervention.
Compensating Controls
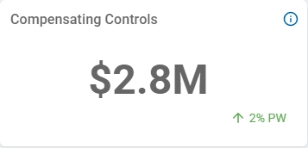
Compensating Controls: Displays the total cost of all sensitive data matches with compensating controls in place.
"Compensating Controls" include any of the following actions applied to sensitive data by Spirion Sensitive Data Platform:
- Restricted Access
- Script Execution
- Quarantine
- Ignore (sensitive data match ignored or sensitive data location ignored)
Note: All costs are taken from the dollar value assigned to each data type in the global data types settings in the Data Asset Inventory. See Working with Data Asset Inventory for more information.
PW Indicator
- The arrow and number percent % shown in the lower right corner of the tile indicates the direction (increase or decrease) and change (in percent %) over the past week (PW)
- In the screenshot above, the total cost of all amount of all sensitive data matches with compensating controls in place has increased 2% in the past week.
Remediated Risk
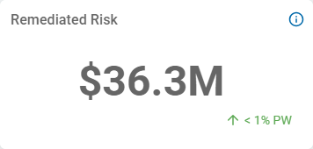
Remediated Risk: Displays the total cost of all sensitive data matches that have been found and subsequently removed using Spirion Sensitive Data Platform via the shred or redact action.
- Data Type:
- Dollar Value (Default $8.00)
- Leverage Playbook Actions:
- Shred
- Redact
Note: All costs are taken from the dollar value assigned to each data type in the global data types settings in the Data Asset Inventory. See How to Get Started with Data Asset Inventory for more information.
PW Indicator
- The arrow and number percent % shown in the lower right corner of the tile indicates the direction (increase or decrease) and change (in percent %) over the past week (PW)
- In the Remediated Risk screenshot above, the total cost of the amount of all sensitive data matches with compensating controls in place has increased less than 1% in the past week.
Organizational Data Risk
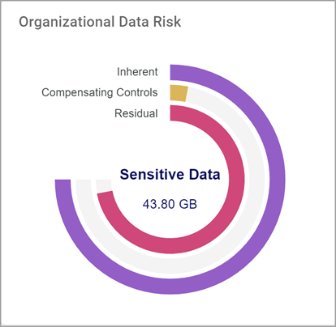
The Organizational Data Risk circle graph is a multi-layered visualization that illustrates the relationship between the total sensitive data discovered and the effectiveness of your security controls.
1. The Central Number: Total Sensitive Data
The number in the center (43.80 GB in the example image above) represents the total volume of files or data objects that have been identified as containing sensitive information. This provides a sense of the "scale" of the data footprint being managed.
2. The Three Rings (Risk Layers)
The graph uses three concentric rings to show how risk is being mitigated:
- Outer Purple Ring (Inherent Risk): This represents the total risk discovered in the environment before any remediation or controls are considered. It is the "starting point" of your exposure.
- The Inherent line is the sum of the Compensating Controls line and the Residual line.
- Middle Amber Segment (Compensating Controls): This represents the portion of the data that has been addressed by a Compensating Control.
- Context: In Spirion, this means a playbook or manual action has been taken to secure the data. The following actions qualify as compensating controls:
- Restrict Access
- Script
- Quarantine
- Ignore
- User Action
- Note: In the example image above, the amber segment is very small, indicating that only a tiny fraction of the total discovered data has been secured with controls.
- Inner Alert Pink Ring (Residual Risk): This represents the data at risk—data that has been discovered but has not yet been remediated or covered by a compensating control.
- Note: In the example image above the Alert Pink ring is nearly as large as the purple ring, confirming that most of the discovered data is still "at risk" and requires action.
- Note: The total of Compensating Controls data and Residual data is equivalent to the total Sensitive data, but is likely not equivalent to the total Scanned data in your environment.
Summary of Use
This graph is a key metric for Risk Management and Compliance. It enables a CISO or Data Privacy Officer to quickly assess the "Remediation Gap."
- The Goal: You want to see the Amber segment grow to fill the middle ring, which would cause the Inner Pink ring to shrink.
- The Takeaway: In the example image above, the organization has discovered a significant amount of data (43.80 GB) but has only applied controls toa very small portion of it. Further analysis and remediation actions are recommended.
Optimum vs. Problematic Organizational Data Risk
Below is an example of low organizational data risk vs. high organizational data risk as displayed by the Organizational Data Risk circle graph.
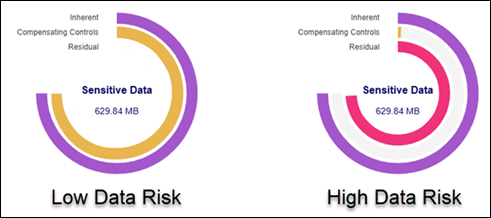
Organizational Data Risk Graphs - Examples of Low versus High Data Risk
- Organizational Data Risk is:
- Low when Compensating Controls, shown in the amber middle line in the semi-circle chart, is much longer than the Residual line, shown in Alert Pink on the inside.
- High (and requires action) when Compensating Controls, shown in the amber middle line in the semi-circle chart, is much shorter than the Residual line, shown in Alert Pink on the inside.
- Recall, the Inherent line (purple line in the graph above) represents all identified sensitive data and is the sum of the Compensating Controls semi-circle line and the Residual semi-circle line.
Sensitive Data Distribution
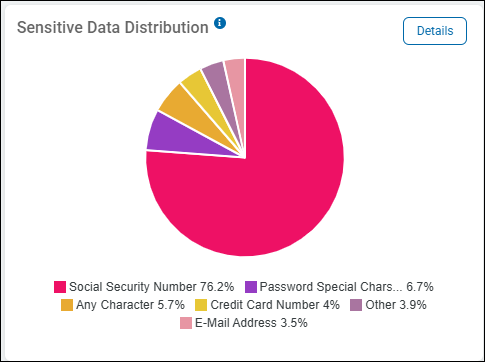
The Sensitive Data Distribution pie chart is a visualization in the Spirion dashboard that breaks down the total volume of discovered sensitive data by its Data Type.
This helps organizations visualize exactly what kind of sensitive information is most prevalent in their environment.
Here is a breakdown of the chart's components:
1. Slices and Percentages: Data Type Volume
Each slice of the pie represents a specific category of sensitive data (either a built-in AnyFind or a Custom Data Type).
- The size of the slice corresponds to the percentage of total matches that data type represents.
The following breakdown uses the example pie chart image above:
- Alert Pink: This is the dominant data type in the environment. In the example pie chart above over three-quarters of all sensitive data discovered consists of Social Security Numbers.
- Purple: Represents matches for passwords or credentials containing special characters in the example above.
- Orange: Any Character in this example. This is likely a custom keyword or RegEx designed to find a specific character pattern.
- Yellow: Credit Card number in this example. Represents discovered PCI data.
- Light Purple: Other data types. This is an aggregation of various other data types that each represent a very small percentage of the total.
- Light Pink: E-mail addresses in this example. This represents discovered email addresses.
2. Colors
- The colors are used to distinguish between the different data types in the legend.
- While colors in other Spirion charts (like the Tree Maps) often represent risk severity, in this specific pie chart, they are primarily used for categorical differentiation.
- Alert Pink color is used to highlight the largest amount of at-risk data (Social Security Numbers in the pie chart example shown here)
3. The Legend
- The legend at the bottom provides the specific name of each data type and the exact percentage of the total "match" count it occupies.
- This enables administrators to see at a glance where their primary data exposure lies.
Summary of Use
This chart is used by Security Analysts and Privacy Officers to:
- Identify the Primary Risk: In this case, the organization has a massive footprint of Social Security Numbers, which should be the primary focus of remediation.
- Tailor Playbooks: Knowing that SSNs are the main issue, the team can prioritize playbooks specifically designed to redact or shred SSN data.
- Monitor Trends: Over time, as remediation occurs, the distribution of these slices shift, enabling the team to target and reduce specific types of risk.
Sensitive Data Distribution Pie Chart Example
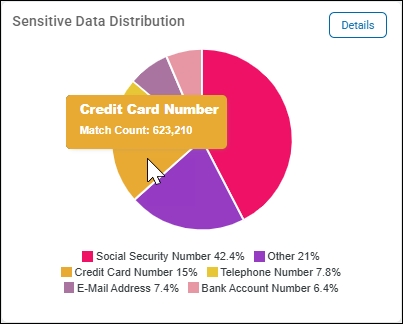
- Mouse over a section in the pie chart to view exact match count for the sensitive data type.
- In the screenshot below, the Match Count of Credit Card Numbers is 623,210.
- This means Sensitive Data scans have discovered 623,210 individual credit card numbers. These numbers are not unique. In this example credit card numbers account for 15% of all sensitive data matches in the scanned environment.
- Social Security numbers account for 42.4% of all sensitive data matches here, and while they represent the most valuable type of sensitive data in the environment, credit card numbers are the 3rd most type of sensitive data and must be monitored and remediated as they represent a sizeable and significant risk of exposed sensitive data.
- Click the Details button in the top right corner of the "Sensitive Data Distribution" tile to view the distribution of sensitive data across all repository types
Sensitive Data Distribution Details
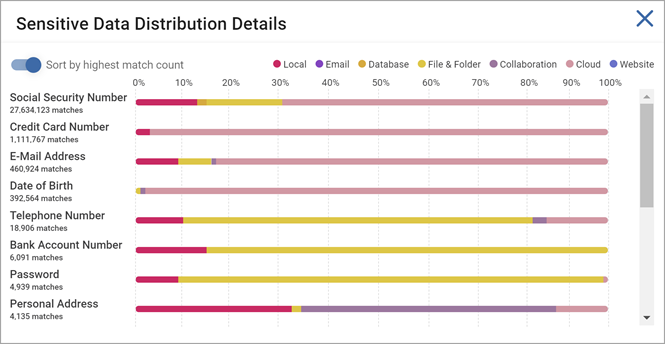
The Sensitive Data Distribution Details view (shown here as a stacked bar chart) provides a granular breakdown of where specific types of sensitive data are located across your different repository types.
While a standard pie chart shows the total volume of data types, this detailed view enables you to see the "storage habits" for each specific sensitive data category.
1. Rows: Data Types
Each row represents a specific category of sensitive data discovered by Spirion (for example, Social Security Number, Credit Card Number, E-Mail Address).
- Match Count: Below each label, you can see the total number of individual matches found for that specific data type (for example, 27,634,123 matches for Social Security Numbers).
2. Stacked Bars: Repository Distribution
The horizontal bar for each data type is color-coded to show the percentage of those matches found in different storage locations.
- Pink (Local): Data found on physical endpoints like laptops and desktops.
- Purple (Email): Data found in Exchange, O365, or Gmail.
- Orange (Database): Data found in structured sources like SQL or Oracle.
- Yellow (File & Folder): Data found on network file shares and on-premise servers (remote file servers or the files and folders on remote workstations, laptops, desktops, etc.).
- Light Purple (Collaboration): Data found in tools like Microsoft Teams or Slack.
- Light Pink (Cloud): Data found in SaaS/IaaS storage like OneDrive, SharePoint, or Google Drive.
- Blue (website): Data found in Website repositories.
3. Key Observations from the Example Image, above
- Social Security Numbers: The majority of SSNs (the large light-pink segment) are stored in the Cloud, with a significant portion also in Databases (orange).
- Credit Card Numbers: These are heavily concentrated on Local endpoints (pink) and File & Folder shares (yellow).
- E-Mail Addresses: These are primarily found in File & Folder shares (yellow) and Email repositories (purple).
- Passwords: Interestingly, the "Password Special Chars" row is 100% Local (pink), suggesting that users are storing password lists or configuration files directly on their workstations.
Summary of Use
This visualization is essential for Remediation Strategy. Instead of just knowing you have 4 million credit card numbers, you now know that a huge portion of them are on a specific location such as Local machines. This tells a Security Admin to prioritize Endpoint Playbooks for Credit Card data, (while focusing Cloud Playbooks on Social Security Numbers).
- Mouse over a sensitive data type bar in the chart to see the breakdown of that data type across all repository types (Local, Email, Database, File & Folder, Collaboration, Cloud, Website).
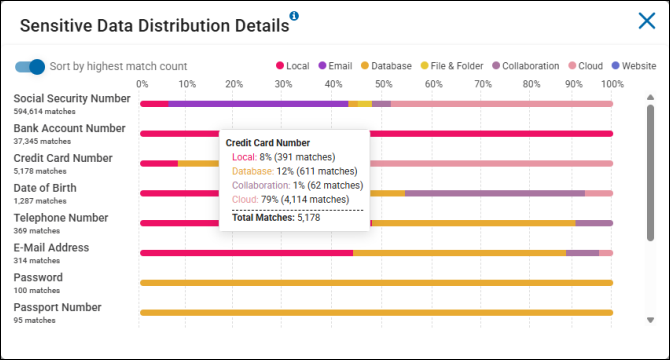
Sensitive Data Distribution Details Example
- In the screenshot above, for example, Credit Card Number data types were matched a total of 5,178 times.
- The breakdown of matches by repository types is as follows:
- 8% of the 5.178 matches were found on Local sources (remote machines, file servers, workstations, etc.)
- 12% of the 5.178 matches were found on Database sources (Oracle, PostgreSQL, mongoDB, Snowflake, etc.)
- 1% of the 5.178 matches were found on Collaboration sources (SharePoint, Bitbucket)
- 79% of the 5.178 matches were found on Cloud sources (Dropbox, OneDrive, Amazon S3, etc.)
- Note: In this example no Credit Card Number matches were found on either Email or File & Folder repository type
Inherent Risk
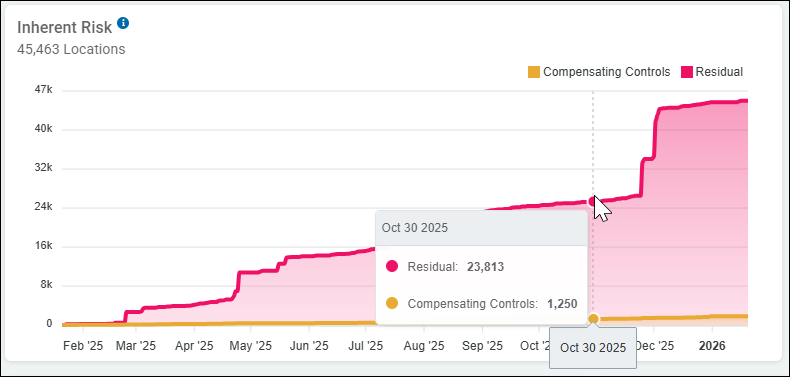
The Inherent Risk tile displays a time-aligned graph which measures the amount of low-risk data (data with Compensating Controls applied) versus high-risk data (Residual data) in your environment over time.
- This graph shows Residual data displayed using a line and shaded area in Alert Pink, on top of data with Compensating Controls applied to it, displayed with a line and shaded area in amber.
- Residual data, also known as ambient data, refers to information that remains on storage devices even after attempts to delete or erase it.
- Compensating Controls are actions applied to sensitive data discovered in your environment to mitigate risks. These actions include:
- Restricted Access: Limiting who can view or interact with the data
- Script Execution: Running scripts to manage or remediate data
- Quarantine: Isolating sensitive data to prevent unauthorized access
- Ignore: Choosing not to act on certain sensitive data matches or sensitive data locations (file, including full path to the file, or email)
- Note: Data which has received the following actions is excluded from the Inherent Risk graph: Classification, User Action, Assign, Notify, MIP Label, Shred, Redact, Take No Action
- Remediated data (data which has been shred or redacted) is filtered out as those items are no longer At Risk
Y Axis
- Indicates the total number of locations with sensitive data
- In the screenshot above, there are a total of 45,463 locations
- A "location" is a file, including path (example: \\server1\folder), or email
- Residual data is shown on top of the data with Compensating Controls applied
- Residual data is represented in Alert Pink
- Data with Compensating Controls is represented in Amber
X Axis
- Indicates the month of the year in which the inherent risk was at the level indicated on the Y axis.
- Mouse over a point in the graph to see details, including the date. See the screenshot above.
Environments with High vs. Low Inherent Data Risk
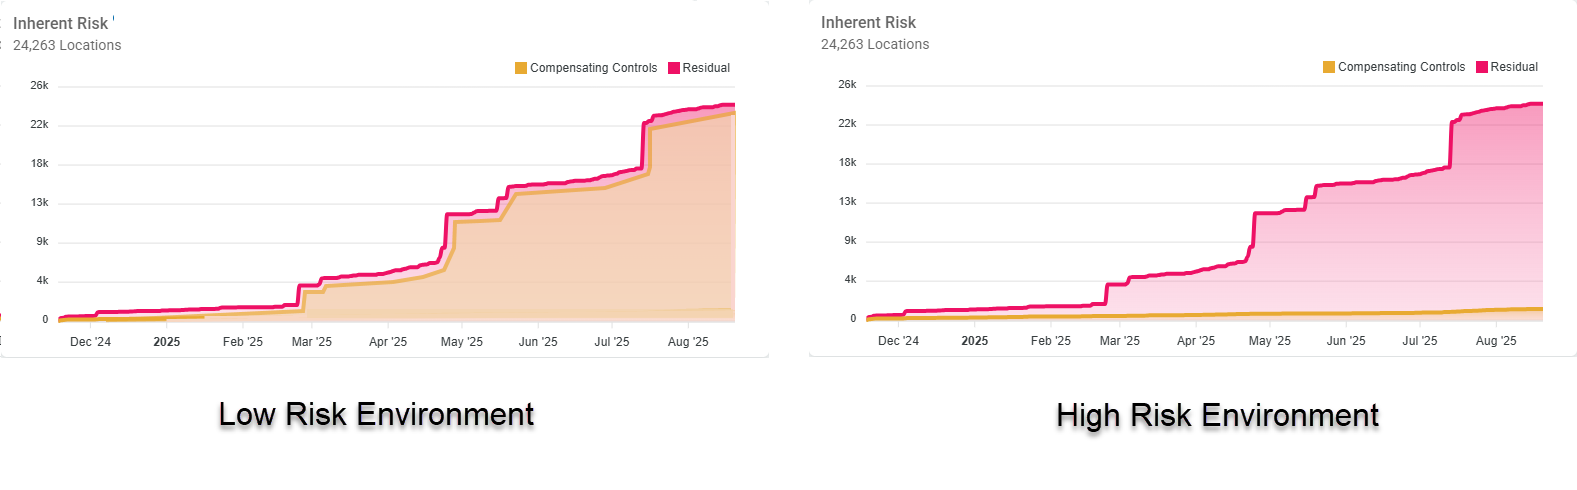
Above is an example of an environment with low Inherent data risk (left) vs. one with high Inherent data risk (right).
- Inherent (data) Risk is categorized as follows:
- Low risk when Compensating Controls, represented by the amber shaded portion, tracks equally with the Residual line, shaded in Alert Pink.
- High risk (and requires action) when Compensating Controls, represented by the amber shaded portion, lags below the Residual line, shaded in Alert Pink.
- The gap between the Compensating Controls line and the Residual data line should be as small as possible at all times as shown in the graph on the left in the image below.
- If your environment resembles the High Risk Environment as shown in the graph on the right in the image below, you must take action to apply compensating controls and lower the risk of your exposed sensitive data as soon as possible!
Repository Type Risks
Note: This feature requires that Data Type Values and Asset Security Measures are entered.
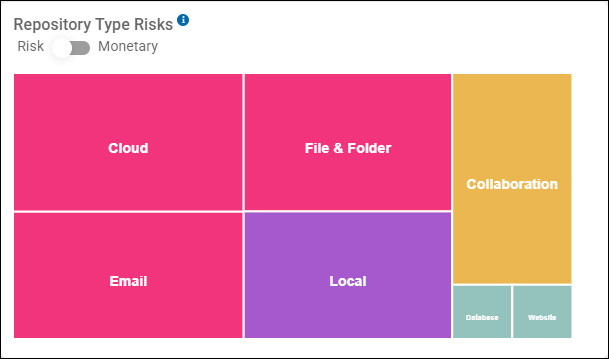
The Repository Type Risks widget, located on the right side of the SPIglass™ Dashboard, is a risk-attribution tool that categorizes sensitive data findings by the type of storage where they were discovered. This helps administrators understand which platforms (for example, cloud, local drives, or databases) pose the greatest risk to the organization.
Based on the provided image, here is a breakdown of the widget:
1. Visual Representation (Treemap)
This widget uses a Treemap layout where the size of each rectangle is proportional to the volume of sensitive data matches found in that repository type.
2. Repository Categories
In the example image the graph identifies several key areas where sensitive data resides:
- File & Folder (Largest Block): This is the dominant risk area, represented by the large pink rectangle. This typically refers to network file shares and unstructured data stored on servers.
- Local (Yellow Block): The second-largest area, representing sensitive data found on individual employee workstations or laptops.
- Secondary Repositories (Teal Blocks): These smaller blocks represent more specialized storage types, including:
- Email: Data found in Exchange, Gmail, or local PST files.
- Collaboration: Data found in platforms like SharePoint, Teams, or Slack.
- Database: Structured data found in SQL, Oracle, or other database environments.
- Cloud: Data residing in cloud storage like Box, Dropbox, OneDrive for business, or Google Drive.
- Website: Sensitive data found on internal or external web pages.
3. Risk vs. Monetary Toggle
At the top of the widget, there is a toggle for Risk and Monetary.
- Risk View (Default): Shows the volume of matches and the inherent danger based on data sensitivity.
Monetary View
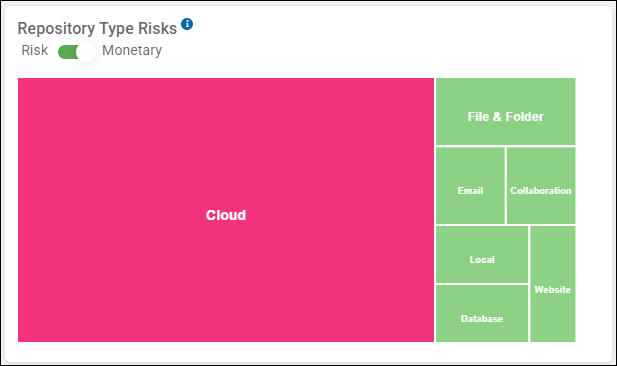
The Repository Type Risks widget with the Monetary toggle enabled translates technical data matches into a financial risk value. This view is specifically designed to help security professionals communicate the "cost of a breach" to executive leadership and board members in a language they understand: dollars and cents.
How the Monetary Value is Calculated
The dollar values shown in this widget are typically based on industry-standard breach costs (such as those provided by the Ponemon Institute or IBM Cost of a Data Breach Report).
- Spirion assigns a "cost per record" to different types of sensitive data (for example, a Social Security Number or Credit Card record has a higher monetary risk value than an Email address).
- The widget multiplies the number of unique sensitive records found in a repository by the assigned cost-per-record to reach the total monetary exposure.
Data Representation (Based on the Dashboard)
When the Monetary toggle is active, the Treemap segments represent the financial liability of each storage type:
- File & Folder: The largest financial risk in this example. Represented by the large pink block, this indicates that the unstructured data on network shares represents the highest potential financial loss for the company.
- Local: Secondary financial risk in this example. The yellow block shows the liability sitting on individual employee workstations.
- Other Repositories: In this example smaller blocks for Email, Collaboration, Database, and Cloud show the relative financial impact of a breach in those specific environments.
How an Administrator Uses Monetary Value
- Justifying Budget: An administrator can use this to say, "We have $10M of financial risk sitting on unprotected local drives; we need $50k for automated remediation tools to eliminate it."
- Prioritizing Insurance: The total monetary value can help the legal and finance teams determine the appropriate level of Cyber Insurance coverage the organization needs.
- Executive Reporting: It simplifies complex security metrics. Instead of reporting "13 million matches," the admin can report "Total Financial Exposure," which is a more impactful metric for non-technical stakeholders.
- Measuring ROI: As remediation playbooks run and data is deleted or encrypted, the administrator can show the "Monetary Risk" decreasing over time, providing a clear Return on Investment (ROI) for the data security tools such as the archTIS Spirion platform.
4. How an Administrator Uses Repository Type Risks Data
- Strategic Prioritization: An administrator seeing this graph would immediately focus their remediation efforts on File & Folder and Local drives, as these contain the vast majority of the organization's exposure.
- Tool Selection: If the risk is concentrated in "Cloud" or "Database," the admin knows they need to deploy specific connectors or agents designed for those environments.
- Policy Adjustment: High risk in "Local" repositories might indicate that employees are downloading sensitive files to their desktops instead of keeping them in secure central storage, signaling a need for better data handling policies or training.
- Resource Allocation: It helps justify the purchase of additional licenses or modules (like the Database or SharePoint connectors) by showing exactly how much risk those areas contribute to the total.
Repository Type Risks Summary
The Repository Type Risks widget provides a "map" of where the organization's sensitive data is hiding.
In this specific example, the organization's primary risk is in unstructured file shares and local endpoints, which should be the first targets for automated remediation playbooks.
Areas of Exposure
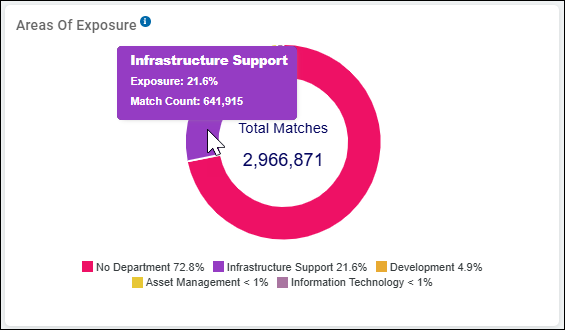
The Areas of Exposure widget, located in the bottom-left of the SPIglass™ Dashboard, is a risk-attribution tool. Its primary purpose is to show who owns the risk by mapping sensitive data matches to specific organizational departments or business units.
Areas of Exposure tile displays the total sensitive data matches in each department as identified in the Data Asset Inventory (DAI).
- Hover over a section to view a total match count of each department
Based on the example image above, here is a detailed breakdown:
1. Data Representation
- Total Matches (2,966,871): This is the central figure, representing the total number of sensitive data findings across all scanned environments.
- Donut Chart Segments: Each color represents a different department or metadata tag assigned to the assets being scanned.
- Percentages: These indicate the proportion of the total risk residing within each department.
2. The "No Department" Category (72.8%)
In this example image, 72.8% of the matches are categorized as "No Department."
- What it means: This indicates that the vast majority of the scanned assets (endpoints, servers, or cloud accounts) have not been assigned to a specific department within the Spirion console.
- The Problem: From a governance perspective, this is a "blind spot." If 72.8% of your risk has no owner, it is difficult to hold business leaders accountable for remediation or to know which department's budget should cover the security controls.
3. Other Categories
The legend shows smaller data blocks attributed to specific administrative departments. These represent smaller, but significant fractions of assets that have been correctly tagged.
- Departmental Distribution:
- No Department (72.8%): The largest segment, indicating that nearly 3/4 of the sensitive data is on assets that have not yet been assigned to a specific department.
- Infrastructure Support (21.6%): The second-largest area of exposure.
- Development (4.9%): A smaller portion of the risk.
- Asset Management (< 1%): Minimal exposure.
- Information Technology (< 1%): Minimal exposure.
4. How an Administrator Uses This Data
- Accountability: This graph transforms technical "matches" into business "ownership." An administrator can use this to show department heads exactly how much sensitive data resides within their purview.
- Identifying "Blind Spots": The high percentage of "No Department" (72.8%) is a critical signal. It tells the administrator that they need to improve their Asset Tagging strategy. Until those assets are tagged to a department, it is difficult to assign remediation tasks to the correct stakeholders.
- Prioritization: By seeing which departments have the highest exposure (like Infrastructure Support at 21.6%), the security team can prioritize remediation playbooks and training for those specific groups.
- Governance Reporting: This is a key visualization for executive leadership to track how risk is distributed across the company and to measure the progress of data reduction initiatives within specific business units.
Areas of Exposure Example Summary
The Areas of Exposure widget turns a massive number of technical matches into organizational accountability. In this example, it serves as a clear signal that the organization needs to improve its asset classification and tagging to effectively manage its nearly 3 million matches.
Regulation Exposure
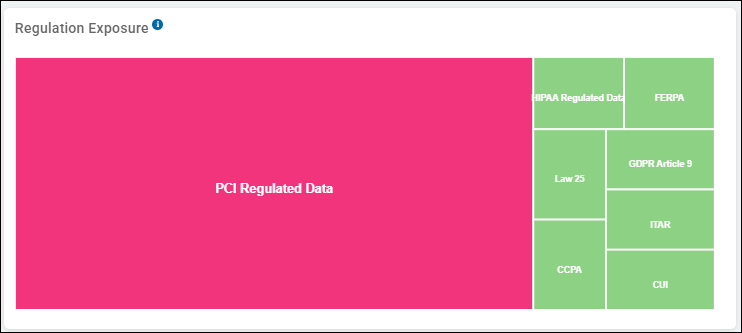
The Regulation Exposure widget is a visualization tool used to map sensitive data findings to specific regulatory frameworks.
It helps organizations understand their compliance risk by showing which laws or standards (like PCI, GDPR, or HIPAA) are most impacted by the discovered data.
Here is a breakdown of the fields and their purpose based on the example image above:
1. Visual Representation (Treemap)
- This widget uses a Treemap layout.
- The size of each rectangle is proportional to the volume of sensitive data matches associated with that specific regulation.
- The dollar value of each regulation is indicated by the size and color of the squares in the chart
- The highest Dollar value is always shown in Alert Pink
- Hover your mouse pointer over a section for more detail.
2. Regulatory Categories
The example image shows several key regulatory blocks:
- PCI Regulated Data (Largest Block): This is the dominant area of exposure, represented by the large pink rectangle. This indicates that the vast majority of the sensitive data found (such as credit card numbers) falls under the Payment Card Industry Data Security Standard.
- Secondary Regulations (Green Blocks): The smaller blocks on the right represent other regulatory risks, including:
- HIPAA Regulated Data: Health-related information.
- FERPA: Student privacy data.
- GDPR Article 9: Sensitive personal data under European law.
- For more about GDPR, see "GDPR Lessons Learned From 200 Companies Who Got It Wrong"
- CCPA: California consumer privacy data.
- Law 25: Quebec's privacy legislation.
- ITAR & CUI: Export control and controlled unclassified information (CUI), which is common in defense/government contracting.
3. Who is this Information Used By?
This map is designed for Executive and Compliance stakeholders. It quickly answers the questions:
- "Which regulation represents our biggest footprint?" (Size)
- "Which regulatory data is currently most at risk?" (Color)
- "What is the potential financial impact of this exposure?" (Cost in Tooltip)
4. How an Administrator Uses This Data
- Compliance Prioritization: An administrator can immediately see that PCI compliance is their biggest risk area. They would likely prioritize remediation playbooks that target credit card data to reduce this exposure first.
- Audit Readiness: This graph provides a high-level "at-a-glance" view for auditors or compliance officers to see the organization's current posture across multiple regulatory requirements.
- Policy Refinement: If an organization is not subject to a specific regulation (for example, FERPA) but data is appearing in that block, it may indicate that the detection policies are too broad or that data is being stored in the wrong locations.
- Risk Communication: It translates technical data matches into "legal language" that executive leadership and legal teams can understand, helping to justify security budgets and resources.
Regulation Exposure Summary
The Regulation Exposure widget turns raw data findings into a compliance roadmap.
- In this specific example, the organization has a significant concentration of PCI-related risk, followed by a diverse mix of privacy and government-related regulatory exposures.
Note: For Regulation Exposure to be accurate, you must set up Assets in your Data Asset Inventory (DAI) and include relevant regulations. See How to Get Started with Data Asset Inventory for more information.