
How to Search an IBM Informix Database
Overview
This article describes how to configure Spirion to scan an IBM Informix database.
You can connect either by using the native Informix client (CLI) or an ODBC driver for Informix.
To scan an IBM Informix database with Spirion, install an Informix CLI (v2.x or later) or an Informix-compatible ODBC driver on the Spirion Agent, then build and test an Informix connection string in the Agent UI.
- Once validated, use that same connection string in an Informix (or ODBC) Database Target (endpoint) in the Spirion Console.
- Ensure the Agent has network access to the Informix server and that the database credentials have sufficient READ access.
Requirements
Before you begin, ensure the Informix client/driver is installed on the Spirion Agent host.
Use one of these approaches:
- Native Informix Client (recommended)
- IBM Informix CLI version 2.x or higher installed on the machine where the Spirion Agent runs.
- The CLI version should be compatible with your Informix server version (for example: 11.7, 12.10, 14.10, 15.x).
- ODBC Driver for Informix (alternative)
- An ODBC driver that supports Informix (for example: IBM Informix ODBC or a third-party driver such as CData for Informix) installed on the Spirion Agent machine.
- A system or user DSN created if you plan to use a DSN-based connection.
Required Network Access
- The Spirion Agent host must be able to reach the Informix server on the appropriate host and port (firewalls, security groups, and network ACLs must allow this traffic).
Database Information from your Informix Administrator
Collect the following details from your DB Administrator:
- Informix server version (for client compatibility)
- Hostname or IP address of the Informix server
- Port (often the service/port defined in sqlhosts)
- Database name
- Server name (the Informix server/instance name, often referred to as SERVERNAME)
- Credentials:
- Username and password for a service account with READ access to the tables/columns you want to scan
- Any locale/environment options required by your Informix environment
- Example: DB_LOCALE, CLIENT_LOCALE (if needed)
Step 1 – Install the Informix Client or ODBC Driver
Use the following steps to install the informix client or ODBC driver:
- Log on to the machine where the Spirion Agentis installed.
- Install the appropriate client/driver:
- Native Informix: Install the IBM Informix Client SDK/CLI (v2.x or later).
- ODBC:
- Install the Informix ODBC driver (IBM or approved third-party).
- Optionally, configure a DSN in the OS ODBC Data Source Administrator (Windows) or the relevant ODBC configuration files (*nix).
- Verify you can connect to the database using a basic test tool provided by the client/driver
- For example, the Informix setnet32/test utilities or an ODBC test tool
Step 2 – Configure and Test the Connection in the Spirion Agent UI
Use the following steps to configure and test the connecction in the Spirion Agent UI:
- On the machine where the Informix client/driver is installed open the Spirion Agent.
- From the scan configuration, select Database as the Target type.
- Once the test connection succeeds, run a small test scan from the Spirion Agent to verify that:
- Tables and columns are accessible
- Sample results are returned as expected

Step 3 – Configure an Informix Target in Spirion Sensitive Data Platform
Use the following steps to configure an Informix target in Spirion Sensitive Data Platform:
- Sign in to the Spirion Console.
- From the left side navigation menu select "Data Asset Inventory > Data Assets and Targets."
- The Data Assets and Targets page opens.
- Click the Actions button in the top right corner.
- Click "Add New Target" from the drop-down menu that appears.
- The Add New Target pop-up window opens.
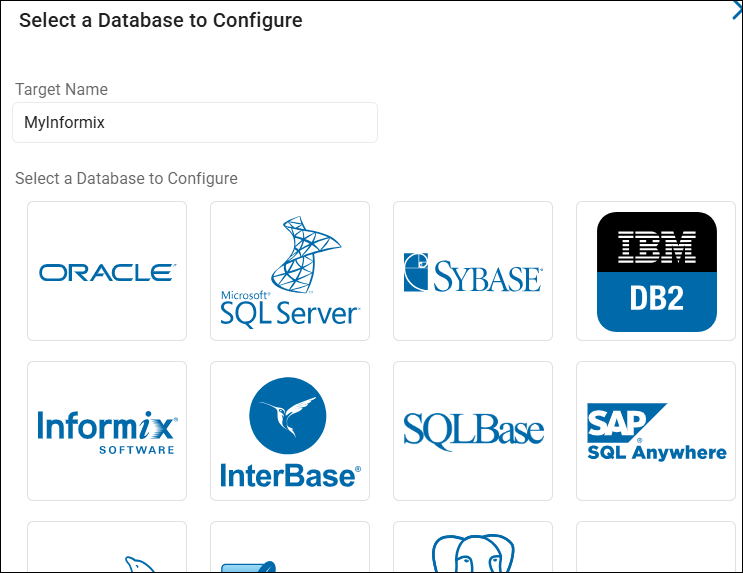
- Name the Target a descriptive name. For example, "Prod_Informix_CustomerDB"
- Click the Database tile.
- Select Informix - or ODBC, if you are using an ODBC driver.
- In the Connection String field enter the connection string. Use the same connection string that you successfully tested in the Spirion Agent.
- Click the Save button at the bottom of the window.
- Create a new scan or edit an existing scan.
- Attach this Target to the appropriate policy/scan definition.
- Ensure the scan is assigned to an Agent that has both:
- The Informix client or ODBC driver installed
- Network access to the Informix server
Sample Connection String Templates
In the sample connection strings below, replace the placeholder values (shown in ALL CAPS) with your actual server and database details.
- The following code blocks are examples.
- Your environment may require additional parameters (such as locale settings, security options).
Native IBM Informix Connection (Typical)
Server=INFORMIX_SERVERNAME;Host=DB_SERVER_HOSTNAME_OR_IP;Service=PORT_NUMBER;Database=DATABASE_NAME;Protocol=onsoctcp;UID=DB_USERNAME;PWD=DB_PASSWORD;Example
Server=ol_informix1210;Host=informix-prod.internal.example.com;Service=1526;Database=customerdb;Protocol=onsoctcp;UID=spirion_svc;PWD=Str0ngP@ssw0rd!;IBM Informix ODBC Driver – DSN-less Connection
Driver={IBM INFORMIX ODBC DRIVER};Server=INFORMIX_SERVERNAME;Host=DB_SERVER_HOSTNAME_OR_IP;Service=PORT_NUMBER;Database=DATABASE_NAME;Protocol=onsoctcp;UID=DB_USERNAME;PWD=DB_PASSWORD;Example😀
Driver={IBM INFORMIX ODBC DRIVER};Server=ol_informix1410;Host=informix-db01.corp.example.com;Service=1530;Database=finance;Protocol=onsoctcp;UID=spirion_reader;PWD=S3cureP@ss;3. ODBC DSN-Based Connection
These examples are used for environments with a configured DSN; for example: InformixProdDSN
SN=InformixProdDSN;UID=DB_USERNAME;PWD=DB_PASSWORD;Example
SN=InformixProdDSN;UID=spirion_svc;PWD=AnotherStr0ngPass;Troubleshooting Tips
Connection Test Fails
If your connection test fails immediately do the following:
- Verify that the Agent host can ping the Informix server and reach theport (telnet HOST PORT or similar).
- Confirm firewall rules and any VPN/network segmentation.
Authentication Errors
If you receive authentication errors, do the following:
- Confirm the username and password used to access the database with your DB administrator.
- Ensure the account has at least READ access to the schemas/tables you intend to scan.
Locale or Encoding Issues
If you experience locale or encoding issues do the following:
- Work with your DBA to identify required DB_LOCALE and CLIENT_LOCALE settings, and add corresponding parameters to theconnection string or client configuration.
Agent Cannot See Informix in the List of Database Types
If your agent cannot see Informix in the list of database types, do the following:
- Confirm the correct Informix client or ODBC driver is installed on the Agent machine.
- Ensure the Agent service has permission to use the installed driver (32-bit vs 64-bit alignment, environment variables, etc.).