
Create New Scan Wizard - Select SQL Advanced Options
The "Select SQL advanced options" page is approximately the 8th screen in the Create New Scan (or Edit Scan) wizard.
This section and the settings in this section applies to SQL (relational) database Targets only.
Note: The settings for other databases may offer slightly different settings than what is described below.
Select SQL advanced options
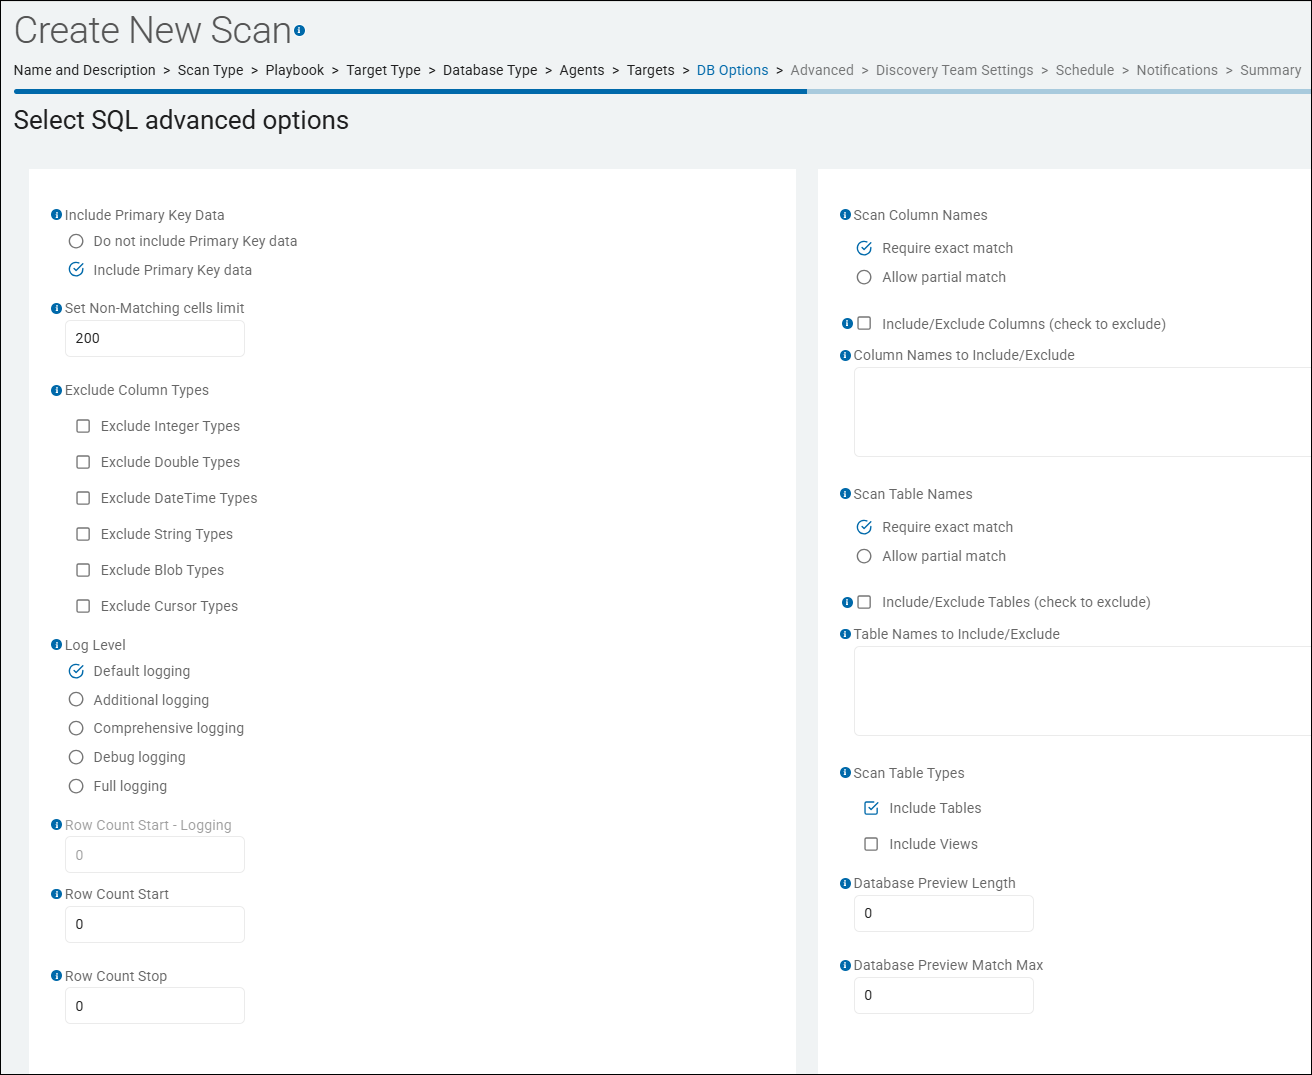
Include Primary Key Data
- Database-specific scan configuration that determines whether the Agent retrieves and reports the primary key values for any row where sensitive data is found.
What it does
- When this setting is Enabled, if the Spirion agent finds a match (e.g., an SSN or Credit Card number) within a database table, it will also capture the value of the column(s) designated as the Primary Key for that specific row.
- The data will be displayed in the Preview window along with the list of columns in which the result was found.
Why it is important
- Remediation and Identification: Without the primary key, a finding in a database only tells you that a table contains sensitive data. With the primary key, you know exactly which record is at risk. This enables database administrators to quickly locate and remediate the specific row (for example, deleting a specific customer record or masking a specific entry).
- Result Uniqueness: It helps the Spirion Sensitive Data Platform console distinguish between different matches within the same table, providing a clearer "Location Preview" for the findings.
- Compliance Requirements: For many compliance workflows (like GDPR "Right to be Forgotten"), you must be able to identify the specific record belonging to an individual.
- Log Markers: If you check the agent's IDF (SystemSearch) logs, you can see if the Agent is correctly identifying the key. Look for the
Is Key: Yesmarker in the column metadata section of the log. - Known Troubleshooting: If this is enabled but the primary keys are not appearing in your results:
- Verify the database user account has permissions to read the
INFORMATION_SCHEMAor equivalent system tables (for example,KEY_COLUMN_USAGE). - Some modern cloud databases (like Snowflake) may require specific authorization to access primary key metadata.
- Verify the database user account has permissions to read the
- Tip: While capturing primary keys is vital for remediation, be aware that if your primary key itself contains sensitive data (which is a poor database design but does happen), that data is sent to the console as part of the match metadata. Ensure your Redaction policies are configured appropriately if you need to mask the primary key values themselves.
Set Non-Matching cells limit
- The setting "Set Non-Matching cells limit" is a performance and optimization configuration used specifically for Database and Structured Data scans (such as SQL, MySQL, Snowflake, or large CSV/Excel files).
- Default Value: The default is often set to a value such as 10,000. This can be adjusted based on your data density.
What it does
- This setting tells the Spirion agent how many consecutive "non-matching" columns it should inspect in a single database row before it decides that the rest of that row is likely "clean" and skips to the next record.
- Mechanism: As the agent reads a database row from left to right (Column 1, Column 2, etc.), it keeps a counter of cells that do not contain a sensitive data match.
- The Trigger: If that counter hits the limit you have set (e.g., 20), the agent stops scanning the current row immediately and jumps to the first column of the next row.
- The Reset: If the agent finds a match before reaching the limit, the counter resets to zero, and the "protection" continues for the rest of that row.
Why it exists in SQL Scans
- Database tables can be extremely "wide" (hundreds of columns). Often, sensitive data (like PII or PHI) is concentrated in specific areas (e.g.,
FirstName,LastName,SSN).
- Optimization for "Sparse" Tables: In many databases, there are dozens of columns for system metadata, timestamps, or boolean flags (True/False) that will never contain a Social Security Number or Credit Card number. This setting prevents the agent from wasting CPU cycles on those irrelevant columns.
- Improving Throughput: Scanning a database with millions of rows is time-consuming. Reducing the number of columns scanned per row can increase the "Rows Per Second" (RPS) processing speed by 2x or 3x.
- Reducing Database Load: By skipping columns, the agent may reduce the amount of data it needs to pull from the database server, lowering the impact on the network and the database's own performance.
Risks and Trade-offs
- The "Hidden Column" Risk: If a database administrator has hidden a sensitive field (like
CommentsorNotes) at the very end of a 500-column table, and the preceding 50 columns are all empty or non-matching, a low "Non-Matching cells limit" will cause Spirion to miss that data. - False Sense of Security: This is a performance optimization, not a thoroughness feature. If your goal is 100% forensic certainty, this limit should be disabled.
Recommendations
- For Known Schema (Standard Apps): If you are scanning a known application (like a CRM or HR system) where you know the PII is at the beginning of the table, a limit of 25 to 50 is a safe and effective way to speed up scans.
- For "Data Lakes" or Unknown Schemas: If you don't know where the sensitive data might be hiding, set this to 0 (Disabled). You want the agent to check every single column.
- When to Use: Only use this in the SQL Advanced Options when you are dealing with tables that have an extremely high column count (100+) and you are observing slow scan speeds.
Summary
The “Set Non-Matching cells limit” in the SQL wizard is a Row-level Efficiency Control. It eneables the agent to "give up" on a database row after a certain amount of non-sensitive data is found, prioritizing scan speed across millions of records over exhaustive column-by-column inspection.
Exclude Column Types
This setting is a database-specific search configuration used to improve performance and prevent the Agent from attempting to scan incompatible or high-overhead data types.
- The "Exclude Column Types" setting is a precision tool for Database Administrators to "trim the fat" from a scan. It ensures the Agent spends time and network bandwidth only on columns likely to contain human-readable sensitive information.
- The Exclude Column Types setting enables you to specify a list of database-native data types (for example,
Integer,Double,DateTime, String, Blob, Cursor) for the Spirion Agent to skip during a scan. - When the Agent enumerates the schema of a table, it checks the data type of each column.
- If a column's type matches an entry in the "Exclude Column Types" list, the Agent does not retrieve or inspect any data from that column, even if the table itself is in scope.
Exclude Integer Types
This option instructs the Spirion Search Agent to skip any database columns defined with numeric integer data types. It tells the Agent to ignore all whole-number columns (like IDs and counts). It is a powerful performance optimization that focuses the scan on text-based columns where PII is typically found.
- Targeted Filtering: It tells the Agent to ignore columns such as
INT,INTEGER,BIGINT,SMALLINT, andTINYINT. - Skips Non-String Data: Since these columns are strictly numeric and do not store formatted strings (like dashes in an SSN or spaces in a name), they are often irrelevant for many sensitive data types.
- Reduces "Noise": It prevents the Agent from scanning primary keys, foreign keys, row counts, and ID numbers that have a high probability of triggering false positives or simply wasting processing time.
Why use it?
- Performance Gains: In large databases, a significant portion of the data is often stored in integer-based ID columns. By skipping these, you can drastically reduce the amount of data the Agent has to pull over the network and process.
- Focus on Text: Most sensitive data (Names, Addresses, SSNs, Credit Card Numbers) is stored in string-based columns (
VARCHAR,NVARCHAR,TEXT). Excluding integers enables the Agent to focus 100% of its resources on the columns most likely to contain actual sensitive information. - False Positive Prevention: Some numeric IDs might accidentally match the mathematical patterns of certain data types (like short account numbers). Excluding integer columns eliminates this risk.
When to be Careful
- Unformatted Numbers: If your organization stores sensitive data as raw numbers without any formatting (for example, storing a 16-digit Credit Card number as a
BIGINTinstead of aVARCHAR), enabling this option causes Spirion to miss that data. - Recommendation: Only enable "Exclude Integer Types" if you are confident that your sensitive data is always stored in text/string fields.
Best Practice
For a standard "Discovery" scan of a new database, enable this option to significantly speed up the scan.
- Most modern applications store PII as strings.
- If you find that you are missing data that you know exists in a numeric format, you can always disable this for a more exhaustive (but slower) follow-up scan.
Exclude Double Types
This option instructs the Spirion Search Agent to skip any database columns defined as floating-point or decimal-based numeric types.
What it does
- Targeted Filtering: It tells the Agent to ignore columns defined as
DOUBLE,FLOAT,REAL,DECIMAL, orNUMERIC. - Skips Mathematical Data: These columns are typically used for scientific calculations, financial balances, coordinates, or percentages—data that almost never contains formatted sensitive strings like SSNs or Names.
- Reduces Data Transfer: By skipping these columns, the Agent avoids pulling large amounts of numeric data over the network, which is particularly beneficial when scanning large financial or analytical databases.
Why use it?
- Performance Optimization: Like excluding integers, excluding "Double" types narrows the search surface. This enables the Agent to complete the scan faster by focusing only on character-based columns (
VARCHAR,TEXT). - Eliminating Irrelevant Data: Sensitive data types (like a Credit Card number or a Social Security Number) are almost never stored in a floating-point format because the precision requirements of those data types would risk "rounding" or truncating the sensitive value.
- False Positive Reduction: Complex floating-point numbers can occasionally trigger false matches for certain algorithmic data types. Excluding these columns removes that possibility.
When to be Careful
- Financial Data: If you are specifically looking for exact financial balances that are considered sensitive in your organization, and those are stored in
DECIMALorMONEYcolumns, excluding these types would prevent Spirion from finding them. However, for standard PII (Names, IDs, etc.), this is not a concern.
Best Practice
- Enable this option for almost all standard PII/PHI discovery scans. There is a near-zero probability that a formatted Social Security Number or a person's name is stored in a
DOUBLEorFLOATcolumn. Excluding these types is a "quick win" for improving database scan performance without sacrificing security coverage.
Summary
The “Exclude Double Types” option tells the Agent to ignore floating-point and decimal columns. It is used to speed up scans by skipping mathematical data that is highly unlikely to contain sensitive strings.
Exclude DateTime Types
This option instructs the Spirion Search Agent to skip any database columns defined as date or time data types.
What it does
- Targeted Filtering: It tells the Agent to ignore columns such as
DATE,TIME,DATETIME,TIMESTAMP,SMALLDATETIME, andDATETIMEOFFSET. - Skips Temporal Data: These columns store chronological information (for example,
2023-10-12 08:30:00). Since these formats do not match the patterns of sensitive data like Social Security Numbers, Credit Card numbers, or Names, they are irrelevant to the search. - Reduces Processing Overhead: It prevents the Agent from performing unnecessary pattern matching on columns that physically cannot contain the sensitive strings you are looking for.
Why use it?
- Significant Performance Gains: Almost every database table contains at least one or two date columns (for example,
CreatedDate,LastModified,DateOfBirth). In a table with millions of rows, skipping these columns significantly reduces the amount of data the Agent has to ingest and analyze. - Zero Probability of Matches: There is no scenario where a person's name or a 16-digit credit card number would be stored in a native
DATETIMEcolumn. Excluding these types is a "safe" optimization that carries no risk of missing standard PII. - Focus on High-Risk Columns: By eliminating temporal data, the Agent can dedicate more CPU and memory to scanning the
VARCHARandTEXTcolumns where sensitive data is actually stored.
Important Distinction
- Date of Birth (DOB): It is important to note that if you are searching for "Date of Birth" as a sensitive data type, Spirion looks for DOBs stored as strings (for example, "January 1st, 1980" in a
VARCHARcolumn). If a DOB is stored in a nativeDATEcolumn, it is already structured data that the database manages; excludingDateTimetypes will skip these columns, but since they don't contain "unstructured" sensitive strings, they are typically not the target of a Spirion pattern search anyway.
Best Practice
- Always enable this option
- Excluding
DateTimetypes is one of the most standard and safest performance optimizations for database scanning. - It provides a clear speed boost with virtually no risk of missing the sensitive data types Spirion is designed to find.
Summary
The “Exclude DateTime Types” option tells the Agent to ignore all date and time columns. It is a highly recommended performance optimization that removes irrelevant temporal data from the scan scope.
Exclude String Types
This option instructs the Spirion Search Agent to skip any database columns defined as character or text-based data types.
What it does
- Targeted Filtering: It tells the Spirion Agent to ignore columns such as
VARCHAR,NVARCHAR,CHAR,NCHAR,TEXT,NTEXT, andSTRING. - Skips the Primary Search Surface: Since almost all sensitive data (Names, Addresses, SSNs, Credit Card Numbers, Emails) is stored in string-based columns, enabling this option effectively tells the Agent not to scan the most likely locations for sensitive information.
Why would you use it? (Warning)
In a standard discovery scan, you would almost never enable this option, as it would cause the agent to miss nearly all PII/PHI. However, there are two specific technical scenarios where it might be used:
- Targeted Numeric Discovery: If you are only looking for sensitive data that you know is stored in numeric formats (for example, account numbers stored as
BIGINT) and you want to skip the massive text columns to save time. - Metadata-Only Audits: If you are performing a scan where you only care about binary objects (
BLOBs) or specific custom types and want to exclude the standard "noise" of the text columns.
The Risk
- Missing Data: Enabling "Exclude String Types" is the most common reason for a database scan returning zero results when you know sensitive data exists. If this is checked, Spirion will skip the very columns it is designed to search.
Best Practice
- Leave this option UNCHECKED. For 99% of Spirion use cases, the "String Types" are exactly what you want to scan. If you are trying to improve performance, use the other exclusion options (Integer, Double, DateTime) instead, as those skip irrelevant data while keeping your high-risk text columns in scope.
Summary
The “Exclude String Types” option tells the Agent to ignore all text and character columns. While it exists for specialized technical audits, enabling it in a standard scan will likely cause you to miss almost all sensitive data.
Exclude Blob Types
This option instructs the Spirion Search Agent to skip any database columns defined as Binary Large Objects (BLOBs) or large character objects.
What it does
- Targeted Filtering: It tells the Agent to ignore columns such as
BLOB,CLOB,LONGBLOB,IMAGE,VARBINARY(MAX), andBYTEA. - Skips "Heavy" Data: These columns are used to store large amounts of data, such as images, compiled code, encrypted blocks, or entire documents (PDFs, Word docs) embedded directly into a database row.
- Prevents Performance Bottlenecks: BLOB columns can be massive (megabytes or even gigabytes per cell). Pulling this data over the network and attempting to perform pattern matching on it is extremely resource-intensive and can cause scans to appear "stuck" or time out.
Why use it?
- Dramatic Performance Improvement: This is often the single most impactful setting for speeding up a database scan. Because BLOBs are so large, skipping them reduces the total volume of data the Agent has to process by a significant margin.
- Avoiding Unstructured Binary Data: If you are looking for standard PII (like a name or SSN in a table), it is highly unlikely to be found inside a binary image or a compiled executable stored in a BLOB.
- Stability: Scanning very large BLOBs can sometimes lead to memory exhaustion on the Agent machine. Excluding them ensures the scan remains stable and completes within a reasonable timeframe.
When to be Careful
- Embedded Documents: If your database stores actual files (like scanned applications, resumes, or medical records) inside BLOB columns, enabling this option prevents Spirion Agents from finding any sensitive data inside those files.
- Recommendation: If you need to scan these columns, it is better to do so in a separate, highly targeted scan rather than a broad discovery scan.
Best Practice
- Enable "Exclude Blob Types" for your initial discovery scans
- Most sensitive data is found in standard text columns (
VARCHAR). - By excluding BLOBs, you ensure your scan is fast and stable.
- Only disable this exclusion if you have a specific requirement to audit "files-in-database" or if you suspect sensitive data is being hidden in binary fields.
Summary
The “Exclude Blob Types” option tells the Agent to ignore large binary and object columns. It is a critical performance and stability setting that prevents the Agent from getting bogged down by massive, non-text data blocks.
Exclude Cursor Types
This option instructs the Spirion Search Agent to skip database columns that are defined as cursors or references to result sets.
What it does
- Targeted Filtering: It tells the Agent to ignore columns with types like
CURSOR(common in Oracle and SQL Server) orREF CURSOR. - Skips Pointer Data: A Cursor type is not a standard data field; it is essentially a "pointer" or a reference to a set of rows produced by a query. It does not contain actual sensitive strings (like names or SSNs) in a searchable format.
- Prevents Execution Errors: Attempting to "read" a cursor column as if it were a text field can often result in database driver errors or unexpected behavior, as the database expects a cursor to be "fetched" or "iterated" rather than scanned for patterns.
Why use it?
- Stability and Accuracy: Excluding cursors ensures the Agent doesn't attempt to process non-data objects. This prevents the scan from failing due to "Invalid Data Type" errors returned by the database driver.
- Performance: While cursor columns are relatively rare in standard data tables, skipping them avoids the overhead of the Agent trying to negotiate how to read a complex reference type.
- Zero Probability of Matches: Because a cursor is a functional database object (a reference to a query) rather than a storage container for a string, it will never contain a match for a Social Security Number, Credit Card, or any other Spirion data type.
Best Practice
- Always enable this option. There is no benefit to scanning cursor types, and including them only increases the risk of a scan error. Like
DateTimeandIntegerexclusions, this is a "safe" setting that helps ensure the stability of your database discovery process.
Summary
The “Exclude Cursor Types” option tells the Agent to ignore database pointers and result-set references. It is used to prevent scan errors and ensure the Agent only focuses on columns that contain actual, searchable data.
Log Level
This setting controls the amount of technical detail the Spirion Search Agent records in its local logs during the database scan.
This setting is primarily used for troubleshooting and performance monitoring.
- When searching databases via the Database Search Module, it is desirable to see detailed logging information during configuration or troubleshooting.
- The logging specified via this setting applies only when logging has been enabled and only specific log entries are displayed if their corresponding log type has been enabled
- For example: Info, Error
Why use it?
- Troubleshooting Connection Issues: If a database scan is failing to connect or "opening tables" intermittently, setting the Log Level to Debug logging reveals the specific error message being returned by the database driver (for example, MySQL, Oracle, or MSSQL).
- Performance Tuning: If a scan is taking longer than expected, higher log levels can help identify which specific table or column is causing the bottleneck.
- Audit Requirements: Some organizations require more detailed logging of "what was searched" for compliance purposes.
Best Practices
- Production Use: Always keep the Log Level at Default. High log levels (especially Level 4) can generate very large log files quickly, which can consume disk space on the Agent machine and slightly impact scan performance.
- Troubleshooting: Only increase the Log Level to Debug logging when actively investigating a failure. Once the issue is resolved, remember to change the setting back to Default in the Scan Policy.
- Log Location: On Windows Agents, these logs are typically found in the following directory:
C:\ProgramData\Identity Finder\Logs\.
Summary
The “Log Level” setting adjusts the verbosity of the Agent's logs. Use Default for standard operations and Debug logging only when you need deep technical details to troubleshoot a scan failure.
Row Count Start - Logging (Entry Field)
- The setting "Row Count Start - Logging" is a specialized database scan configuration that determines if the agent should record its starting row position in the local log files.
- While the setting "Row Count Start" is the functional setting that tells the Agent where to begin scanning a table, the "- Logging" suffix specifically controls the auditability of that action.
- To enable this logging, specify the row number at which to start.
- This setting should only be set after consulting with the Support Team.
What it does
- When this setting is Enabled, the Spirion Agent writes a specific entry into its local IDF (SystemSearch) log every time it begins scanning a database table using a custom start row.
Why it exists
- Verification of Resume: If a scan was interrupted and you use "Row Count Start" to pick up where you left off, this logging setting provides the "proof" in the logs that the agent actually started at the requested row (for example, row 500,001) rather than starting from the beginning (row 1).
- Troubleshooting Offsets: If you are not seeing expected results, a support engineer can look at the logs to see if a "Row Count Start" was applied. Without this logging enabled, the Agent might skip millions of rows silently, making it difficult to diagnose why data is "missing" from the console.
- Audit Compliance: For highly regulated environments (like PCI or HIPAA), auditors may require logs that show exactly which segments of a database were scanned and which were bypassed via offsets.
How it works in the workflow
- Configuration: You set a "Row Count Start" value (for example, 10,000) and enable the accompanying "Logging" toggle in the Database Policy settings.
- Execution: The Agent connects to the database and issues a
SELECTquery with the appropriate offset/fetch logic. - The Log Entry: The Agent writes a line to the
SystemSearch.log(orIDF.log) similar to the following:Database Scan: Table [Users] starting at row [10000] as specified by policy. - Error Handling: If the "Row Count Start" exceeds the total rows in the table, the log specifically notes that the table was skipped because the start point was invalid.
Tips and Recommendations
- Log Bloat: If you are scanning thousands of small tables, enabling this will add a line for every single table. However, for large enterprise databases, the "log bloat" is negligible compared to the troubleshooting value it provides.
- Performance: This setting has zero impact on the speed of the scan itself; it only affects the generation of text in the agent's local log file.
- Bitness: In v13.6, ensure your database drivers (ODBC/OLEDB) are correctly configured (32-bit vs 64-bit), as a driver mismatch can sometimes cause the "Row Count Start" logic to fail before it even reaches the logging stage.
Summary
- The "Row Count Start - Logging" setting is a diagnostic switch. It ensures that any "skipping" of database rows is explicitly documented in the agent's logs for troubleshooting and audit purposes.
Row Count Start
- The row number at which to start detailed column logging:
- To enable this logging, specify the row number at which to start.
- This setting should only be set after consulting with the Support Team.
- This setting is a database-specific search configuration that enables you to define the exact row number where the Spirion Agent should begin its inspection of a table.
- When you provide a numeric value for "Row Count Start" (for example,
500,000), the Agent skips all preceding rows and begin performing sensitive data discovery starting specifically at that row.
Why it exists (Common Use Cases)
- Resuming Interrupted Scans: If a scan of a massive database table (e.g., 10 million rows) is interrupted due to a network timeout or a maintenance window, you can use this setting to restart the scan at the last successfully processed row rather than starting from Row 1.
- Sampling Large Tables: If you want to "spot check" the middle or end of a very large historical table without scanning the entire thing, you can set a high starting row.
- Staged Discovery: In environments with strict performance windows, an admin might scan rows 1–1,000,000 on Monday and then use "Row Count Start" to scan 1,000,001–2,000,000 on Tuesday.
How it works technically
- The Query: The Spirion agent uses its internal database libraries (SQLAPI++) to modify the SQL query sent to the Target (for example, SQL Server, Oracle, MySQL). It uses the appropriate syntax for that database engine (like
OFFSET,FETCH NEXT, orROWNUM) to skip the specified number of records. - Validation: If the value you enter is greater than the total number of rows in the table, the Agent logs an informational message and skip that table entirely (since there is no data to scan at that offset).
- Default Value: The default is 1 (or 0 depending on the UI version), which means the scan starts at the very first record.
Tips and Recommendations
- Performance Impact: Skipping rows in a database still requires the database engine to "count" or "seek" to that position. For extremely large tables without a clustered index, the database itself may take some time to reach the starting row before it begins sending data to the Spirion agent.
- Ordering: Because databases do not always return rows in a guaranteed order unless specified, this setting is most effective on tables with a Primary Key or a consistent physical sort order.
- Accompanied Logging: As mentioned in related settings, it is a "Best Practice" to enable "Row Count Start - Logging" alongside this setting so that your agent logs clearly document that a skip was intentional.
Summary
- The "Row Count Start" is an efficiency and recovery tool. it enables an administrator to control exactly where a database search begins, saving time and resources during large-scale discovery projects.
Row Count Stop
- This setting is a database-specific search configuration that defines the maximum number of rows the agent will scan within a single table before moving on to the next target.
- What it does
- When you provide a numeric value for "Row Count Stop" (for example,
10,000), the Spirion Agent ceases its inspection of that specific database table once it has processed that many rows. It then gracefully closes the connection to that table and proceed to the next table in the scan list.
- When you provide a numeric value for "Row Count Stop" (for example,
- Why it exists (Common Use Cases)
- Representative Sampling: If you have a massive table with 50 million rows, you likely don't need to scan the entire thing to determine if it contains sensitive data.
- Setting a "Row Count Stop" of 10,000 or 100,000 provides a statistically significant sample size to identify risk without the overhead of a full table scan.
- Performance & Window Management: In production environments where scanning can impact database performance (CPU/IO), capping the row count ensures that the scan completes within a specific time window.
- Proof of Concept (PoC) / Testing: When initially configuring new search expressions or verifying database connectivity, administrators often set a low "Row Count Stop" (for example, 500) to get immediate results without waiting for a long-running query to finish.
- How it works
- The SQL Query: The Spirion Agent uses its internal database libraries to append a "Limit" or "Top" clause to the SQL query sent to the database engine (e.g.,
SELECT TOP 10000...in SQL Server orLIMIT 10000in MySQL/Postgres). - Efficiency: Because the limit is handled at the database level, the database engine stops sending data to the Agent once the limit is reached, saving both network bandwidth and Agent-side CPU cycles.
- Default Value: If set to 0 or left blank, the agent will perform a full scan of the table (no stop limit).
- The SQL Query: The Spirion Agent uses its internal database libraries to append a "Limit" or "Top" clause to the SQL query sent to the database engine (e.g.,
- Tips and Recommendations
- Interaction with "Row Count Start": If you set "Row Count Start" to 1,000 and "Row Count Stop" to 5,000, the Agent scans a total of 4,000 rows (starting at 1,000 and stopping at 5,000).
- Data Distribution Risk: If sensitive data is only located at the very end of a table (for example, in recent records added after row 1,000,000), a low "Row Count Stop" value will miss those findings. This is why "Stop" is typically used for discovery and sampling, while a full scan is used for compliance auditing.
- Bitness and Drivers: As with all database settings in v13.6, ensure your ODBC/OLEDB drivers match the bitness of the agent to ensure these row-limiting commands are passed correctly to the database engine.
- Summary
- The "Row Count Stop" is a throttling and sampling tool.
- It enables administrators to cap the scope of a database scan to save time and resources while still gaining visibility into the types of sensitive data residing in large tables.
Scan Column Names
Require Exact Match
This controls how strictly the Spirion Search Agent matches your specified column names against the actual columns in the target database.
What it does
- Strict Filtering: When enabled, the Agent scans only those columns whose names exactly match the names provided in the field "Column Names to Include/Exclude."
- Case Sensitivity & Whitespace: It typically enforces exact character-for-character matching, including case sensitivity (depending on the database's collation) and the absence of any extra spaces or wildcards.
- Excluding Partial Matches: If this is disabled, the Agent might perform a "contains" or "partial" match. For example, if you specify
SSNas a column to scan: - With "Exact Match" enabled: It will only scan a column named
SSN. It will skipEmployee_SSNorSSN_Last4. - With "Allow Part Match" enabled: It will scan any column that has
SSNanywhere in the name (e.g.,SSN_Number,Old_SSN,SSN_Table).
- With "Exact Match" enabled: It will only scan a column named
Why use it?
- Precision Scanning: Use this when you know the exact schema and want to limit the scan to specific, high-risk columns to save time and database resources.
- Avoiding False Positives: It prevents the Agent from scanning columns that might have similar names but contain irrelevant data (e.g., scanning a column named
Class_IDbecause you were looking forID). - Performance: By strictly limiting the number of columns the agent has to inspect, you reduce the overall workload on both the agent and the database.
Best Practice
- For Targeted Audits: Enable "Require Exact Match" if you are performing a "re-scan" or a specific audit of known sensitive columns (for example, "I only want to scan the
CreditCardcolumn in theTransactionstable"). - For Discovery Scans: If you are trying to find any column that might contain sensitive data, it is often better to enable "Allow partial match" so that you capture variations like
User_SSN,SSN_Num, andSocialSecurityNumber.
Allow Partial Match
This setting enables the Spirion Search Agent to identify and scan columns that contain your specified keywords anywhere within their name.
This is the functional opposite of the "Require Exact Match" setting.
What it does
- Keyword-Based Discovery: If you provide a keyword like
SSN, the agent will automatically include any column that has those characters in its name. - Example: A search for
SSNwould matchEmployee_SSN,SSN_Last4,SSN_Number, andOldSSN.
- Example: A search for
- Broadening the Scope: It is designed to catch sensitive data that might be stored in columns with inconsistent naming conventions across different tables or databases.
- Automated Inclusion: You do not need to know the exact schema of every table; you only need to know the common "signals" or abbreviations used for sensitive data in your organization.
Why use it?
- Discovery Scans: This is highly effective for "Blind Discovery" where you suspect sensitive data exists but aren't sure exactly how the DBA named the columns (for example,
CC,CreditCard,CardNum). - Catching Shadow Data: It helps find "shadow" columns where developers might have copied sensitive data into temporary or backup columns (for example,
SSN_BackuporTEMP_CC). - Efficiency in Configuration: Instead of manually listing 50 different variations of a column name, you can simply list 5 core keywords and enable "Allow Partial Match."
Best Practice
- Watch for "Noisy" Keywords: Be careful with very short keywords. For example, if you use
IDwith partial matching enabled, you might accidentally scanEmail_ID,Project_ID,Class_ID, andRow_ID, most of which likely do not contain sensitive data. This can significantly increase scan time. - Combine with NMCL: When using partial matching, ensure your Non-Matching Cell Limit (NMCL) is configured (typically the default is 200). This ensures that if the Agent starts scanning a "noisy" partial match (like
Project_ID) and finds no sensitive data in the first 200 rows, it stops scanning that column and moves on.
Summary
- The “Require Exact Match” option ensures the Agent scans only columns that perfectly match your provided list. Enable it for precision and performance; disable it for broad discovery of variations in column naming.
- The “Allow Partial Match” option instructs the Agent to scan any column where your keyword is part of the name. It is a powerful tool for broad discovery but should be used with specific, high-signal keywords to avoid scanning irrelevant data.
Include/Exclude Columns (check to exclude)
- This setting is a targeting filter that enables you to define exactly which parts of a database table the scan should inspect.
What it does
- This setting provides a granular way to "white-list" or "black-list" specific data columns during a one-time scan or a scheduled scan job.
- The UI Behavior: You are presented with a tree view of the database schema. When you drill down into a table, you see a list of its columns.
- The "Check to Exclude" Logic: By default, all columns are included (unchecked). If you check the box next to a column, the Agent is instructed to skip that column entirely while scanning the rest of the table.
Why it exists in the Wizard
- While you can set exclusions in a persistent Policy, having this in the Create New Scan wizard is designed for flexibility during:
- Ad-hoc Discovery: When you want to quickly scan a database but know that certain columns (like
SystemIDorLogData) are irrelevant or will cause false positives. - Targeted Remediation: If you only need to verify that sensitive data has been cleared from specific columns (for example,
NotesandComments), you can exclude all other columns to make the scan finish much faster. - Speed/Performance: In very large databases, scanning every column is time-consuming.
- This wizard option enables you to limit the scope to only the "high-risk" columns (for example,
Email,Address,TaxID).
- This wizard option enables you to limit the scope to only the "high-risk" columns (for example,
- Ad-hoc Discovery: When you want to quickly scan a database but know that certain columns (like
Technical Impact
- When the scan runs, the Spirion Agent dynamically constructs the SQL query based on these selections. Instead of running a broad
SELECT *, it requests only the specific columns that were not checked for exclusion. - This reduces the following:
- Network Latency: Less data is transferred from the database to the agent.
- Agent CPU Usage: The agent doesn't have to perform regex matching on "junk" columns.
- Database Load: The database engine processes a smaller result set.
How to use it in the Wizard
- Launch the Create New Scan wizard.
- Progress to the Select SQL advanced options page (this appears after you've selected a Database Target).
- Locate the Include/Exclude Columns section.
- Expand the database and table names.
- Check the boxes for any columns you want the agent to ignore.
- Finish the wizard and execute the scan.
Tips
- If you find yourself excluding the same columns repeatedly in the wizard, it is highly recommended to move those exclusions into a Policy Target instead. This ensures that any future scans using that policy automatically inherit the same optimized scope without you having to manually check boxes in the wizard every time.
Column Names to Include/Exclude (Entry Field)
- This setting is a "bulk filtering" tool.
- Unlike the checkbox list (which is used for manual selection), this entry field enables you to define rules using wildcards or comma-separated lists to automatically include or exclude columns across multiple tables at once.
- Enter your terms separated by commas.
- Example (to clean up noise):
*ID, *Time, *Date, Status, Active, Type, Version
- Example (to clean up noise):
- (Optional) Use the asterisk (
*) as a wildcard for prefix or suffix matching.
What it does
- This field enables you to enter specific column names or patterns.
- Based on the toggle usually associated with it (Include vs. Exclude), the scan performs one of the following actions:
- Only look at columns that match your text
- Skip every column that matches your text
- Exclude (Common): If you enter
*ID, *Date, System*the scan automatically skips any column ending in "ID" or "Date" and any column starting with "System" across the entire database target. - Include: If you enter
Comments, Notes, Descriptionthe scan ignores every other column in the database and searches only those three specific fields.
Why it exists (The Problem it Solves)
- Manual checkboxes are great for a single table, but if you are scanning a database with 5,000 tables, you cannot manually click every "CreatedDate" or "RowID" column.
- Mass Exclusion of "Noise": Most databases have thousands of columns like
LastModifiedByorPK_IDthat will never contain an SSN or Credit Card number. Using this field lets you "black-list" those patterns globally for that scan. - Targeted Broad Search: If you suspect that users are "hiding" sensitive data in
Commentsfields across the entire ERP system, you can set the field to Include*Comment*to scan only those relevant fields everywhere. - Speed/Scale: Pattern-based filtering is the fastest way to reduce the "Surface Area" of a massive database scan, significantly reducing the time it takes for the scan to complete.
How it works technically
- When the Spirion agent "crawls" the database schema before starting the search, it compares every column name it finds against this text string.
- If a column matches an Exclude pattern, it is dropped from the internal "To-Scan" list.
- The resulting SQL
SELECTstatements sent to the database will only contain the "vetted" column names.
Recommendations
- Case Sensitivity: In version 13.6, these filters are generally case-insensitive for most SQL targets (SQL Server, Oracle), but it is a best practice to match the case used in your database.
- The "Double Filter" Caution: If you use both the Entry Field (patterns) and the Checkboxes (manual), the settings are cumulative. A column will be excluded if it matches either the pattern in the text box or the manual checkbox.
- Best Practice Patterns: To significantly speed up any SQL scan, always exclude common non-sensitive patterns like
*GUID,*Timestamp,*Color, and*Identity.
Summary
- The “Column Names to Include/Exclude” entry field is a pattern-based scope filter. It is the most efficient way to manage large-scale database discovery by allowing you to include or exclude groups of columns across the entire database using simple text rules.
Scan Table Names
- This setting is a metadata-inspection feature.
What it does
- By default, Spirion database scans look for sensitive data (like SSNs or Credit Card numbers) inside the rows and columns of a database table. When you enable “Scan Table Names,” the Agent also inspects the names of the tables themselves against your selected data elements.
- Example: If you are searching for "Employee" or "Social Security" as keywords, and you have a table literally named
HR_Employee_SSN_Table, enabling this setting causes that table name to be flagged as a match, even before the Agent looks at the data inside it.
Why it exists
- Contextual Discovery: Sometimes the name of a table or schema is a dead giveaway that sensitive information is present. Identifying these can help auditors find "hidden" or "legacy" data repositories that might otherwise be overlooked.
- Naming Convention Compliance: Organizations often have policies against including sensitive terms in database object names. This setting helps identify and remediate those naming convention violations.
- Comprehensive Auditing: It ensures that "Sensitive Data" isn't just hidden in plain sight within the metadata of the database.
How it works in the workflow
- Enumeration: During the discovery phase, the Agent queries the database's information schema to get a list of all tables.
- Metadata Match: The Agent compares the strings of those table names against the search patterns (RegEx, Keywords, etc.) defined in your Playbook.
- Reporting: If a table name matches, it is reported as a "Match" in the console, typically with a location type indicating it was a metadata/table name hit.
Available Options
- Require exact match
- When this option is selected, the Agent reports a match only if the entire name of the table or column is identical to the data type or keyword you are searching for.
- How it works: It performs a literal string comparison where
SearchTerm == MetadataName. - Example: If you are searching for the keyword "SSN":
- Match: A table named exactly
SSNwill be flagged. - No Match: A table named
Employee_SSNorSSN_Tablewill be ignored.
- Match: A table named exactly
- Use Case: This is best used when you have very specific, high-confidence naming conventions and you want to avoid "False Positives" from tables that might contain your search term as part of a longer, unrelated word.
- Allow partial match
- When this option is selected, the Agent reports a match if your search term is found anywhere within the table or column name.
- How it works: It performs a "contains" search where
MetadataName.Contains(SearchTerm). - Example: If you are searching for the keyword "SSN":
- Match: A table named
SSNwill be flagged. - Match: A table named
Employee_SSNwill be flagged. - Match: A table named
SSN_2024_Archivewill be flagged.
- Match: A table named
- Use Case: This is the recommended setting for most discovery tasks. Because database administrators often use prefixes, suffixes, or underscores (for example,
tbl_,_bak,_old), a partial match ensures you don't miss sensitive tables just because they have a decorative or functional name.
Summary Comparison
Setting | Logic | Result for "CC" on table |
|---|---|---|
Require Exact Match |
| No Match |
Allow Partial Match |
| Match |
Recommendations
- When to Enable: Use this when you are performing a "Broad Discovery" or an initial audit of a new database environment. It is very useful for finding rogue tables created by developers (for example,
temp_user_passwords_table). - When to Disable: If you are running frequent, high-speed production scans and you only care about the content of the data, you can leave this off to slightly reduce the processing overhead.
- Note on False Positives: Be aware that if your search patterns are very broad (for example, searching for the word "Data"), this setting might trigger a match on almost every table in your database, creating "noise" in your results.
- Pro-Tip: If you are unsure of the naming conventions used by the DBA, always choose Allow Partial Match. It is much safer to review a few extra metadata hits than to miss an entire sensitive table because it was named
UserSSNsinstead ofSSN.
Summary
- The “Scan Table Names” setting expands the search boundary to include the database schema metadata.
- It ensures that if the name of a table contains sensitive keywords or patterns, it is flagged alongside the actual data rows.
Scan Table Types
- This setting enables you to define which specific categories of database objects the Agent should treat as "tables" during a scan.
- Options include one or both:
- Include Tables
- Include Views
Include Tables
Instructs the Spirion Search Agent to scan standard, persistent data tables (often referred to as Base Tables) within the target database.
What it does
- Targeting Base Data: When this option is enabled, the Agent enumerates and inspects the actual physical tables where your structured data is stored.
- Excluding Views (if desired): This setting allows you to distinguish between scanning the "source" tables versus scanning Views (virtual tables). In many database environments, you may want to scan only the base tables to avoid redundant results if multiple views reference the same underlying sensitive data.
- Default Behavior: In most standard SQL scans, "Include Tables" is enabled by default because the primary goal is to find sensitive data (PII, PHI, PCI) residing in the database's core storage.
How it works with other settings
- If you check only "Include Tables," the Agent skips all virtual views.
- If you check both, the Agent scans everything.
- Performance Impact: Scanning only "Tables" is often more efficient than scanning both Tables and Views, as it prevents the agent from processing the same data multiple times (since a View is just a stored query pointing back to the Tables).
Best Practice
- If your database has a complex architecture with many overlapping Views, enable only "Include Tables" for your initial discovery scan. This ensures you find the "source of truth" for the sensitive data without inflating your match counts with duplicate findings from virtual views.
Include Views
In the Select SQL advanced options page of the Create New Scan Wizard, the “Include Views” option for the “Scan Table Types” setting instructs the Spirion Search Agent to scan virtual tables (Views) in addition to (or instead of) physical base tables.
What it does
- Scanning Virtual Data: A View is a stored SQL query that presents data from one or more underlying tables as if it were a single table. Enabling this option tells Spirion to treat these virtual objects as searchable targets.
- Capturing Aggregated Data: Views often combine data from multiple tables or apply transformations. Scanning them can be useful if sensitive data is only "exposed" or readable through a specific business view, even if the underlying raw tables are obfuscated or partitioned.
- Comprehensive Coverage: It ensures that no logical representation of data is missed, which is sometimes required for specific compliance audits that demand a search of all "accessible" data structures.
Important Considerations (Warnings)
- Redundant Results (Double Counting): This is the most common issue. If a View pulls data from "Table A," and you are scanning both "Include Tables" and "Include Views," Spirion will find and report the same sensitive data twice—once in the physical table and once in the virtual view.
- Performance Impact: Scanning views can be significantly slower than scanning base tables. Because a View is a query, the database must execute that query and generate the results in real-time for the Spirion agent to inspect. If the View is complex (involving many joins or calculations), it can put a heavy load on the database server.
- Circular References: In rare cases, poorly designed database schemas with nested views can lead to extremely long scan times or timeouts as the agent attempts to enumerate complex virtual structures.
Best Practice
- Default Recommendation: Generally, leave "Include Views" unchecked for your standard discovery scans. It is more efficient and accurate to scan the "Base Tables" (the source of truth) to identify where the data actually lives.
- When to Enable: Only enable "Include Views" if you have a specific requirement to verify what a specific user role can see (e.g., "Can the 'Reporting_View' see unmasked SSNs?") or if the underlying base tables are inaccessible but the views are open for scanning.
Summary
- The “Include Tables” option tells Spirion to scan the physical base tables of the database. It is used to ensure the agent inspects the primary storage locations of structured data while providing the flexibility to exclude virtual views.
- The “Include Views” option tells Spirion to scan virtual, query-based tables. While it provides broader coverage, it often leads to duplicate results and increased database load. Use it only when you specifically need to audit the data as it is presented through a virtual layer.
Database Preview Length (Entry Field)
- This is a data-sampling configuration used to verify connectivity and schema access before a full scan begins.
- To provide context to matches when viewing results on the console, version 10.7 and later of the endpoints and console can send the specified number of characters from before and after the match itself.
- By default, no characters preceding or following database matches will be sent to the console.
- Maximum allowed number of characters is 1000.
- A value of 0 disables sending preview information to the console.
- Valid values:
- 0: Disabled (no preview data will be sent to the console)
- 1-1000: The specified number of characters from before and after the database match will be sent to the console
- >1000: Invalid (the value will be set back to the default of 20)
What it does
- When you are configuring a new SQL scan, this setting determines how many rows of data the console will pull from the target database to show you a "Live Preview" within the wizard interface.
- Low Value (for example, 10): The console quickly pulls 10 rows from a table to show you the column names and sample data.
- High Value (for example, 1,000): The console pulls a much larger sample, which takes longer but gives you a better sense of the data distribution.
Why it exists
- Validation: It enables a scan administrator to confirm that the Service Account used for the scan has the correct
SELECTpermissions on the tables. - If the preview fails, the scan fails.
- Schema Awareness: By seeing a preview of the data, the admin can decide if certain columns should be excluded (for example, columns that clearly contain binary blobs or encrypted strings) before launching a massive scan.
- Data Type Verification: It helps you see if the data in a column matches what you expect (for example, confirming a "Phone" column actually contains phone numbers and not just random IDs).
How it works in the workflow
- Wizard Configuration: You enter the SQL Server credentials and click the "Connect" button.
- Request: The console sends a query to the database:
SELECT TOP [Preview Length] * FROM [Table Name]. - Display: The results are rendered in a grid within the Create New Scan wizard.
- No Impact on Final Scan: This setting does not limit the actual scan. When the scan eventually runs on the Agent, the Agent scans all rows unless a separate "Limit Rows" setting is applied.
Recommendations
- Default Setting: Usually set to 10 or 100. This is typically plenty for validation.
- Performance Warning: Do not set this to an extremely high number (like 10,000) if you are scanning over a slow network. The "Preview" happens in real-time while you are building the scan; a large preview length will make the wizard feel "laggy" or unresponsive.
- Troubleshooting: If the "Preview" window shows an error like
Permission Denied, you know immediately that your Service Account needs more rights in SQL, saving you from running a failed scan later.
Summary
- The “Database Preview Length” is a diagnostic tool. It controls the "sample size" used during the scan setup process to prove that the console can talk to the database and see the data correctly before the actual job is scheduled.
Database Preview Match Max (Entry Field)
- The setting “Database Preview Match Max” is a safety and performance limit specifically for the Preview function within the SQL scan wizard.
- While “Database Preview Length” controls the total number of rows pulled from the database for the preview, “Database Preview Match Max” controls how many of those rows the console attempts to search for sensitive data in real-time.
What it does
- When you are setting up a scan and click to preview a table, the console doesn't just show you the raw data; it actually runs your selected Playbook/Search Criteria against that sample data to show you what "Matches" would look like.
- The Limit: If you set this to 10, the console stops searching for sensitive data once it finds 10 matches in your preview sample.
- The Result: In the preview grid, you see a highlight or a "Match" indicator on those first 10 items, but any sensitive data beyond that 10th match in the sample is not highlighted.
Why it exists
- Wizard Responsiveness: Running complex Regular Expressions (RegEx) against thousands of rows of data is CPU-intensive. Since the Preview happens "on-the-fly" while an administrator is waiting, this setting prevents the browser or the console from freezing if a table happens to contain millions of matches.
- Immediate Feedback: You don't need to see 5,000 matches to know your search criteria is working. Seeing the first 5 or 10 is usually enough to confirm that your "Social Security Number" pattern is correctly identifying data in the "SSN" column.
- Reducing Database Load: It tells the Ingress/Console service to stop processing the preview request as soon as a "proof of concept" is found, saving resources for actual production scans.
How it works in the workflow
- Request: You click "Preview" on a table in the SQL wizard.
- Sampling: The console pulls rows based on the Database Preview Length.
- Analysis: The console starts scanning those rows for the patterns in your Playbook.
- The Stop: As soon as the number of matches hits the Database Preview Match Max, the scanning stops.
- Display: The preview window pops up, showing you the sample rows with the first few matches highlighted.
Recommendations
- Recommended Value: Keep this low (10 to 50). There is rarely a reason to see more than 10 matches in a preview.
- Troubleshooting: If you see "No Matches Found" in the preview, but you are certain the table has sensitive data, check if your Database Preview Length is too short. If the first 100 rows of a table are empty or contain "Test" data, and your Preview Length is only 100, you won't hit any matches regardless of what your "Match Max" is set to.
- Distinction: Remember, this setting only affects the Preview window. It has zero effect on the actual scheduled scan, which will find every single match in the database regardless of this limit.
Summary
- The “Database Preview Match Max” is a UI performance cap.
- It ensures the Scan Wizard remains fast by limiting how much work the console does to show you "sample" matches during the setup process.