
How to Create a Policy Using the Wizard - Additional Settings - Advanced Options
After completing the Additional Settings page of the Create Policy wizard, click Advanced Options to input more detailed options.
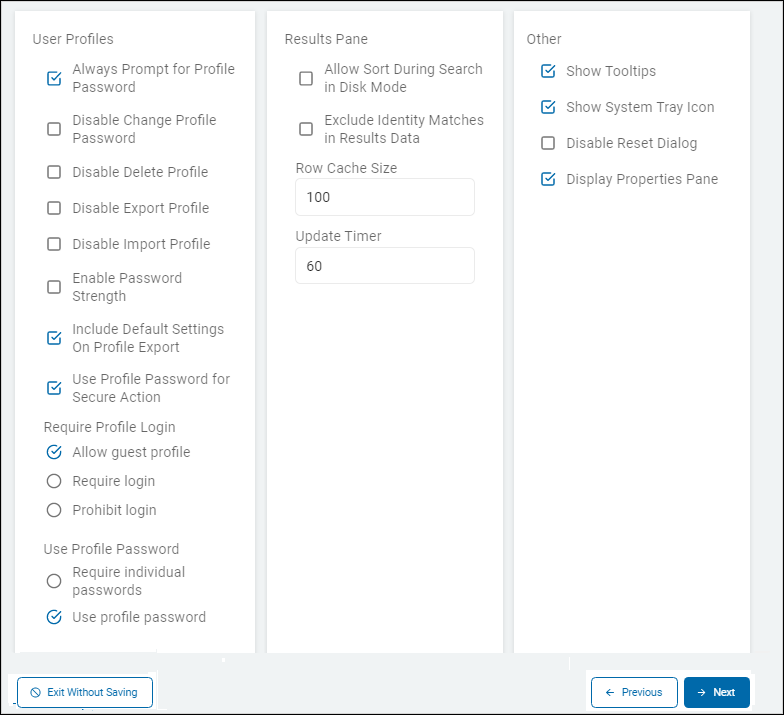
These settings control user profiles, such as when and how to prompt for the user's profile password, change their profile password, user's ability to delete their profile, password strength requirements, the encrypt action, requirements to login to the Agent, options for on-disk mode, and how to exclude matches when collecting results. Menu bevavior is configured here, such as enabling tooltips, the system tray icon, the ability to reset confirmation dialogs, and whether to display the properties pane in the Windows endpoint user interface.
Use the info below to help you fill in the settings on the page Additional Settings - Advanced Options.
When you are done:
- Click Next to proceed, Previous to return to the previous screen, or Exit Without Saving
to discard. - To complete the Local Reporting Options page, see "Create a New Policy Using the Add Policy Wizard - Local Reporting Options."
User Profiles
The "User Profiles” section on the Additional Settings - Advanced Options page is a collection of governance controls that define how the local agent manages user-specific data, authentication, and permissions on the endpoint.
A "User Profile" in Spirion acts as a secure container for an individual user's search history, ignored matches, and encrypted password vaults. This section enables administrators to restrict or enforce how those profiles are used.
The User Profile is the "security boundary" on the Agent side. Without these settings, a user could theoretically delete their own audit logs, use a weak password to "secure" their credit card matches, or skip authentication entirely and lose their work. This section gives the central administrator power over those local behaviors.
Always Prompt for Profile Password
This setting is a security and workflow control that dictates how the local Agent application handles user authentication at startup.
What it does
This setting forces the Spirion Agent to display a login prompt every time the application is launched in interactive mode, regardless of whether the user previously signed in or chose to skip the login during a previous session.
- Enabled (checked): Every time the Agent starts, the user is presented with the Profile Password prompt. They must either provide their profile password or explicitly choose to skip to the Guest Profile for that specific session.
- Disabled (unchecked): The Agent relies on the last known state. If a user previously skipped the login and used the Guest Profile, they may not be re-prompted to sign in on subsequent runs, potentially keeping them in a restricted "Guest" state where they cannot access their saved results, password vault, or individual settings.
Why it exists
- Encouraging Authenticated Use: Many organizations want users to use their Profiles (which store search history, password vaults, and ignored locations) rather than the Guest Profile (which is temporary and doesn't save most data). This setting ensures they are always given the opportunity to log in.
- Shared Workstation Security: On a shared machine, forcing a prompt ensures that a second user doesn't accidentally start a scan or view information within the previous user's profile if the first user forgot to sign out or close the app properly.
- Governance Consistency: It ensures a uniform user experience across the enterprise, where the starting point for every manual scan is a deliberate authentication choice.
How it works in the architecture
- Policy Enforcement: This setting is part of the Agent's Initialization Configuration.
- Interactive vs. Non-Interactive: This setting applies only to the Interactive Mode (when a user opens the app manually). When Spirion runs as a Scheduled Task or background job from the console, this setting is ignored because there is no user present to respond to a prompt.
- Guest Profile Interaction: Even if this is enabled, a user can still click "Skip" to use a Guest Profile unless you have also enabled the "Require Profile Log in" setting, which removes the skip option entirely.
Recommendations
- Best Practice: Set this to Enabled if your users frequently use "Secure" actions (Encryption) or the "Password Vault," as those features require a Profile Password to function.
- Stealth/Silent Deployments: If your goal is for users to never see the Spirion UI at all, this setting is irrelevant as the Agent will be running silently via console tasks.
Summary
The “Always Prompt for Profile Password” setting is a Login Visibility Toggle. It ensures that the first thing a user sees when opening Spirion is the option to authenticate, preventing them from accidentally performing work in a Guest Profile where their progress and secure keys would not be saved.
Disable Change Profile Password
The setting “Disable Change Profile Password” on the page Additional Settings - Advanced Options is a restriction control that locks the password a user has set for their local Spirion profile.
What it does
When this setting is enabled, it prevents the end user from accessing the functionality to change the password associated with their Spirion Profile.
- Enabled (checked): The "Change Password" button or menu option within the local Spirion Agent application is greyed out, hidden, or otherwise disabled. The user is forced to continue using their current profile password.
- Disabled (unchecked): Default. The end user can go into their profile settings at any time and update their profile password to a new value.
Why it exists
This setting is primarily used for Supportability and Access Continuity:
- Preventing User Lockouts: If users are allowed to change their passwords frequently, they are more likely to forget them. Since Spirion uses the Profile Password to encrypt the local Password Vault and the results history, a forgotten password can lead to a permanent loss of access to that local data.
- Corporate Password Standards: If an organization has provided a standard or "initial" password to users, they may want to prevent the user from changing it to something that doesn't meet corporate security requirements (or something the IT department cannot assist with resetting).
- Governance Stability: In environments where multiple users might share a local profile (though not recommended), locking the password ensures that one user cannot lock out the others by changing the credentials.
How it works in the architecture
- Policy Key: This setting corresponds to the internal configuration key
Profile\DisableChangePassword. - Enforcement: Once the agent pulls the policy from the Spirion Sensitive Data Platform console, it immediately applies the UI restriction to the desktop application.
- Scope: This only affects the Profile Password (the local application password). It has no effect on the user's Active Directory password or their password for logging into the SDP web console.
Important Technical Context
A Spirion "Profile" is a local .idp file (or similar encrypted store) that contains the user's local settings, ignored locations, and password vault. If a user forgets their password and this setting is enabled, they cannot change it. They would effectively have to delete the profile (if not also disabled) and start a new one, losing their saved metadata and vaults in the process.
Recommendations
- Low-Touch Environments: We generally recommend Enabling this if you have provided a pre-set password to your users and want to minimize help desk tickets related to forgotten local passwords.
- High-Security/Privacy Environments: You may want to keep this Disabled so that users can regularly update their passwords, especially if they are using the Spirion Password Vault to store sensitive credentials.
Summary
The “Disable Change Profile Password” setting is a UI Restriction. It prevents the end user from modifying the password they use to unlock their local Spirion application, ensuring that the access credentials for local results and vaults remain consistent.
Disable Delete Profile
The setting “Disable Delete Profile” on the page Additional Settings - Advanced Options is a data integrity control that prevents end users from removing their local Spirion identity and history from their machine.
What it does
This setting removes or deactivates the functionality within the Spirion Agent that allows a user to delete their local Profile.
- Enabled (checked): The "Delete Profile" button or menu option in the local Spirion Agent is removed or greyed out. The user is unable to wipe the local storage associated with their Spirion identity.
- Disabled (unchecked): Default. The user can select their profile at the login screen and choose to delete it, which permanently removes all local data associated with that profile.
Why it exists
This is a critical setting for Compliance and Audit Persistence:
- Preserving the Audit Trail: A Spirion Profile contains the "Search History" (a record of every file scanned and its result) and the "Ignore List" (items the user has marked as non-sensitive). If a user could delete their profile, they could effectively wipe the record of their previous scans and remediation actions, creating a gap in the organization's compliance reporting.
- Maintaining "Ignored" Data: If a user spends hours marking certain files as "false positives" (Ignore), deleting the profile would lose all that work. Disabling the delete function prevents accidental or intentional loss of these "Allowed" states.
- Protecting Secure Keys: Since the Profile also contains the Password Vault, deleting the profile would destroy the only keys available to open any files the user has encrypted with Spirion.
How it works in the architecture
- Policy Key: This setting maps to the internal configuration key
Profile\DisableDelete. - Local Storage: Spirion profiles are typically stored as encrypted
.idpfiles in the user's local application data folder. While an advanced user could technically find and delete the file manually via Windows Explorer, this setting disables the official way to do so through the software UI, which is sufficient for the vast majority of enterprise users.
Recommendations
- Standard Practice: For almost all enterprise deployments, it is highly recommended to Enable (set to "Prevent delete") this setting. This ensures that the search history and audit data remain on the endpoint for the duration of the machine's lifecycle, providing a consistent record for security officers and auditors.
- When to leave Disabled: You might only leave this disabled in a "BYOD" (Bring Your Own Device) or highly transient environment where users are expected to clean up all corporate data from their personal machines when a project ends.
Summary
The “Disable Delete Profile” setting is an Audit Protection tool. It ensures that the record of what was found, what was ignored, and what was encrypted remains intact on the endpoint by preventing the user from wiping their local Spirion profile.
Disable Export Profile
The setting “Disable Export Profile” on the page Additional Settings - Advanced Options is a security control designed to prevent the unauthorized movement of Spirion metadata and encrypted keys.
What it does
This setting removes the ability for a user to create a portable copy of their Spirion Profile (typically an .idp file) from the local Agent.
- Enabled (checked): The "Export" button or menu option in the Spirion Agent interface is removed or greyed out. The user cannot save a copy of their profile to a thumb drive, network share, or another folder.
- Disabled (unchecked): Default. The user can export their profile, which packages their search history, ignore lists, and password vaults into a single file that can be moved to another computer.
Why it exists
This setting is used for Data Loss Prevention (DLP) and Key Governance:
- Protecting the Password Vault: A Spirion Profile often contains the user’s Password Vault, which holds the keys to every file they have encrypted (remediated) using Spirion. If a user can export their profile, they are essentially taking the "master keys" for their sensitive data with them. Disabling export ensures these keys stay on the authorized corporate endpoint.
- Preventing Policy Evasion: A user’s "Ignore List" (items marked as non-sensitive) is stored in the profile. By preventing export, the organization ensures that a user cannot "share" an ignore list with another user to help them bypass or hide matches on a different machine.
- Maintaining Device Affinity: In a strictly managed environment, security teams want to ensure that the audit trail (Search History) remains on the specific device where the scan occurred. Disabling export prevents users from moving that history to a personal or unauthorized device.
How it works in the architecture
- Policy Key: This setting corresponds to the configuration key
Profile\DisableExport. - Enforcement: Once the policy is applied, the UI element for exporting is immediately deactivated.
- Interaction with Import: This is often used in conjunction with "Disable Import Profile" to ensure that the profile lifecycle is completely managed on the local machine and cannot be influenced by external files.
Recommendation
- Standard Corporate Security: We recommend Enabling ("Disable") this setting for most users. This keeps sensitive remediation keys and audit metadata locked to the managed endpoint.
- Exception Case: You might leave this Disabled for a "Migration" group—for example, if a user is getting a new laptop and needs to move their Password Vault and Ignore List from their old machine to the new one. Once the migration is complete, the setting should be re-enabled.
Summary
The “Disable Export Profile” setting is a Key and Metadata Lockdown tool. It prevents users from taking their Spirion "Identity"—including their audit history and encryption keys—off the local machine, thereby reducing the risk of unauthorized access to sensitive remediation data.
Disable Import Profile
The setting “Disable Import Profile” on the page Additional Settings - Advanced Options is a security control that prevents users from loading external Spirion profile data into their local Agent.
What it does
This setting deactivates the functionality that enables a user to browse for and load a previously saved Spirion Profile file (typically an .idp file) into the application.
- Enabled (checked): The "Import" button or menu option in the Spirion Agent interface is removed or greyed out. The user is prevented from adding an external profile to their local instance.
- Disabled (unchecked): Default. The user can import a profile file from a thumb drive, network share, or local folder. This allows them to bring in a search history, ignore list, and password vault from a different machine or a previous backup.
Why it exists
This setting is used to ensure Governance Integrity and Audit Accuracy:
- Preventing Audit Gaps: If a user could import a "clean" profile (one with a pre-populated ignore list for common sensitive files), they might be able to hide sensitive data on their current machine by "ignoring" matches before the scan even runs. Disabling import ensures the local agent starts with a fresh, untampered profile.
- Maintaining Device Trust: Security teams often want to ensure that the work performed on a specific endpoint (remediation, classification, ignoring) originated on that endpoint. Blocking imports prevents users from bringing in external, unverified metadata or keys from unauthorized devices.
- Standardizing User Experience: By disabling import, administrators ensure that every user begins their Spirion experience in a standardized state, rather than carrying over potentially outdated or non-compliant settings from a years-old profile file.
How it works in the architecture
- Policy Key: This setting maps to the configuration key
Profile\DisableImport. - Profile Identity: A Spirion profile is the user's "digital identity" within the agent. By disabling the import, you force the user to either use the Guest Profile or create a New Profile specifically for that machine.
- Interaction with Export: This is almost always used in tandem with "Disable Export Profile." Together, they "sandbox" the profile, ensuring it can neither leave the machine nor be replaced by an external one.
Recommendations
- High-Governance Environments: We recommend Enabling ("Disable") this setting to prevent users from bypassing discovery rules using imported "Ignore" lists.
- Migration Scenarios: The only common reason to leave this Disabled is during a "Hardware Refresh" project where a user is moving to a new computer and needs to bring their Password Vault (containing keys to their encrypted files) over to the new device.
Summary
The “Disable Import Profile” setting is an Integrity Lockdown tool. It ensures that the local Spirion agent is not influenced by external data files, requiring the user to generate their audit trail and remediation history directly on the managed endpoint.
Enable Password Strength
*This setting applies to Windows and Mac but not Linux.
The setting “Enable Password Strength” located on the page Additional Settings - Advanced Options is a security control that enforces complexity requirements for the passwords users create to protect their local Spirion profiles.
The setting can be configured in Spirion Sensitive Data Platform, Sensitive Data Manager or within the Spirion Agent GUI but this setting is applicable only when logging into the Agent GUI (user interface).
What it does
This setting defines the minimum requirements a password must meet before the Spirion Agent permits a user to create or change their profile password.
- Enabled (checked): Requires a minimum of 6 characters and must contain at least one letter and at least one non-letter (number or symbol).
- Non-letters:
- Digits (0-9)
- Symbols/Special characters (e.g., !, @, #, $)
- Disabled (unchecked): No specific complexity rules are enforced by the software UI, although the system may still require a minimum number of characters.
Why it exists
The Profile Password is the key to a user's local "Security Boundary." This setting exists for the following:
- Protecting the Password Vault: Since Spirion uses the Profile Password to encrypt the user's Password Vault (where keys for all shredded or encrypted files are kept), a weak password makes it easier for an unauthorized person to gain access to those keys.
- Securing Audit Data: The profile stores the "Search History" and "Ignore List." Enforcing a strong password ensures that only the authorized user can access or modify these compliance-critical records.
- Meeting Regulatory Standards: Many data privacy regulations (like HIPAA or PCI-DSS) require that any software managing or protecting sensitive data must have enforced password complexity.
How it works in the architecture
- Policy Key: This setting corresponds to the internal configuration key
Profile\PasswordStrength. - Enforcement Point: The enforcement happens at the UI level on the endpoint. When a user tries to create a new profile or change their password, the "OK" button remains disabled, and a warning message appears until the password meets the configured "Strong" or "Stronger" criteria.
- Scope: This only applies to the password for the Spirion Profile. It does not change the complexity requirements for Active Directory, Windows login, or the Spirion Sensitive Data Platform web console.
Recommendations
- Recommended Setting: We strongly recommend enabling this setting.
- The Risk of Weakness: Because the profile password is often the only thing protecting the master keys to an employee's encrypted sensitive files, a "123456" password would represent a significant security vulnerability in your data protection strategy.
Summary
The “Enable Password Strength” setting is a Credential Hardening tool. It ensures that the local container holding a user's audit history and encryption keys is protected by a password that is resistant to simple guessing or brute-force attacks.
Include Default Settings on Profile Export
*This setting applies to Windows and Mac, but not Linux
The setting “Include Default Settings on Profile Export” on the page Additional Settings - Advanced Options is a configuration management toggle used when a user creates a portable copy of their Spirion profile.
What it does
This setting determines whether the exported profile file (the .idp file) should contain only the user-specific changes (like their personal Ignore List and Password Vault) or if it should also bundle the "Default Settings" currently applied to the Agent.
- Enabled (checked): When a user exports their profile, the resulting file includes all current configuration settings (for example, search locations, data types, and performance settings) alongside their personal metadata.
- Disabled (unchecked): Default. The exported profile contains only the "delta"—the items unique to that user, such as their Search History, Password Vault, and any locations they have personally marked as "Ignore."
Why it exists
This setting is primarily used for Supportability and System Migration:
- Troubleshooting: If a support engineer needs to see exactly how a specific user's Agent is behaving, they might ask the user to export their profile with "Default Settings" included. This gives the engineer a complete "snapshot" of the environment as the user sees it.
- Configuration Persistence: When moving a user to a new machine that might not yet be connected to the Spirion Sensitive Data Platform Console, including the default settings ensures the Agent starts with the correct search parameters (the "Gold Image" settings) the moment the profile is imported.
- Offline Use: For machines that spend significant time disconnected from the network, including the default settings ensures that the "last known good" policy remains with the user's profile even if the local settings cache is cleared.
How it works in the architecture
- Export Trigger: This setting only takes effect when the user manually triggers an Export Profile action from the Spirion Agent UI.
- File Size: Enabling this slightly increases the size of the
.idpfile because it is adding more XML configuration data to the package. - Interaction with Console Policies: When a profile containing "Default Settings" is imported into a new agent, those settings will stay in effect until that new agent successfully checks in with the SDP Console and receives a fresh policy update, which will then override the imported defaults.
Recommendations
- Standard Enterprise Use: We recommend keeping this Disabled. This keeps the exported profile files smaller and ensures that when a user moves to a new machine, they strictly receive the current corporate policy from the console rather than relying on potentially outdated settings from their old machine.
- Admin/Power Users: You may want to enable this for a specific group of IT administrators who frequently test different policy configurations and need to move those exact "test states" between different machines.
Summary
The “Include Default Settings on Profile Export” setting is a Configuration Bundling tool. It controls whether a user's exported identity file is a "lean" record of their personal work or a "complete" package including the entire application configuration.
Use Profile Password for Secure Action
*This setting applies to Windows and Mac, but not Linux.
The setting “Use Profile Password for Secure Action” on the page Additional Settings - Advanced Options is a workflow and security control that determines how authentication is handled when a user attempts to remediate data.
What it does
This setting controls whether the user must use their main Profile Password to perform encryption actions or if they are required to create/enter a unique password for each individual file or session.
- When set to "Use profile password" (Default / 1): When a user selects a file and chooses a "Secure" action (like Encrypt), Spirion uses the existing Profile Password to secure the file. The user is typically not prompted for a new password because they have already "unlocked" their profile.
- When set to "Require individual passwords" (0): Spirion bypasses the profile's master password. Every time the user attempts to encrypt or secure a file, they are forced to manually enter a password specifically for that action/file.
Why it exists
This setting is used to balance User Convenience with Security Granularity:
- Single Sign-On Experience (Convenience): By using the Profile Password, the user only has to remember one credential. Once they log in to Spirion, they can remediate dozens of files seamlessly. The "master key" for all those files is their profile password.
- Increased Security (Granularity): Requiring individual passwords ensures that even if someone manages to sit down at an already-logged-in Spirion Agent, they cannot encrypt (or potentially decrypt) files without knowing a secondary password. This follows the "Two-Person Rule" or "Re-authentication" security patterns.
- Password Vault Integration: When using the Profile Password, the keys are automatically managed and stored in the user's local Password Vault. This allows them to open the secure files later without being re-prompted, as long as they are logged into their profile.
How it works in the architecture
- Policy Key: This maps to the internal configuration key
Settings\Actions\Secure\UseProfilePassword. - Vault Dependency: If you set this to "Require individual passwords," the user must be very careful to remember which password they used for which file, as the "automated" recovery via the Profile Password is disconnected.
- Secure Actions: This setting specifically affects remediation actions such as Encrypt and Secure Zip, as well as opening/accessing files that were previously secured using these methods.
Recommendations
- Standard Deployment: We highly recommend using "Use profile password." This ensures that encryption keys are automatically stored in the Password Vault, which is itself secured by the profile password. This prevents "lost password" scenarios that result in permanent data loss.
- High-Security Exceptions: Only use "Require individual passwords" if you have a specific requirement where different files must have different access levels, even for the same user (e.g., a "Secret" file vs. a "Top Secret" file on the same machine).
Summary
The “Use Profile Password for Secure Action” setting is a Credential Workflow choice. It decides whether the user’s "Master Profile Password" acts as the key for all remediated files or if each file requires its own distinct, manually-entered password.
Require Profile Log in
*This setting applies to Windows and Mac, but not Linux.
The setting “Require Profile Log in” on the page Additional Settings - Advanced Options) is a fundamental access control that dictates whether a user can bypass authentication to use the software.
What it does
This setting determines if the "Guest Profile" is available to the end user. The Guest Profile is a temporary session that does not require a password but also does not save search history, ignore lists, or encryption keys.
- Require log in: The "Skip" button on the login screen is removed. The user must either create a new profile with a password or log in to an existing one before they can access the Spirion interface or perform any scans.
- Prohibit login: The user is forced to use the Guest Profile. They cannot create or use a password-protected profile at all.
- Allow guest profile: Default. The user is presented with a choice. They can log in to their secure profile or click "Skip" to enter as a Guest.
Why it exists
This is one of the most important settings for Governance and Accountability:
- Enforcing the Audit Trail: In many regulatory environments (HIPAA, PCI, GDPR), you must be able to prove who performed a remediation action or who ignored a specific match. By requiring a login, you ensure that every action is tied to a persistent, authenticated profile rather than an anonymous Guest session.
- Ensuring Data Recovery: Features like the Password Vault and Encryption require a profile password to store the keys. If a user runs a scan as a "Guest" and encrypts a file, there is a much higher risk that they will lose access to that file because the Guest profile does not permanently store the keys.
- Preventing Configuration Loss: A Guest profile's "Ignore List" is often cleared or not maintained reliably across sessions. Requiring a login ensures that if a user marks a file as a false positive, it stays ignored in their next session.
How it works in the architecture
- Initialization: This setting is checked by the Agent during the very first steps of launching the interactive UI (
Initialization\Configuration). - UI Modification: When set to "Require log in," the agent modifies the standard login dialog to hide the "Skip/Guest" option.
- Note on Policy Delivery: As noted in internal documentation, this specific setting is sometimes restricted from being modified via simple XML configuration files and should be set directly through the SDP Console Policy Wizard to ensure it is correctly signed and delivered to the Agent.
Recommendations
- Best Practice: Set this to "Require log in." This is the strongest configuration for enterprise security. It ensures that all end-user activity is tracked, all encryption keys are vaulted, and "false positive" work (ignores) is never lost.
- When to use "Prohibit log in": This is rare, but it is used for "Kiosk" machines or public terminals where you specifically do not want any user data or passwords to ever be saved on the local disk.
Summary
The “Require Profile Log in” setting is an Authentication Enforcement tool. It closes the "Guest" loophole, ensuring that all users must authenticate before using Spirion, which guarantees that their work is saved and their actions are auditable.
Use Profile Password
*This setting applies to Windows and Mac but not Linux.
It is important to clarify that "Require Profile Log in" and "Use Profile Password" are actually two separate but closely related settings found within the User Profiles section of the Additional Settings - Advanced Options page.
If you are seeing these terms together (often labeled as "Require Profile Log in" with an option to "Use Profile Password"), it refers to the Remediation and Authentication Workflow.
What it does
This specific configuration determines how the Agent behaves when a user performs a Secure Action (like Encrypting a file). It links the user's initial application login to their ability to remediate data.
- Use Profile Password: The Agent treats the user's Profile Password (the one they used to open Spirion) as the "Master Key" for all encryption tasks. Use Profile Password for sign on, Encrypt, Open, Save, and other actions that require a password.
- The Result: The user does not have to type a new, separate password every time they want to encrypt a file. Spirion automatically uses the logged-in profile's credentials to secure the file and store the key in the local Password Vault.
- When "Require Individual Passwords" is selected instead: The Agent "unlinks" the login password from the encryption action. To require users are always prompted for individual passwords, select 'Require individual passwords.'
- The Result: Every time the user clicks "Encrypt," they are stopped and asked to create a unique password for that specific file, even if they are already logged in to their profile.
Why this combination exists
The goal is Credential Efficiency. Spirion's architecture is designed around the idea that if a user has already securely authenticated to the application with a Strong password, they shouldn't be burdened with managing hundreds of individual passwords for hundreds of encrypted files.
- Vault Integrity: By using the Profile Password for login and secure actions, the Password Vault remains the single source of truth for the user’s encryption keys.
- User Experience: It enables for "Bulk Remediation." A user can select 50 files and encrypt them all at once using their Profile Password, rather than being prompted 50 times for individual passwords.
- Key Recovery: If a user uses their Profile Password for everything, the organization can potentially help them recover data if they know that one password. If the user creates 50 different passwords for 50 files, recovery becomes almost impossible if the user forgets them.
Recommendations
- Always use "Use Profile Password": We strongly recommend this setting for 99% of deployments. It ensures that the Password Vault works as intended, providing a seamless and secure way for users to protect data without losing the keys.
- Avoid "Individual Passwords": Only use this option if you have a highly specialized "Data Custodian" workflow where different files must have different passwords for legal or extreme privacy reasons.
Summary
The “Require Profile Log in / Use Profile Password” logic ensures that a single, strong authentication at the start of the day serves as the security foundation for all subsequent data protection actions, making the software easier to use while maintaining high encryption standards.
Use Profile Password for Save
*This setting applies to Windows and Mac, but not Linux.
The setting “Use Profile Password for Save” on the page Additional Settings - Advanced Options is a specific permission control that dictates how the Agent handles the creation of password-protected files.
What it does
This setting determines which password is used when a user "saves" or exports data into a secure format, such as a Secure Zip or an Encrypted Copy.
- When Enabled (Use Profile Password): When the user attempts to save a file into a secure container, Spirion automatically applies their Main Profile Password (the one they used to log in to the application) to that file.
- The Result: The user is not prompted for a new password. The file is locked using their "Master Key."
- When Disabled (Prompt for Individual Password): When the user clicks "Save" for a secure action, the Agent stops and prompts them to enter a new, unique password for that specific file/archive.
- The Result: The user must manually create and remember a separate password for this specific saved item.
Why it exists
This setting is designed for Workflow Automation and Key Management:
- Eliminating "Password Fatigue": If a user is frequently saving batches of sensitive data into encrypted containers, prompting for a password every single time is a friction point. This setting allows the user's authenticated identity to serve as the key provider.
- Vault Persistence: When the Profile Password is used for the "Save" action, the resulting key is typically added to the Password Vault. This enables the user to open that saved file later without being challenged for a password, as long as they are currently logged into their Spirion Profile.
- Preventing Weak Passwords: Users often choose very weak passwords (like "123") when prompted for individual file passwords. By forcing the use of the Profile Password (which usually has enforced Password Strength rules), the organization ensures the saved file is protected by a strong, compliant credential.
How it works in the architecture
- Context: This setting specifically targets the "Save" and "Save As" pathways within the Spirion Agent interface during remediation or result-exporting.
- Encryption Logic: Spirion uses the hash of the profile password to generate the encryption key for the resulting file.
- Dependency: This setting relies on "Require Profile Log in" being enabled. If the user is in a "Guest" session, there is no profile password to use, so the Agent reverts to prompting for an individual password regardless of this setting.
Recommendations
- Recommended: Enable (Use Profile Password). This creates a much smoother user experience and ensures that the "Save" actions are as secure as the user's main profile login.
- When to Disable: Only disable this if you are in an environment where users are expected to share encrypted files with other people. If the user uses their profile password to secure a file, they would have to give away their main profile password to let someone else open it. If they are prompted for an "individual password," they can create a one-time password to share with a colleague.
Summary
The “Use Profile Password for Save” setting is a Credential Inheritance tool. it enables the Agent to automatically secure exported files using the user's existing authenticated password, ensuring high security with minimal user interruption.
Results Pane
The “Results Pane” section (found under Additional Settings - Advanced Options) is used to configure how search findings are displayed to the end-user within the local Spirion Agent interface.
This section is primarily relevant for interactive/managed scans where an employee is expected to review their own results and take action (remediate) on their local machine.
While the specific options can vary based on the Agent version, this section typically controls the visibility and granularity of the information shown in the Agent's results window.
Why it exists
The Results Pane settings are about User Experience (UX) and Privacy:
- Operational Clarity: For a "Self-Remediation" workflow, the user needs enough information to know which files to delete or encrypt, but not so much information that the Results Pane itself becomes a security risk.
- Privacy Compliance: In regions with strict privacy laws (like GDPR), showing the full sensitive match context to a local admin or a non-owner of a file might be prohibited. These settings allow the organization to "mask" that data at the agent level.
Allow Sort During Search in Disk Mode
*This setting applies to Windows and Mac but not Linux.
The setting “Allow Sort During Search in Disk Mode” is a performance-optimization control specifically for Windows Agents when they are configured to use Disk Mode for local results storage.
What it does
This setting controls whether the user is permitted to click on column headers (like Name, Location, or Match Count) to sort the results list while a scan is still actively running.
- Enabled (checked): The user can sort the results in real-time as they appear. However, because "Disk Mode" involves constant reading/writing to a local SQLite database, frequent sorting while the Agent is also trying to write new results can cause the UI to become sluggish or "hang."
- Disabled (unchecked): Default. Sorting is disabled until the scan is completed or paused. This ensures that all available system resources and database "locks" are dedicated to the search engine and the ingestion of findings, rather than the visual arrangement of the UI.
What is "Disk Mode"?
To understand this setting, you must understand Disk Mode. Spirion Agents can store search results in two ways:
- Memory Mode: Results are kept in RAM. This is very fast but can consume a lot of memory if there are millions of matches.
- Disk Mode: Results are written to a local database file on the hard drive. This is used for very large scans (like searching a massive file server) to prevent the agent from crashing due to high memory usage.
Why it exists
This setting is purely about Stability and Performance:
- Preventing Database Contention: In Disk Mode, the agent is constantly writing new rows to a local database. If a user tries to "Sort" that database simultaneously, it creates a "contention" issue where the search process and the UI process are fighting for control of the database file.
- Resource Conservation: Sorting a list of 100,000 items while another 100,000 items are being added in the background is computationally expensive. Disabling sort during the search ensures the scan finishes as quickly as possible.
- UI Responsiveness: It prevents the "App Not Responding" (White Screen) state that can occur if the Windows UI thread gets stuck waiting for a database sort to finish.
How it works in the architecture
- Internal Key: This maps to
Settings\Results\Disable\SortDuringSearchDiskMode. - Scope: This only applies to the Interactive Agent UI on Windows. It has no effect on "Silent" or "Unattended" scans, as there is no UI for a user to interact with in those cases.
Recommendations
- Standard Practice: Leave the setting Disabled (the default). For large scans that require Disk Mode, it is much more efficient to let the Agent finish the search entirely before the user begins organizing or reviewing the data.
- When to Enable: Enable this setting only if you are performing small, targeted searches where Disk Mode is required for a specific technical reason, but the expected total match count will be so low sorting will not impact performance.
Summary
The “Allow Sort During Search in Disk Mode” setting is a UI Performance Guardrail. It prevents the user from triggering resource-heavy sorting operations while the agent is busy writing discovery data to the local disk, ensuring the scan remains stable and responsive.
Exclude Identity Matches in Results Data
*This setting applies to Windows and Mac but not Linux.
The setting “Exclude Identity Matches in Results Data,” found on the page Additional Settings - Advanced Options is a privacy and data-minimization control.
What it does
This setting prevents the actual sensitive values (the "Identity Matches") that were found during a scan from being included in the results payload that is shipped to the SDP Console.
- Enabled (checked): The Agent reports that a match was found (for example, "Found 1 Social Security Number in file X"), but does not include the actual sensitive string (the Social Security number itself) in the data sent to the console.
- Disabled (unchecked): Default. The Agent includes the match evidence/snippet in the results payload so that an administrator can see the value (or a masked version of it) in the console for verification.
Why it exists
This setting is essential for organizations with strict SaaS Trust Models and Data Residency requirements:
- Zero-Knowledge Reporting: Some organizations have a security policy that prohibits sensitive data from ever leaving the local network, even in encrypted form. By enabling this, the console becomes a "metadata-only" dashboard—you know where the risk is, but the console never touches the sensitive data itself.
- Compliance with Privacy Laws (GDPR/CCPA): If you are scanning for data belonging to citizens in a highly regulated region, you may want to ensure that their personal identifiers are never stored in your central reporting platform, reducing the scope of your "data at rest" audit.
- Reducing "Toxic Waste" Accumulation: Every sensitive match stored in a database is a potential liability if that database is ever compromised. Excluding identity matches ensures your reporting database stays "clean" of actual PII/PHI.
How it works in the architecture
- Agent-Side Filtering: The exclusion happens before the data is written to the
shipper_queue(on Windows) or the SQLite database (on Mac/Linux). The Agent performs the detection, records the count and location, but "drops" the specific match string from the outbound message. - Impact on the Console: When an admin views a result in the SDP Console, the "Match" or "Evidence" field will be empty or show a placeholder like
[Value Excluded by Policy]. - Remediation remains functional: Because the Agent still knows exactly where the match is, automatic Playbooks and Workflows can still shred, quarantine, or encrypt the file. Only the central reporting is blinded to the specific value.
Recommendations
- For High-Security Environments: We recommend enabling this setting. Most mature security teams need to know only which files are sensitive to take action; they rarely need to see the actual credit card number or Social Security number in the reporting UI.
- For "False Positive" Tuning: If you are just starting out and need to tune your regex patterns, disable this setting, temporarily. You need to see the match evidence to determine if your patterns are accurate. Once your policy is tuned and accurate, enable the exclusion to move into a "privacy-first" production mode.
Summary
The “Exclude Identity Matches in Results Data” setting is a Privacy Shield. It enables Spirion to provide full visibility into where sensitive data exists across the enterprise without ever centralizing the actual sensitive values in the cloud console.
Row Cache Size
*This setting applies to Windows, but not Mac/Linux.
In the Spirion Sensitive Data Platform (SDP) Policy wizard, the “Row Cache Size” setting (located in the Performance section of Additional Settings - Advanced Options) is a database tuning parameter that controls how the Windows Agent manages the flow of search results into its local storage.
What it does
This setting defines the number of search result rows (matches) the agent holds in its temporary memory (RAM) before "flushing" them in a single batch to the local PostgreSQL (or SQLite) database.
- When set to a High Value (1000+): The Agent waits until it has collected a large number of matches before writing them to the disk.
- The Result: This reduces "Disk I/O" (input/output) operations. Writing one large block of data is much more efficient for the hard drive than writing 1,000 tiny individual pieces of data.
- When set to a Low Value (100 or 1): The Agent writes results to the disk almost as soon as they are found.
- The Result: This increases disk activity and can slow down the overall scan, but it ensures that results are saved safely to the disk immediately in case the computer crashes or loses power.
Why it exists
This setting is primarily for Performance Optimization on High-Volume Targets:
- Reducing Disk Contention: On a machine with a slow hard drive (HDD) or a heavily taxed server, frequent small writes to a database can cause the system to "stutter." A larger Row Cache Size enables the Agent to "bulk upload" results, which is much faster.
- Scaling for Millions of Matches: If you are scanning a massive file server that contains millions of Social Security Numbers, the Agent generates results very quickly. Without a proper Row Cache, the database "write" process could become a bottleneck that slows down the search engine's ability to read files.
- Balancing Memory vs. Stability: While a massive cache is faster, it uses more RAM. If the Agent crashes while the cache is full but not yet "flushed" to the disk, those unsaved results are lost and would need to be re-scanned.
How it works in the architecture
- Internal Key: This maps to
Settings\Performance\RowCacheSize. - The Write Cycle: The Agent's search "Worker" finds a match → The match is placed in the Row Cache → Once the
RowCacheSizelimit is reached → The Agent opens a database transaction → The cache is written to thejob_queueorshipper_queue→ The cache is cleared. - Windows-Specific: This is most critical for Windows Agents using the PostgreSQL-based queueing model, where database performance is a key part of the agent's stability.
Recommendations
- Default Setting: The default (usually 1000) is sufficient for almost all standard endpoint scans.
- For High-Speed Servers (NVMe/SSD): You can safely increase this to 5000 or 10000 if you are scanning a high-performance server with millions of expected matches to shave time off the total scan duration.
- For Unstable Environments: If you are scanning over a very poor network connection or on hardware prone to rebooting, decrease the cache size to ensure results are "banked" to the disk more frequently.
Summary
The “Row Cache Size” setting is a Database Throughput control. It determines how many findings the Agent "batches up" in memory before writing them to the local disk, enabling you to optimize for either raw scanning speed (high cache) or data persistence safety (low cache).
Update Timer
*This setting applies to Windows, but not Mac/Linux.
The “Update Timer” setting on the page Additional Settings - Advanced Options is a UI-responsiveness control that dictates how often the Agent refreshes the visual display of results.
What it does
This setting defines the interval (in milliseconds) at which the Spirion Agent's search engine sends an "update" to the user interface (the Results Pane) to show new findings while a scan is running.
- When set to a High Value (for example, 5000ms): The Agent updates the screen only every five seconds.
- The Result: The user sees the "Matches Found" count jump in large blocks. This is much more efficient for the computer's CPU because the software doesn't have to constantly redraw the window.
- When set to a Low Value (for example, 100ms): The Agent updates the screen almost constantly.
- The Result: The user sees a "live" scrolling list of results as they are found. This looks impressive but is very taxing on the computer’s processor (CPU) and memory, potentially slowing down the actual scan.
Why it exists
This setting is primarily for CPU and Resource Management:
- Preventing UI "Hanging": Redrawing a Windows interface with thousands of rows of data is an intensive task. If the Update Timer is too low, the CPU spends all its time "painting" the screen instead of "searching" the files.
- Optimizing for Large Scans: On a server or a machine where millions of matches are expected, a fast Update Timer can cause the Spirion Agent to appear "Frozen" or "Not Responding" because the UI thread is overwhelmed by the sheer volume of refresh requests.
- User Experience (UX) vs. Performance: Most users like to see progress, but in a professional data discovery context, "Batching" the updates (using a higher timer) ensures the search finishes faster.
How it works in the architecture
- Internal Key: This maps to
Settings\Performance\UpdateTimer. - The UI Thread: The "Search Worker" finds data and puts it in the Row Cache. Separately, the Update Timer tells the UI thread: "Check the cache and draw any new rows on the screen now."
- Default Value: The default is typically 1000ms (1 second). This provides a good balance where the user sees steady progress without lagging the system.
Recommendations
- Standard Use: Keep the default of 1000ms.
- For High-Volume Servers: If you are running a scan where you expect hundreds of thousands of matches, increase this to 5000ms or even 10000ms. This directs the server's power toward the search rather than the display.
- For "Silent" or "Scheduled" Scans: This setting is largely irrelevant for background scans (where no UI is visible), as there is no interface to update.
Summary
The “Update Timer” setting is a UI Throttle. It controls how frequently the Agent "refreshes" the list of results on the screen, allowing you to prioritize either a real-time visual experience (low timer) or maximum scanning efficiency (high timer).
Other
The “Other” section on the “Additional Settings - Advanced Options” page serves as a "catch-all" or "overflow" area for specific technical configurations that do not naturally fit into the primary categories like Performance, Search History, or Agent Operations.
While it is less frequently used than other sections, it contains settings that often relate to Integration, UI Visibility, and specialized application behavior.
Show Tool tips
The “Show Tooltips” setting (found under Additional Settings - Advanced Options) controls the visibility of small, helpful text boxes that appear when a user hovers their mouse over buttons, icons, or settings within the Spirion Agent interface.
What it does
When the Spirion Agent is running in Interactive Mode (where the GUI is visible to the end-user):
- Enabled (Default): When a user hovers their cursor over a feature (like the "Shred" button, the "Quarantine" icon, or a specific scan status), a small yellow or white "bubble" pops up with a brief explanation of what that feature does.
- Example: Hovering over "Shred" might show a tooltip saying: "Permanently delete this file and overwrite its contents to prevent recovery."
- Disabled: No hover-text appears. The user must rely on their own knowledge of the icons and buttons to navigate the interface.
Why it exists
This setting is primarily focused on User Experience (UX) and Education:
- Guided Remediation: For non-technical employees who are asked to clean up their own PII findings, tooltips provide "just-in-time" training. They explain the consequences of an action (like Shred vs. Scrub) before the user clicks.
- Reducing User Error: Tooltips help prevent accidental data loss. If a user isn't sure what an icon does, the tooltip provides a safety check.
- Interface Clarity: Spirion uses many icons to represent different file types and match statuses. Tooltips translate those icons into plain English for the user.
How it works in the architecture
- UI Local Property: This is a client-side UI flag. When the policy is delivered to the Agent, it toggles a setting in the Agent’s graphical engine (for example,
Settings\Application\UI\ShowToolTips). - Impact: This setting has zero impact on scan performance, resource usage, or security. It is purely a visual "help" feature for the human sitting at the computer.
Recommendations
- For Standard "Self-Remediation" Deployments: Leave this Enabled. If you are asking employees to review their own scan results, they need all the help they can get to make the right decisions.
- For "Locked Down" or IT-Only Environments: Disable this setting if you want a cleaner, more minimalist interface, or if your users have been extensively trained and find the pop-up boxes distracting.
- Note for Silent Scans: If your Agents run silently in the background (as a service), this setting is irrelevant as there is no UI for the tooltips to appear in.
Summary
The “Show Tooltips” setting is the "In-App Help Manual." It provides instant, context-sensitive explanations to the user as they navigate the Spirion interface, making the software more approachable and reducing the risk of "accidental" clicks during the remediation process.
Show System Tray Icon
*This setting applies to Windows, but not Mac/Linux.
The “Show System Tray Icon” setting on the page Additional Settings - Advanced Options) is a visibility control that determines if the Spirion "Shield" icon is visible in the Windows System Tray (the area next to the clock).
What it does
This setting controls the presence of the Spirion Agent's persistent background icon.
- Enabled (checked): Default. The Spirion icon (typically a small blue or orange shield) appears in the System Tray as soon as the Agent starts.
- Functionality: Users can right-click this icon to quickly open the main interface, check the status of a running scan, or see the "last scan" results.
- Disabled (unchecked): The icon is hidden from the System Tray. The Agent still runs in the background as a service or process, but there is no visual indicator to the user that it is active.
Why it exists
This setting is essential for managing the User Presence of the software:
- Transparency vs. Stealth:
- Transparency: In "Self-Remediation" programs, you want the icon visible so users know Spirion is protecting them and can easily access the tool to clean up their data.
- Stealth: In "Silent Auditing" or "Incident Response" scenarios, you may want to scan a machine without the user knowing. Disabling the icon prevents the user from seeing that a scan is in progress.
- User Experience (UX) Management: IT departments often like to "de-clutter" the system tray to prevent users from accidentally closing important security software or to maintain a clean desktop environment.
- Preventing User Interference: If the icon is visible, a curious user might try to "Exit" or "Stop" the agent. If the icon is hidden, it is much harder for a non-technical user to find and stop the process.
How it works in the architecture
- Internal Key: This maps to
Settings\Application\Display\ShowSystemTrayIcon. - Process Detail: This setting specifically affects the
Spirion.exe(UI) process. The background worker service (which handles the actual searching) continues to run regardless of whether the icon is visible. - Notifications: Even if the icon is hidden, the agent may still show "Toast Notifications" (pop-up balloons) if those are enabled in a separate setting.
Recommendations
- For Employee-Led Programs: Keep it Enabled. It builds trust and allows users to feel in control of their own data privacy.
- For Executive/VIP Machines: Sometimes Disabled to avoid distracting busy executives with "yet another icon" in their taskbar.
- For Secret Audits: Must be Disabled. If you are looking for evidence of data exfiltration or a policy violation, you do not want the tray icon to alert the user that they are being scanned.
Summary
The “Show System Tray Icon” setting is a Visual Presence Toggle. It determines whether the Spirion "Shield" is visible to the end-user, enabling you to choose between an interactive, transparent experience and a silent, background operation.
Show Tool tips
The “Show Tooltips” setting on the page Additional Settings - Advanced Options is a straightforward usability control for the interactive Agent.
What it does
This setting determines whether small, hovering information boxes (tooltips) appear when a user moves their mouse over buttons, column headers, or icons within the Spirion Agent interface.
- Enabled: Default. When a user hovers over an element—for example, the "Shred" button or the "Data Type" column—a small text box appears explaining what that button does or what that column represents.
- Disabled: No hover text appears. The interface remains "clean," but users do not get the immediate, in-app guidance for specific UI elements.
Why it exists
This setting is focused on User Onboarding and Interface Simplification:
- Guiding Non-Technical Users: For employees who only open Spirion once a month for a mandatory scan, tooltips provide "just-in-time" training. They explain the difference between "Quarantine" and "Shred" without the user needing to consult a manual.
- Reducing Help Desk Tickets: By providing clear explanations of what remediation actions do directly in the UI, organizations can reduce the number of calls from users who are afraid to click a button because they don't understand the outcome.
- UI Customization for Power Users: In some environments, such as a Security Operations Center (SOC) where analysts use the tool daily, tooltips can be seen as "clutter" or a distraction. Disabling them provides a more streamlined, professional interface for expert users.
How it works in the architecture
- Internal Key: This maps to
Settings\Application\Display\ShowTooltips. - UI Thread: This is a purely cosmetic setting handled by the agent's front-end (GUI) thread. It has zero impact on search performance, CPU usage, or the accuracy of the discovery engine.
- Scope: This setting only affects the Interactive Agent UI. It has no effect on "Silent" scans or the SDP Cloud Console itself.
Recommendation
- For End-User Deployments: Always keep “Show Tooltips” enabled. It is one of the most effective ways to ensure users take the correct remediation actions and feel confident using the software.
- For Managed/VDI Environments: Usually kept enabled unless there is a specific branding or "kiosk mode" requirement where you want a completely static, non-interactive-feeling UI.
Summary
The “Show Tooltips” setting is a UX (User Experience) Toggle. It provides helpful "pop-up" explanations for buttons and features within the local agent, acting as a built-in guide to help users navigate their sensitive data results.
Disable Reset Dialog
*This setting applies to Windows, but not Mac/Linux.
The “Disable Reset Dialog” setting found on the page Additional Settings - Advanced Options) is a safety and workflow control that manages how the Agent handles the "Reset" command.
What it does
This setting determines whether the Agent displays a confirmation warning when a user attempts to Reset the application or their current search results.
- Disabled (unchecked): Default. If a user clicks "Reset" (to clear their current results or revert settings), a pop-up dialog appears asking, "Are you sure you want to reset? This will clear all current findings from the view."
- Enabled (checked): The confirmation dialog is suppressed. If the user clicks "Reset," the action happens immediately without any warning or second chance.
Why it exists
This setting is primarily about Workflow Speed vs. Data Safety:
- Preventing Accidental Data Loss (UI): In the Spirion Agent, "Resetting" often clears the results list. If a user has just spent an hour scanning a massive drive and accidentally clicks "Reset," they would lose that visual list and have to start the scan over. The dialog acts as a "speed bump" to prevent this mistake.
- Streamlining for Power Users: For advanced users or internal IT staff who are performing repetitive testing or manual cleanup, the confirmation dialog can be an annoyance. Enabling "Disable Reset Dialog" enables them to move faster between tasks.
- Kiosk or Lab Environments: In environments where the Agent is used for a specific, repetitive purpose (like a data-clearing station), you may want the "Reset" button to act as a "Clear Screen" button that requires zero extra clicks.
How it works in the architecture
- Internal Key: This maps to
Settings\Application\Disable\ResetDialog. - Scope: This affects only the Interactive Agent UI. It has no impact on "Silent" scans or scheduled tasks, as those do not involve manual user interaction with a "Reset" button.
- Behavioral Note: This does not delete files. It only "Resets" the state of the Agent's display and its local memory/cache of the current scan results.
Recommendations
- For General Employees: Keep this at the default (0/Disabled). You want users to be prompted before they clear their results. It is very common for a user to mistake the "Reset" button for a "Refresh" button; the dialog box saves them from the frustration of losing their work.
- For QA/Testing/Admins: Enable this (1). When you are testing policies and running scans dozens of times a day, the extra click of the confirmation box becomes a significant friction point.
Summary
The “Disable Reset Dialog” setting is a Confirmation Bypass. It enables the "Reset" action to occur instantly without a warning pop-up, prioritizing operational speed for experts over accidental-click protection for general users.
Display Properties Pane
The setting “Disable Properties Pane” found on the page Additional Settings - Advanced Options is a visibility control that restricts access to the detailed metadata window for search results.
What it does
In the Spirion Agent, when a user selects a search result, there is normally a Properties Pane (or window) that displays deep-dive information about that specific find. Enabling this setting hides or deactivates that pane.
- When Disabled (unchecked): Default. The user can see the Properties Pane. This window typically shows the following:
- File Metadata: Full path, size, creation/modification dates, and owner.
- Match Details: The specific Data Type found (for example, "Social Security Number") and the exact count of matches within that file.
- Context: Detailed location info (for example, "Sheet 2, Cell A10" for Excel, or "Table: Customers, Column: SSN" for a Database).
- When Enabled (checked): The Properties Pane is removed from the interface. The user sees only the high-level row in the main Results Pane.
Why it exists
This setting is used to manage Information Exposure and Interface Complexity:
- Privacy and "Least Privilege": Sometimes, the Properties Pane can reveal too much information. For example, it might show the name of the file owner or metadata that a lower-level employee shouldn't see. Disabling it ensures users only see the "minimum necessary" information to perform remediation.
- Reducing User Confusion: For non-technical employees, the Properties Pane can be overwhelming. It contains technical paths and database identifiers that might confuse them. Hiding it keeps the interface simple: "Here is a sensitive file; please delete or encrypt it."
- Preventing "Data Mining": If a user is "maliciously curious," they might use the Properties Pane to gather intelligence about the file system or database structure. Disabling the pane limits their ability to explore the technical details of the environment through the Spirion Agent.
How it works in the architecture
- Internal Key: This maps to
Settings\Results\Disable\PropertiesPane. - UI Impact: This specifically targets the "bottom" or "side" panel in the Agent UI that updates whenever a result is clicked.
- Scope: This only affects the Interactive Agent UI. It has no impact on what data is shipped to the SDP Console or what appears in the central reports.
Recommendation
- For "Self-Remediation" by General Staff: We often recommend Enabling this (disabling the pane). Most employees don't need to know the NTFS "Created Date" or the specific "Record ID" to know they should delete an old spreadsheet containing PII.
- For IT Admins and Power Users: Keep it Disabled (show the pane). Admins need those technical details to troubleshoot why a file is where it is and to identify the true owner of the data.
Summary
The “Disable Properties Pane” setting is a Detail Filter. It hides the "deep-dive" metadata window in the Agent interface, ensuring that users stay focused on the high-level remediation task without being distracted or granted access to unnecessary technical details.