How to Work with Scans
The Scans page in Spirion Sensitive Data Platform is where you view, create, and manage your scans.
Overview
- Scans are the searches that agents perform on Targets to find either the file locations or find specific data types within the Files and Folders.
- The Scans screen is where you view, create, and manage your scans.
Note: During the process of creating a new scan you must select a playbook. If you have not created a playbook, you must create one. You cannot perform a scan of your Targets without a playbook.
How to Access and View Scans
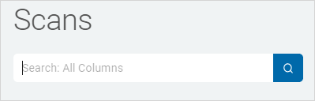
To access Scans use the following steps:
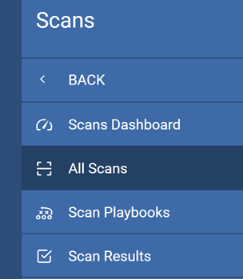
- From the left side navigation menu, select Scans > All Scans.
- The Scans page opens showing all of your scans in a table.
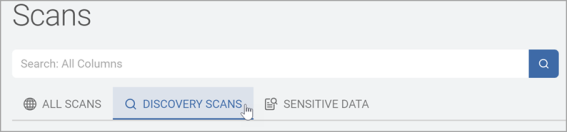
- Views are sorted by the tabs at the top of the page: ALL SCANS, DISCOVERY SCANS, or SENSITIVE DATA scans. Click a tab to change the view.
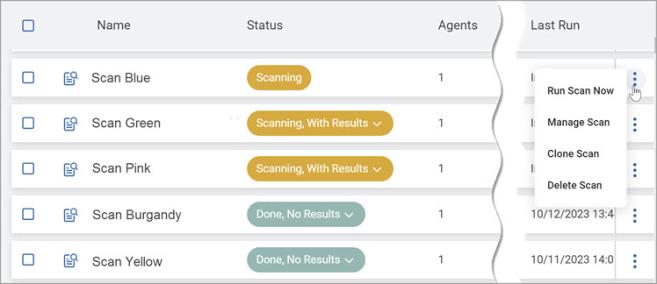
Scans are displayed in a table with the following columns:
- Name
- Status
- Agents
- Targets(s) Scanned
- Next Run
- Last Run
- Scan Owner
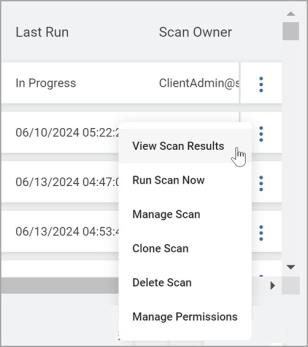
- More options (Note: options can vary depending on the scan status.)
- View Scan Results
- Run Scan Now
- Manage Scan
- Clone Scan
- Delete Scan
How to Search for a Scan
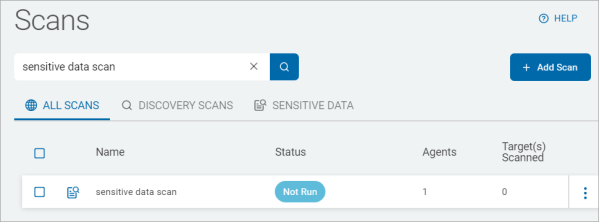
Use the following steps to search for a specific scan:
- From the left side navigation menu select Scans > All Scans.
- The Scans page opens.
- Enter a search term in the search box. Spirion Sensitive Data Platform searches across ALL COLUMNS in your scan table. This enables you to search the information in each table column, such as Scan Owner, date (Last Run or Next Run), Status, and scan name (Name).
- Examples:
- Name - Enter search terms such as: "MAC," "Win," "Local," "HR," "Azure," "Confluence," "Quarantine," "SQL," "File Share"
- Status - Enter search terms such as: "Done," "Errors," "Scanning," "With Results," etc.
- Next Run/Last Run - Enter the current or past dates: "12/04/2025" and/or times in 24-hr format, such as "14:41". Enter "In Progress" for currently running scans. The application will reveal dates even with search terms only partially entered.
- Scan Owner - Enter a part or entire scan owner account name such as: "jsmith@acme.com," "JohnS," "Admin," or "AcmeAdmin@acme.com"
- The search results are displayed in the scans table below.
How to Create a New Scan
Select the type of scan and complete the Scan Configuration wizard using these guides:
Note: When you create a scan and select options for excluding files or settings for maximum file sizes, all Target types except Dropbox use your selected configurations to improve scan times.
How to View Scan Results
- The default view of results from a specific scan condensed by location.
- As a result, the default itemization of the Scan Results table is locations with matches, which includes summary information of the location’s data type(s), match count, and playbook action(s).
- Each location can be expanded to view the location's (sensitive data) matches.
- This launches a modal containing details for individual matches, including the match string itself, and options for user level remediation (ULR).
- Options for ULR actions emphasize the difference between location-level and match-level actions, as explained in the following section.
- The traditional match view is still available and can be toggled to by clicking on Total Match Count next to the Actions button.
- The option to View Scan Results by Location is nested under the Actions button.
To view scan results:
- From the All Scans page, locate the Scan you want to view.
- From the kebab menu, select View Scan Results.
- Alternatively, you can filter to a subset of matches from the Scan Results page.
- Alternatively, you can filter to a subset of matches from the Scan Results page.
- Itemization by location is confirmed by the following:
- Total Match Count listed at the top-right of the screen, next to the Actions button.
- Clicking this toggles to results itemized by match.
- The Location column has an expansion icon:
- Clicking this icon opens the ULR modal including match data.
Note: For database Targets, the column name is in the match info tool tip, accessed by clicking the i next to a match.
- Clicking this icon opens the ULR modal including match data.
- The URL of a location-based results table ends in “/scans/results”
- The URL of a match-based results table ends in “/scans/results-alt”
- As noted above, clicking the Total Match Count button lists results itemized by match.
- There is also a View Scan Results by Match option accessible from the Actions button.
- Returning to Results by Location
- From the Actions button, select View Scan Results by Location.
Scan Status Column
Note: You can filter the Status column by entering the term ("Scanning," "Done," "With Results," "Errors," etc.) in the search field at the top of the page.
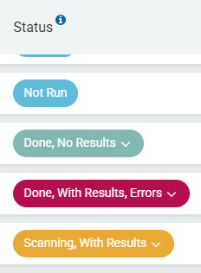
The following scan status displays for Spirion Agents version 13 and later:
- Scanning
- View Details
- Scanning, With Results
- View Details
- View Scan Results
- Done, With Results
- View Details
- View Scan Results
- Done, With Results, Errors
- View Details
- View Scan Results
- Done, No Results
- View Details
- Not Run
How to View the Status of a Scan
Use the following steps to view the details of a scan:
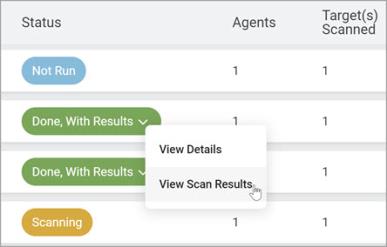
- From the Status column, click the drop-down list of the scan you want to view.
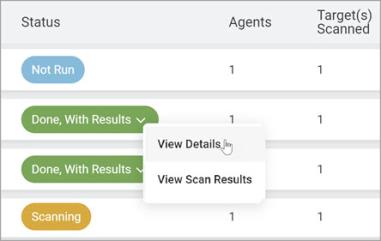
- Click View Details from the sub-menu that appears.
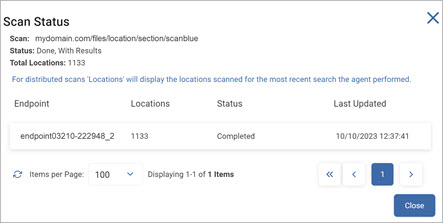
- The Scan Status pop-up window opens and displays the following information:
- Scan Name
- Status
- Total Locations
- Endpoint
- Locations
- Status
- Last Updated
How to View Scan Results
After a scan is complete, the sensitive data captured by the scan is available.
- To fully realize the value of Spirion Sensitive Data Platform, it is imperative that you ensure the sensitive data discovered by scans is addressed quickly and appropriately
- To investigate sensitive data and the actions that are or are not being performed on it, the All Scans page is a great place to start.
- Remember, users typically choose a method of remediating sensitive data that is interative.
- You first scan and capture your sensitive data with few actions
- Next, you classify your scanned sensitive data
- Next, you notify users and request they take action (classify, shred, redact, etc.)
- Next, you examine the actions taken on sensitive data by expert users and automate these actions
- At each phase, Spirion Sensitive Dashboards reveal how much exposed sensitive data is being properly managed and remediated over time
Use the following steps to view the results of a scan:
- From the left side navigation menu select Scans > All Scans.
- The Scans page opens.
- Scan are shown in a table with three available tabs:
- ALL - This tab contains both Discovery and Sensitive Data scans.
- DISCOVERY SCANS - This tab contains only Discovery scans (metadata only)
- SENSITIVE DATA - This tab contains only Sensitive Data scans
- Locate the scan you want to examine.
- For the target scan, under the "Status" column perform the following steps:
- Click the drop-down menu of the scan completion status (must be "Done, with Results," or "Done, With Results, Errors")
- Select View Scan Results.
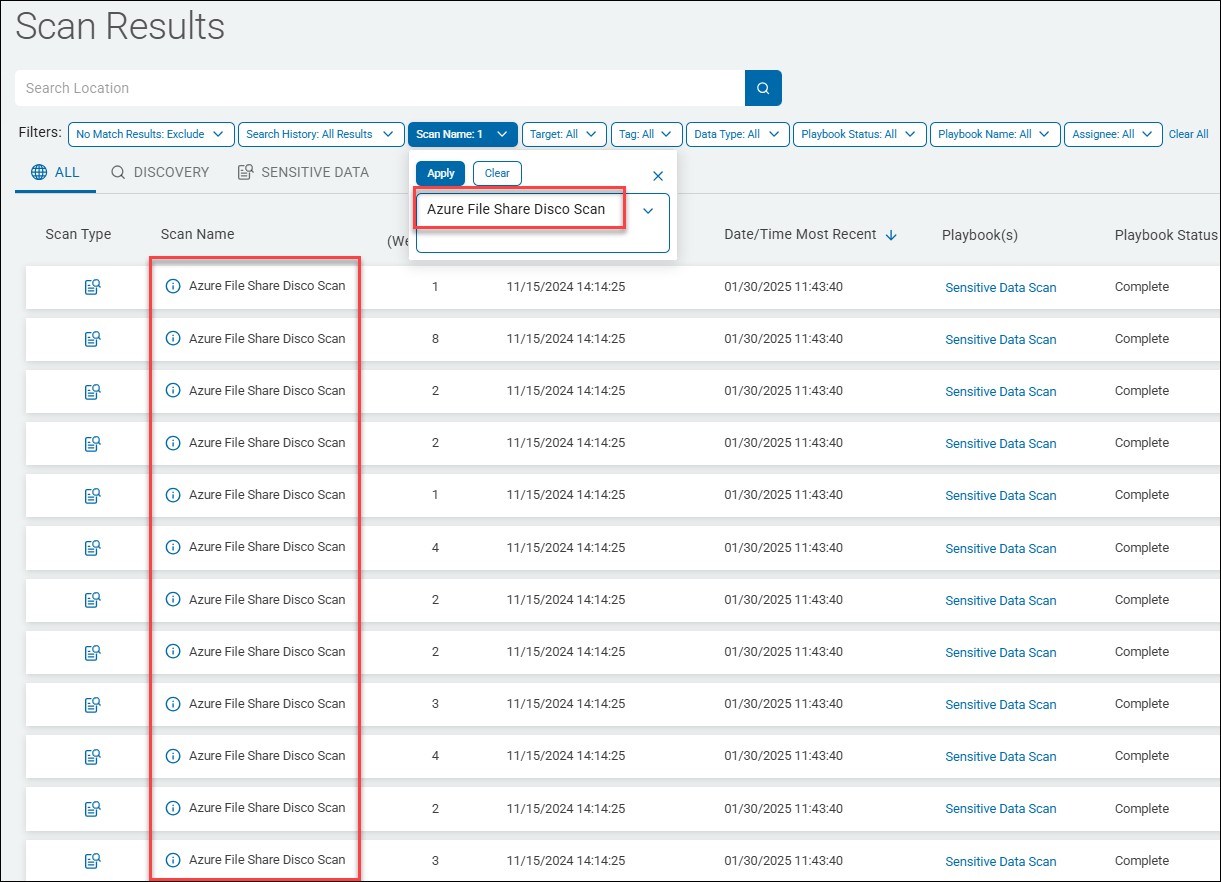
- The Scan Results page opens with the filter "Scan Name" at the top of the page selected and applied for the scan selected on the Scans page.
- The table on the page displays only the results of the scan you selected.
- From here, investigate the status of your sensitive data by location (file or email which contains sensitive data matches, including path)
- Scroll to the right to the Locations column
- Click the opposing arrows icon:
Alternatively, click the More Options menu at the end of the row, and select View Matches.
- The "Location Details" pop-up window opens with various information about the Location selected.
- For details about the Location Details window and how to take remediation actions on the sensntive data matches shown, see How to Perform Location and Match Actions on Scan Results.