
How to Create a Policy Using the Wizard - Additional Settings
Use the following steps to set your Agent Additional Settings options:
- After completing the Agent Operations - Advanced Options page of the Create Policy wizard, click the Next button to proceed to the Additional Settings page to input more detailed options.
- Use the topics below to help you complete the Additional Settings page.
- When you are done, click Advanced Options to input more detailed options.
- To complete the Advanced Options page, see "Create a New Policy Using the Add Policy Wizard - Additional Settings - Advanced Options."
Show Help Menu
*This is a Windows-only option. This option is specific to searches initiated from Spirion Agent GUI.
The setting “Show Help Menu” is a user interface (UI) configuration toggle that controls the visibility of help resources within the Spirion Agent application on the end user's machine.
What it does
This setting determines whether the "Help" option is visible in the local Agent's menu bar or navigation.
- When Enabled (Checked/Yes): The end user will see a "Help" menu in their Spirion Agent. Clicking this typically provides access to the "About" screen (showing version and license info) and links to online or local help documentation.
- When Disabled (Unchecked/No): The "Help" menu is hidden from the agent's interface. The user will have no direct way to access help files or build information through the application's UI.
Why it exists
This setting is used by administrators to manage the End-User Experience and Support Workflow:
- Interface Simplification: In many enterprise environments, the Spirion Agent is intended to run with minimal user interaction. Hiding the Help menu keeps the interface focused purely on the scan progress and any required user actions (like remediation).
- Custom Support Routing: Organizations often prefer that employees contact their internal IT Help Desk rather than viewing Spirion’s generic product documentation. Disabling this menu prevents users from bypassing internal support channels.
- Endpoint Lockdown: For highly restricted environments, administrators may want to prevent users from seeing technical details like the specific software version or AnyFind engine versions, which are found in the "About" section under the Help menu.
How it works in the architecture
- Policy Delivery: The setting is saved in the Policy XML on the SDP Console.
- Agent Polling: The Windows or Mac agent checks in with the console and downloads the updated policy.
- Dynamic UI Update: The local agent service communicates the setting to the User Agent (the UI component). The "Help" menu is then rendered or removed based on the policy instruction.
Recommendations
- For General Deployments: It is common to Disable this setting to reduce "UI clutter" for the average employee.
- For IT/Admin Groups: Keep this Enabled for technical teams so they can easily verify their build numbers and access documentation while troubleshooting on their own machines.
Summary
The “Show Help Menu” setting is an Agent UI Toggle. It enables you to hide or show the help resources on the local machine to ensure the agent's look and feel aligns with your organization's support and security standards.
Show Search Menu
* This option is specific to searches initiated from Spirion Agent GUI. This is a Windows-only option. Mac/Linux are excluded.
The “Show Search Menu” setting is a visibility toggle that controls the availability of the manual search controls within the local Agent's interface.
What it does
This setting determines whether the "Search" tab or menu is visible to the end-user when they open the Spirion Agent on their workstation.
- Enabled: Default. The user can see and interact with the Search menu. This allows them to manually start, pause, or stop a scan. They can also potentially modify which locations (folders, drives) they want to scan if the rest of the policy permits it.
- Disabled: The Search menu is hidden from the user interface. The user cannot see the "Start" button or any manual scan configuration options.
Why it exists
This setting is primarily used to enforce Policy Control and Automation:
- Centralized Control (Scheduled Scans Only): Many organizations prefer that scans only run on a specific schedule (e.g., every Wednesday at 2:00 PM) to manage CPU impact across the enterprise. By hiding the Search menu, you prevent users from starting their own "ad-hoc" scans at inappropriate times.
- Reducing User Error: If a policy is highly complex or targets specific network shares, an administrator may not want a user to "mess with" the settings. Hiding the menu ensures the agent only does exactly what the central policy commands it to do.
- Silent Auditing: In a "Silent" or "Stealth" deployment, you want the agent to be as invisible as possible. If a user happens to find the Spirion application and opens it, having the Search menu disabled ensures they can't trigger a scan that might alert them to the software's full capabilities.
- "Results Only" Workflow: Some organizations want users to focus only on the results of a scan that was run for them automatically. In this scenario, the user opens Spirion to see their findings and remediate them, but they are restricted from performing any new searches.
How it works in the architecture
- Internal Key: This maps to
Settings\Application\Display\ShowSearchMenu. - UI Restriction: This is a "Grey-out" or "Hide" command for the GUI. It does not stop the underlying engine from running a scan if one is triggered by a schedule or a remote command from the SDP Console.
- Permissions: This is often used in conjunction with "Disable Configuration," which prevents the user from changing settings even if they can see the menu.
Recommendations
- For Managed Workstations: It is common to Disable this setting. This forces the agent to behave as a managed security tool rather than a personal utility, ensuring that discovery remains consistent across the company.
- For Power Users/IT Staff: Keep it Enabled. IT personnel often need to run manual "spot checks" on specific folders or after a cleanup project to verify the data is gone.
Summary
The “Show Search Menu” setting is a Manual Control Toggle. It determines whether an end-user has the ability to trigger their own scans manually or if they are limited to viewing results and performing remediation on scans managed centrally by the administrator.
Show Secure Menu
*This option is specific to searches initiated from Windows Spirion Agent GUI. This is a Windows-only option. Mac/Linux are excluded.
the “Show Secure Menu” setting is a visibility control that manages access to the Agent's built-in encryption and secure storage features.
What it does
This setting determines whether the "Secure" menu (or tab) is visible to the end-user within the local Spirion Agent interface. This menu typically houses the tools for Vaults and encryption management.
- Enabled: Default. The user can see the "Secure" menu. This enables them to create and manage Spirion "Vaults" (encrypted containers for passwords, notes, or files) and use Spirion's internal encryption tools to protect data.
- Disabled: The "Secure" menu is hidden. The user cannot access Vaults or the Agent's native encryption/password management features through the UI.
Why it exists
This setting is used to align the Agent's capabilities with an organization's Data Protection Standards:
- Standardizing Encryption Tools: Many organizations already have a preferred encryption or password management solution (e.g., BitLocker, 1Password, or VeraCrypt). To prevent "shadow IT" and avoid having sensitive data locked in a proprietary Spirion Vault that the IT team can't manage, they may choose to hide the Secure menu.
- Simplifying the User Interface: If the primary goal of the deployment is simply "Find and Delete" (Discovery and Remediation), the Secure/Vault features can be seen as unnecessary clutter. Hiding the menu keeps the user focused on remediating their search results.
- Preventing Data Silos: Because Spirion Vaults are often tied to a local user profile or a specific password, there is a risk that an employee might encrypt critical business data and then leave the company, making the data unrecoverable. Disabling this menu prevents users from using Spirion as a personal encryption tool.
How it works in the architecture
- Internal Key: This maps to
Settings\Application\Display\ShowSecureMenu. - Feature Decoupling: Disabling the menu only hides the UI access points. It does not necessarily disable the underlying encryption engine if it is needed for other system tasks, but it effectively prevents the user from manually interacting with Vaults.
- Remediation Impact: Hiding the Secure menu does not typically disable the "Encrypt" remediation action in the Results view, provided that the "Encrypt" action is allowed elsewhere in the policy. It specifically targets the dedicated "Secure" management interface.
Recommendation
- For Discovery-Only Projects: Disable this setting. If you only want users to clean up PII, you don't want them getting distracted by a password manager or a file vault.
- For High-Privacy/Executive Users: Sometimes Enabled if those users need a quick, local way to store sensitive keys or notes that are separate from the main network, though this is becoming less common in favor of enterprise password managers.
- General Corporate Policy: Most large-scale deployments Disable the Secure menu to ensure employees use the official corporate encryption and credential management tools instead.
Summary
The “Show Secure Menu” setting is a Feature Visibility Toggle. It controls whether users have access to the Spirion Vault and encryption management interface, allowing administrators to prevent the use of local encryption tools that might conflict with enterprise security standards.
Show Shred Menu
*This option is specific to searches initiated from Windows Spirion Agent GUI. This is a Windows-only option. Mac/Linux are excluded.
The “Show Shred Menu” setting (found under Additional Settings - Advanced Options > User Interface) is a visibility control for the agent's secure file deletion utility.
What it does
This setting determines whether the "Shred" menu (or tab) is visible to the end-user in the local Spirion Agent interface. This menu provides access to the "Digital Shredder," which allows users to manually drag and drop files or folders to be securely deleted (overwritten multiple times) independently of a scan.
- Enabled: Default. The user can see the "Shred" menu. They can use the Spirion Agent as a standalone secure-deletion tool for any file on their system, even if that file wasn't found during a Spirion scan.
- Disabled: The "Shred" menu is hidden. The user cannot use the Agent for ad-hoc, manual shredding of files.
Why it exists
This setting allows administrators to control how users interact with Destructive Remediation tools:
- Preventing Accidental Data Loss: The "Shred" menu is a powerful tool—once a file is shredded by Spirion, it cannot be recovered by standard undelete utilities. Administrators may hide this menu to prevent users from accidentally shredding important business documents that they simply intended to move or recycle.
- Focusing the User Experience: If the organization's goal is for users to remediate only the sensitive data found during official scans, hiding the standalone Shred menu keeps the interface clean and prevents the agent from being used as a general-purpose utility.
- Compliance and Legal Hold: In some industries, "shredding" (securely overwriting) might violate data retention policies or legal hold requirements. By disabling the Shred menu, the organization ensures that employees aren't circumventing standard deletion processes.
Important Distinction: Menu vs. Remediation
It is critical to distinguish between the Shred Menu and the Shred Remediation Action:
- Show Shred Menu: Controls the standalone tool where you drag/drop files to destroy them.
- Allow Shredding (Remediation): A separate setting that determines if a user can click "Shred" on a specific search result found during a scan.
- Disabling the menu does not necessarily stop a user from shredding a search result, provided the remediation action itself is still permitted in the policy.
How it works in the architecture
- Internal Key: This maps to
Settings\Application\Display\ShowShredMenu. - Technology: Spirion's shredding typically uses the US Department of Defense (DoD) 5220.22-M standard (3-pass or 7-pass) to ensure data is unrecoverable.
Recommendations
- For General Corporate Use: Disable this setting. You want users to remediate the PII found in scans, but you generally don't want them using Spirion as a "Swiss Army Knife" for destroying any file they choose.
- For IT/Security Teams: Enable this setting. Security professionals often need a verified tool to securely wipe configuration files, old logs, or sensitive exports without running a full scan first.
Summary
The “Show Shred Menu” setting is a Utility Visibility Toggle. It controls whether the standalone Digital Shredder interface is available to the user, allowing administrators to limit the software to its primary discovery role and prevent the unauthorized or accidental destruction of non-scan-related data.
Show Sub Menu
*This option is specific to searches initiated from Windows Spirion Agent GUI. This is a Windows-only option. Mac/Linux are excluded.
This setting functions differently than the main menu toggles. This setting controls the Right-Click (Context) Menu behavior for sensitive data results found in the Agent.
What it does
When an agent finds sensitive data, the user typically right-clicks a result to take action. The “Show Sub Menu” setting determines how the remediation actions (like Shred, Scrub, Encrypt, and Quarantine) are organized in that right-click menu.
- Enabled (checked): The remediation actions are nested inside a "Spirion" or "Remediate" sub-menu.
- User Experience: Right-click file > Hover over "Spirion" > Select "Shred."
- Disabled (unchecked): The remediation actions are promoted to the top level of the context menu.
- User Experience: Right-click file > Select "Shred" directly from the main list.
Why it exists
This is a User Interface (UI) Cleanliness and Safety setting:
- Preventing Accidental Remediation: By placing actions like "Shred" or "Scrub" inside a sub-menu, you add an extra click/hover requirement. This "friction" helps prevent a user from accidentally clicking "Shred" when they intended to click "Open" or "Properties" in the standard Windows context menu.
- Reducing Context Menu "Bloat": If you have many remediation actions enabled (Shred, Scrub, Encrypt, Quarantine, Recycle, Ignore), having them all appear at the top level of the right-click menu can make the menu very long and overwhelming. Putting them in a sub-menu keeps the interface tidy.
- Standardizing the Look: Many enterprise tools (like 7-Zip or antivirus software) use sub-menus to keep their secondary actions organized. This setting allows Spirion to follow that same professional UI pattern.
How it works in the architecture
- Internal Key: This is part of the
Settings\Application\Display\ShowContextMenulogic, specifically controlling theSubMenuboolean. - Scope: This affects the context menu inside the Spirion Agent's Results Pane. It can also affect the Spirion entries in the Windows Shell (Windows Explorer) context menu if the shell extension is enabled.
Recommendations
- For Most Deployments: Enable the Sub-Menu (Keep it checked). This is the safest configuration because it prevents accidental deletions. Users are less likely to "slip" and shred a file if they have to intentionally navigate into the Spirion sub-menu.
- For High-Volume Remediation: If a user's sole job is to right-click and process thousands of files manually, you might Disable the sub-menu to save the user the "hover" time, and enable faster one-click remediation.
Summary
The “Show Sub Menu” under “Show Context Menu” is an Organization Toggle. It determines whether Spirion's remediation tools are neatly tucked into a sub-folder when you right-click a result or if they are listed individually at the top level of the menu. Most organizations keep it enabled to improve safety and reduce UI clutter.
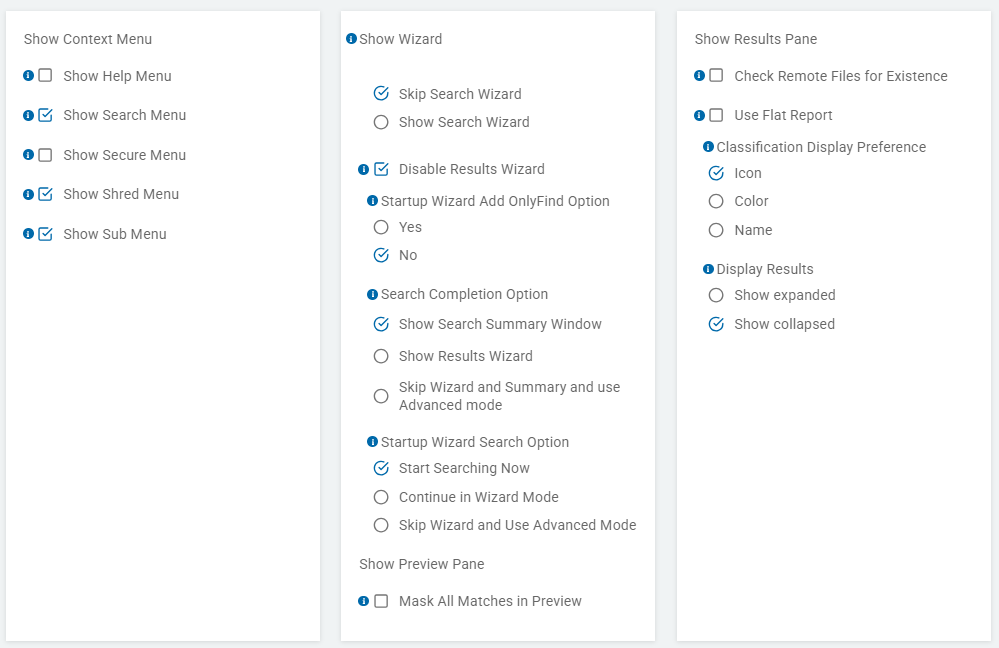
Show Wizard
The “Show Wizard” setting controls the initial "Welcome" or "Startup" experience when a user launches the Spirion Agent.
What it does
This setting determines whether the Search Wizard automatically appears when the user opens the Spirion application.
- Show Search Wizard
- This is the "Guided Mode" for the agent.
- What it does: When the user clicks the "Start" or "New Search" button (or when the application launches for the first time), a multi-step pop-up window appears. This wizard asks the user:
- What do you want to search? (Files, Emails, Browser, etc.)
- Where do you want to search? (My Documents, Desktop, etc.)
- Which data types should I look for? (SSNs, CCNs, etc.)
- User Experience: It simplifies the process into "Next > Next > Finish" steps.
- Best Use Case: Use this for non-technical employees who are being asked to run their own manual scans. It ensures they don't get lost in the complex ribbon menus of the main interface.
- Disabled: The application opens directly to the main "Dashboard" or "Search" interface. The user is expected to know how to navigate the ribbon/menu to start a scan or view previous results without being prompted by a step-by-step guide.
- Skip Search Wizard
- This is the "Expert Mode" or "Direct Action" mode.
- What it does: It completely bypasses the guided walkthrough. When the user clicks "Start" or launches the app, they are taken directly to the main Spirion interface (the Dashboard/Results view).
- If they click "Start Search," the agent immediately begins scanning using whatever settings were previously saved or defined by the administrator in the policy, without asking the user any questions.
- User Experience: The application feels "snappier" and more automated. There are no pop-up questions to answer.
- Best Use Case: Use this for highly managed environments where the administrator has already locked down the search locations and data types via policy. It prevents the user from accidentally changing those settings by clicking a different button in the Wizard.
Why it exists
This setting is used to manage the User Learning Curve and Operational Efficiency:
- Guided Experience for New Users: If you are rolling Spirion out to a large group of non-technical employees and asking them to run their own scans, the Wizard is very helpful. it ensures they don't skip critical steps (like selecting their "My Documents" folder).
- Preventing "Analysis Paralysis": For an average employee, the full Spirion interface can be intimidating because it has many buttons and tabs. The Wizard simplifies the experience by showing only one choice at a time.
- Speed for Power Users: For IT staff or employees who use the tool daily, the Wizard can be annoying and slow. Disabling it allows them to jump straight into the interface, load a saved configuration, and hit "Start" immediately.
- Scheduled vs. Manual Environments: If an administrator has already configured everything via a central policy, there is no need for a user to see a Wizard. Hiding it ensures the user doesn't try to change the predefined settings by clicking through the Wizard steps.
How it works in the architecture
- Internal Key: This maps to
Settings\Application\Display\ShowWizard. - First-Run Behavior: In many versions of the agent, the Wizard is programmed to show on the "First Run" by default. This setting allows the administrator to override that behavior so it never appears, even the first time the software is opened.
Recommendations
- For General Rollouts: Enable the Wizard. It reduces the number of support tickets from users asking "How do I start a scan?"
- For Managed/Silent Environments: Disable the Wizard. If you are managing everything through SDP policies and schedules, the user doesn't need a walkthrough; they only need to see the results when the scan is finished.
- For Self-Service IT: Disable it. Your technical teams will prefer the "Advanced" interface where all options are visible on the ribbon.
Summary
The “Show Wizard” setting is a Startup Experience Toggle. It determines if the Agent uses a guided, step-by-step walkthrough for new searches or if it opens directly to the main management interface. Disabling it is common in highly managed enterprise environments where consistency is more important than user guidance.
Disable Results Wizard
*This option is specific to searches initiated from Windows Spirion Agent GUI. This is a Windows-only option. Mac/Linux are excluded.
The “Disable Results Wizard” setting controls the automated cleanup guidance that appears immediately after a scan finishes.
What it does
By default, the Spirion Agent includes a Results Wizard (sometimes called the "Remediation Wizard") that pops up as soon as a scan is completed. This wizard walks the user through their findings and asks them what they want to do with the sensitive data (for example, Shred it, Scrub it, or Ignore it).
- Disabled (unchecked): Default. The Results Wizard appears. After the scan, a window pops up saying, "Search Complete. I found X results. Would you like me to help you clean them up?" and provides a "Next > Next" workflow for remediation.
- Enabled (checked): The Results Wizard is suppressed. When a scan finishes, the agent simply shows the standard "Results Grid" (the spreadsheet-like view of all findings). The user is then responsible for manually selecting rows and clicking remediation buttons on the ribbon.
Why it exists
This setting is used to manage User Responsibility and Workflow Complexity:
- Forcing Manual Review: In highly sensitive environments, administrators may not want users to "blindly" click "Next > Shred All" in a wizard. By disabling the wizard, you force the user to look at the full list of results in the main grid, encouraging a more careful, line-by-line review.
- Streamlining for Power Users: Experienced users often find the Results Wizard repetitive. They prefer to jump straight to the results grid where they can sort by "Data Type" or "Location" and perform bulk actions more efficiently than a step-by-step wizard allows.
- Reducing "Prompt Fatigue": If you are running frequent background scans, having a wizard pop up and take over the screen every time a scan ends can be intrusive to an employee's workday. Disabling it makes the completion of a scan much quieter.
- Consistently Managing Remediation: If your organization's policy is "Find but do not remediate locally" (e.g., results are handled by a central security team), you would disable the Results Wizard so the local user isn't even prompted to take action.
How it works in the architecture
- Internal Key: This maps to
Settings\Application\Display\DisableResultsWizard. - Post-Scan Trigger: This setting specifically targets the transition state between the "Search" phase and the "Review" phase of the agent's lifecycle.
Recommendations
- For Non-Technical Staff: Keep it Unchecked (Enable the Wizard). Most employees need the "hand-holding" provided by the Results Wizard to understand that they actually need to take action on the data found.
- For IT and Security Pros: Check it (Disable the Wizard). These users usually know exactly what they are looking for and will find the results grid much more powerful for sorting and filtering their findings.
- For "Silent" Audit Scans: Check it (Disable the Wizard). You don't want a pop-up interrupting the user if the goal of the scan is simply to report findings back to the console without immediate user interaction.
Summary
The “Disable Results Wizard” setting is a Post-Scan Interface Toggle. It determines whether the Agent provides a guided cleanup walkthrough after a search or if it simply drops the user into the full results list for manual processing. Most "managed" enterprise policies disable this wizard to avoid interrupting the user's workflow.
Startup Wizard Add OnlyFind Option
This setting modifies the choices presented to a user within the initial Startup/Search Wizard.
What it does
This setting adds a specific checkbox or selection called "OnlyFind" to the step-by-step Search Wizard.
OnlyFind is a specialized high-speed discovery mode in Spirion. When this option is available and selected by a user in the wizard:
- The Goal: The Agent focuses strictly on identifying locations that contain sensitive data, rather than counting every single instance of data within those locations.
- The Behavior: As soon as the Agent finds one match in a file or database table, it flags that location as "sensitive" and immediately moves on to the next file or table.
- The Interface Change: This setting literally inserts the "OnlyFind" toggle into the Wizard's "What to Search" or "Search Options" screen.
Why it exists
This setting is used for High-Speed Initial Discovery:
- Massive Data Sets: If a user needs to scan a 10 TB file share, counting every single Social Security Number could take days. By adding the "OnlyFind" option to the wizard, you give the user the ability to quickly "map" which folders have PII without the performance overhead of an exhaustive count.
- User Empowerment: It allows the end-user to decide between a "Quick Audit" (OnlyFind) and a "Full Forensic Scan" (Standard) depending on their current need and available time.
- Reducing Resource Impact: Because the agent stops searching a file after the first hit, it reduces Disk I/O and CPU usage. Providing this option in the wizard encourages users to choose the more "polite" scanning mode for their workstations.
Important Note on Results
If a user selects the "OnlyFind" option that this setting enables:
- The Match Count in the results will always be "1" for any flagged location, even if the file actually contains 5,000 sensitive items.
- The Remediation (Shred/Scrub) will still apply to the entire file, ensuring the location is cleaned even though only one hit was officially "counted."
How it works in the architecture
- Internal Key: This maps to
Settings\Application\Display\StartupWizardAddOnlyFindOption. - Dependency: This setting only has an effect if the "Show Wizard" setting is also enabled. If the wizard is skipped, the user never sees this option.
Recommendations
- For Initial "Clean-Up" Campaigns: Enable this option. Tell your users to check the "OnlyFind" box for their first scan. It will get them results much faster, allowing them to start remediating high-risk folders immediately.
- For Compliance/Regulatory Audits: Disable this option. If you need a "Total Count" of every PII instance for a report (like a GDPR or CCPA disclosure), you don't want the user accidentally selecting a mode that only reports one hit per file.
- For Managed Policies: Usually Disabled. Administrators typically prefer to define whether a scan is "OnlyFind" or "Full" at the policy level in the console, rather than letting the end-user choose.
Summary
The “Startup Wizard Add OnlyFind Option” is a Feature Access Toggle. It places a "High-Speed" discovery checkbox in the user's setup wizard, allowing them to choose a scanning mode that finds sensitive files quickly by stopping after the first match is found.
Startup Wizard Search Option
*This option is specific to searches initiated from Windows Spirion Agent GUI. This is a Windows-only option. Mac/Linux are excluded.
The “Startup Wizard Search Option” setting is a configuration toggle that defines the "default path" or complexity level presented to the user during the initial search setup.
What it does
This setting defines exactly what happens the moment a user clicks "Search" or opens the application.
They essentially control the "Velocity" of the user experience—deciding how many clicks stand between the user and the start of a scan.
- Start Searching Now
- This is the "One-Click" or "Express" mode.
- As soon as the user triggers the search action, the agent immediately begins scanning. It uses the default settings (defined by the policy or the last successful scan) and bypasses all configuration screens.
- User Experience: The user sees a progress bar immediately. There is no opportunity to change locations or data types.
- Best Use Case: Use this for automated or highly standardized workflows where you want zero user interaction. It ensures the user doesn't "mess up" the scan by unchecking important folders.
- Continue in Wizard Mode
- This is the "Guided" or "Educational" mode.
- This is the default behavior. It launches the step-by-step Search Wizard (Step 1: What, Step 2: Where, Step 3: Which Data Types). The user must click "Next" through several screens before the scan actually starts.
- User Experience: The user feels in control and is "walked through" the setup process.
- Best Use Case: Use this for newly onboarded employees or for "Self-Service" privacy initiatives where you want users to consciously choose what they are searching (e.g., "I only want to scan my Downloads folder today").
- Skip Wizard and use Advanced Mode
- This is the "Power User" or "Full Control" mode.
- This bypasses the simplified, step-by-step wizard and drops the user directly into the Main Agent Interface (the Ribbon/Dashboard).
- User Experience: No pop-up wizard appears. Instead, the user sees the full application window with all technical tabs (Search, Remediation, Configuration) visible. They can manually tweak deep settings (like OCR, Compressed File depth, or specific Registry keys) before clicking the "Start" button on the top ribbon.
- Best Use Case: Use this for IT Staff, Security Analysts, or DBAs. These users often find the Wizard too restrictive and prefer to see all their "knobs and dials" on one screen before initiating a complex search.
Comparison Summary
Option | User Friction | Interaction Level | Best For... |
|---|---|---|---|
Start Searching Now | None | Automatic | Standardized/Enforced Policies |
Continue in Wizard Mode | High | Step-by-Step | Non-technical users / Training |
Skip Wizard & Advanced | Medium | Expert Manual | IT Professionals / Complex Scans |
How it works in the architecture
- Internal Key: This maps to
Settings\Application\Display\StartupWizardSearchOption. - Dependency: This setting only functions if "Show Wizard" is enabled. It dictates the logic of the "Search Locations" screen within that wizard.
- Persistence: It writes to the local agent's registry or configuration file to remember the user's preference for the next launch.
Recommendations
- For Managed Corporate Policies: Choose “Start Searching Now.” It provides the most consistent results for your reports because every user is running the exact same scan without variation.
- For Help Desk/Troubleshooting: Choose “Skip Wizard and use Advanced Mode.” This allows the technician to quickly jump into the settings to see why a specific file might be getting skipped or to target a very specific directory for testing.
Summary
These options under “Startup Wizard Search Option” function as a Workflow Speed Selector. They allow an administrator to choose whether the agent immediately executes a scan, guides the user through a setup, or provides full manual control via the advanced interface.
Search Completion Option
- Note: If this option is set in the system container to "Show Results Wizard" or "Show Advanced Mode," the user does not have the opportunity to sign in with their profile password when the search completes.
The “Search Completion Option” setting defines the automatic behavior of the Agent immediately after a scan finishes.
What it does
This setting determines what the user sees—and what actions are taken—the moment the search progress bar reaches 100%. It effectively bridges the gap between the Search phase and the Review/Remediation phase.
These options determine whether the user is prompted with a high-level overview, a guided cleanup path, or the full-featured data grid.
- Show Search Summary Window
- This is the "Quick Report" mode.
- When the scan finishes, a small pop-up window appears showing high-level statistics: How many files were searched, how many matches (PII) were found, and the elapsed time.
- User Experience: It provides a "Congratulations, your scan is done" message with a summary. The user must usually click an "OK" or "View Results" button to move forward to the actual list of findings.
- Best Use Case: Use this for general users who need confirmation that the scan worked but don't necessarily need to be pushed into an immediate cleanup wizard. It’s a good "soft landing" for the user.
- Show Results Wizard
- This is the "Call to Action" mode.
- This bypasses the summary and immediately launches the Remediation Wizard. This is a step-by-step guided walkthrough (for example, "Step 1: Review SSNs. Do you want to Shred or Scrub?").
- User Experience: It is highly interactive. It doesn't just show the user the data; it actively asks them to fix it.
- Best Use Case: Use this when your organizational goal is immediate user-led remediation. It is the most effective way to ensure non-technical users actually perform the cleanup rather than just closing the application.
- Skip Wizard and Summary and use Advanced Mode
- This is the "Direct Access" or "Data Scientist" mode.
- This suppresses all pop-ups, summaries, and wizards. The agent immediately displays the main Results Grid (the spreadsheet-like view).
- User Experience: The user is dropped directly into the full list of findings. All advanced tools (filtering, sorting, right-click remediation, and the "Preview" pane) are immediately available on the screen.
- Best Use Case: Use this for Power Users, Security Analysts, and IT Staff. These users typically want to sort their results by "Date Modified" or "File Path" to investigate findings deeply, and they find summaries/wizards to be an unnecessary barrier to their work.
Comparison Summary
Option | Post-Scan Behavior | Interaction Style | Primary Goal |
|---|---|---|---|
Show Search Summary | Statistical Pop-up | Informational | Feedback & Confirmation |
Show Results Wizard | Step-by-Step Cleanup | Guided Action | High Remediation Rates |
Skip Wizard & Summary | Opens Full Results Grid | Manual Exploration | Detailed Investigation |
Recommendations
- For Compliance Mandates: Choose “Show Results Wizard.” If the company policy says "You must clean your PII," don't give them a summary they can ignore; give them a wizard that requires a choice.
- For "Silent" or Discovery Scans: Choose “Skip Wizard and Summary...” Combined with other "hidden" settings, this ensures that if a user does happen to open the agent while it's scanning, they aren't bombarded with pop-ups when it finishes.
- For Employee Training: Choose “Show Search Summary Window.” It gives the user a moment to digest the scale of the "Sensitive Data footprint" on their machine before they dive into the details.
Summary
The “Search Completion Option” settings allow you to choose between informing the user (Summary), guiding the user (Wizard), or empowering the user (Advanced Mode) once the data discovery phase is complete.
Mask All Matches in Preview
The “Mask All Matches in Preview” setting is a critical privacy and security control for the Agent's "Preview Pane."
What it does
When a user clicks on a result in the findings grid, the Spirion Agent typically shows a Preview of the file or email to help the user verify if the finding is a "True Positive."
- Disabled (unchecked): Default. The Agent displays the actual sensitive data in the preview window (for example, you would see the full Social Security Number:
555-00-1234). - Enabled (checked): The Agent automatically redacts or "masks" the sensitive characters within the preview window using asterisks or blocks (for example, the Social Security number would appear as
***-**-****).
Why it exists
This setting is used to enforce Principle of Least Privilege and Data Privacy:
- Preventing "Data Leakage" to the Reviewer: Sometimes, the person tasked with "cleaning" the data (like an IT intern or a delegated privacy officer) should not actually be allowed to see the sensitive data they are managing. This setting enables them to confirm a file is sensitive without ever seeing the actual PII/PCI.
- Compliance with Regulations: Under regulations like GDPR or PCI-DSS, displaying full Credit Card numbers or sensitive identifiers on a screen can be considered an "unauthorized disclosure." Masking ensures that the act of reviewing results doesn't create a new compliance violation.
- Physical Security (Shoulder Surfing): If an employee is reviewing their results in an open office or a public space, masking prevents passersby from seeing the sensitive data on the screen.
- Screenshot Protection: If a user takes a screenshot of their Spirion results to send to the Help Desk for a "False Positive" report, the sensitive data is already masked, ensuring the PII isn't accidentally attached to a support ticket.
Important Distinction: Masking vs. Shredding
- Masking in Preview: This is a UI-only change. It does not alter the original file on the hard drive. It only changes how the data looks inside the Spirion application.
- Scrubbing/Masking (Remediation): This is a permanent action that overwrites the actual data on the disk. Do not confuse the "Preview Masking" setting with the permanent "Scrub" action.
How it works in the architecture
- Internal Key: This maps to
Settings\Application\Display\MaskAllMatchesInPreview. - Logic: The agent identifies the "offset" (location) of the match in the file. When the Preview pane renders the text, the application logic replaces the characters at those specific coordinates with masking characters before the pixels are drawn on the screen.
Recommendations
- For General Business Users: Enable this setting. There is rarely a reason an employee needs to see their own full SSN or Credit Card number in a preview pane; they just need to know the file contains it so they can delete it.
- For Security Analysts/Forensics: Disable this setting. Analysts often need to see the "Context" and the actual value to determine if a finding is a "False Positive" (e.g., identifying if a string of numbers is an actual SSN or just a long internal tracking ID).
- For Shared Workstations: Always Enable.
Summary
The “Mask All Matches in Preview” setting is a UI Redaction Tool. It ensures that sensitive data is hidden behind asterisks within the Agent's preview window, protecting the data from being viewed during the review process while still allowing the user to manage the file.
Check Remote Files for Existence
The setting “Check Remote Files for Existence” is a performance and stability toggle used during remote scanning operations.
What it does
When an Agent is performing a remote scan (searching a network share, a remote computer, or a mounted volume), this setting tells the Agent to verify that a file actually exists and is accessible before it attempts to open it for deep inspection.
- Enabled (checked): Default. The Agent performs a quick "ping" or "existence check" on the remote file system metadata. If the file is missing (perhaps it was deleted between the time the directory was indexed and the time the scan reached it), the Agent gracefully skips it and moves to the next file.
- Disabled (unchecked): The Agent skips the existence check and immediately tries to open/stream the file for scanning.
Why it exists
This setting is primarily used for Error Handling and Optimizing Network Traffic:
- Handling "Ghost" Files: On busy network shares, files are constantly being moved, renamed, or deleted by users. If this setting is off, the Agent might trigger a "File Not Found" system error or a timeout when it tries to open a file that no longer exists, which can slow down the overall scan.
- Reducing Timeout Latency: Remote file systems (especially over slow VPNs or WANs) can hang if you try to open a non-existent file. A metadata "existence check" is much faster than a full "open file" request.
- Permissions Verification: This check can also serve as a "smoke test" for permissions. If the Agent can't even see if the file exists, it knows immediately that it doesn't have the rights to scan it, allowing it to log a "Permission Denied" error quickly rather than waiting for an expensive search operation to fail.
How it works in the architecture
- Internal Key: This is part of the
Settings\Locations\Remoteconfiguration tree, often related toCheckRemoteFileSystemsOnSearchStart. - Protocol Level: It typically uses standard SMB/CIFS metadata calls (like a
STATcommand) to query the file's presence without pulling the actual data bits across the wire.
Recommendations
- For Standard Network Shares: Enable this setting. It makes the scan more resilient to the "noise" of a live office environment where files are constantly changing.
- For Static Archives: If you are scanning a "frozen" or "read-only" backup where files never change, Disable this setting to save a tiny amount of metadata overhead, though the performance gain is usually negligible.
- For Unstable Connections: Always Enable this setting. If your network connection is flaky, you want the Agent to be as cautious as possible before committing to a full file download.
Summary
The “Check Remote Files for Existence” setting is a Pre-Scan Validation tool. It ensures the Agent doesn't waste time or trigger system errors by trying to scan files that have been moved or deleted from a remote network location since the scan started.
Use Flat Report
The “Use Flat Report” setting controls the data structure of the results file generated by the Agent.
What it does
This setting determines whether the Agent produces a hierarchical report or a flat (tabular) report.
- Disabled (unchecked): Default. The Agent generates a hierarchical report. In this mode, results are grouped by location (for example, File Path). If a single file has 50 Social Security numbers, the report lists the file once and then nests the 50 matches underneath it as sub-items.
- When Enabled (checked): The Agent generates a "Flat" report. In this mode, every single match becomes its own independent row. If a file has 50 SSNs, the report contains 50 separate entries, each repeating the file path, the specific match value, and its coordinates.
Why it exists
This setting is used to facilitate Data Integration and External Analysis:
- Compatibility with SIEMs and Log Analyzers: Tools like Splunk, ELK, or Microsoft Sentinel prefer "flat" data. It is much easier for these systems to ingest and count a CSV-style list of rows than it is to parse a complex, nested XML or JSON structure.
- Simplified Spreadsheet Analysis: If an administrator intends to export the agent's results into Excel for manual pivoting or filtering, a "Flat" report is essential. You cannot easily filter a hierarchical list in Excel without losing the connection between the "Parent" (file) and the "Child" (match).
- Detailed Auditing: When you need to prove exactly how many total matches exist across your entire enterprise (rather than just how many files are "at risk"), a flat report provides a direct 1:1 count of rows to matches.
- Database Ingestion: If you are importing results into a custom SQL database for long-term tracking, a flat structure maps directly to a standard relational table without requiring complex transformation logic.
How it works in the architecture
- Internal Key: This typically maps to
Settings\Reports\UseFlatReport. - Output Format: This setting primarily affects the way data is serialized into
.spf,.xml, or.csvfiles before they are shipped or saved locally. - SDP Console Ingestion: While the SDP cloud console is designed to handle Spirion's native data formats, this setting is often toggled when "Local Results" are being saved for consumption by third-party scripts or automation.
Recommendations
- For Console Reporting: Disable the setting. The SDP Console is optimized for the standard hierarchical format, which is more efficient for storage and network transmission (as it doesn't repeat file paths unnecessarily).
- For Custom Scripting/Excel: Enable the setting. If you have a Python script or an Excel macro that processes scan results, it is 10x easier to write if the data is flat.
- For Compliance Proofs: Enable it. When an auditor asks for a list of "every instance of a Credit Card number," the flat report is the easiest "smoking gun" to provide.
Summary
The “Use Flat Report” setting is a Data Serialization Toggle. It switches the Agent's output from a grouped/nested view to a row-by-row tabular format, making the results significantly easier to use in Excel, SIEMs, and external databases.
Classification Display Preference
The “Classification Display Preference” setting is a UI-specific configuration that determines how classification labels are presented to the end-user within the local Agent's interface.
What it does
Spirion supports multiple ways of "tagging" or "classifying" data (for example, Public, Internal, Confidential, Restricted). This setting controls the visual style of these labels in the agent's Results Grid and Remediation Wizard.
Choose between the following:
- Name: Displays the literal text string of the classification (for example, "Confidential," "Internal Use Only," or "PPR - Public").
- User Experience: This is the most explicit and least ambiguous option. It provides the exact terminology defined by the organization's Data Governance policy.
- Best Use Case: Use this when policy clarity is the priority. If your organization has recently changed its classification names, showing the full name ensures there is no guesswork involved for the employee.
- Icon: This displays a small graphical symbol (typically defined in the Console's Classification settings) next to the file result. Common icons include shields, locks, or exclamation marks.
- User Experience: This is the most "compact" visual cue. It allows users to scan a long list of results and quickly spot high-risk items based on the shape or symbol without having to read the text of the label.
- Best Use Case: Use this for multi-lingual environments or environments where users are already trained to recognize specific security symbols (for example, a "Red Shield" always means a high-risk compliance violation).
- Color: Uses a background color or a side-bar color in the results grid to indicate the classification level of each row at a glance. This applies a color-coded highlight or colored text to the classification column or the entire row in the results grid.
- User Experience: This is the most high-impact visual cue. Color is processed by the human brain faster than text or shapes. A sea of "Green" rows with a single "Red" row makes the critical finding stand out immediately.
- Best Use Case: Use this for High-Volume Review. If a user has to process 1,000 findings, the color allows them to prioritize their work instinctively (e.g., "I'll handle the red rows first, then the yellow").
Can they be combined?
In many versions of the Spirion Agent, these are not mutually exclusive. Depending on the specific UI build:
- You might select multiple options (for example, Name and Color) to ensure the row is both highlighted and explicitly labeled.
- If the UI only allows a single selection, Color is generally considered the most "urgent," Name is the most "informative," and Icon is the most "unobtrusive."
Recommendations
- The "Gold Standard": If your policy allows for it, use Name and Color. This provides the immediate "Red Alert" psychological trigger while simultaneously providing the "Confidential" text needed for compliance reporting.
- For Minimalist UIs: Use Icon only. This keeps the Results Grid from looking cluttered while still providing a hint of the risk level.
Summary
- Icon: Provides a symbolic cue (shape-based).
- Name: Provides a literal cue (text-based).
- Color: Provides a psychological cue (urgency-based).
By adjusting this preference, an administrator can tailor the Spirion Agent's "look and feel" to match the organization's broader Data Privacy awareness program.
Why it exists
This setting is used to Improve User Recognition and Speed of Review:
- Standardizing with Corporate Branding: If your organization uses specific colors for classification (e.g., "Red" always means top-secret), you can use this setting to ensure the Spirion agent matches those visual cues.
- Accessibility: For some users, a large color-coded block is easier to distinguish than small text.
- Reducing Complexity: In some environments, administrators prefer a "Clean" look with no icons to avoid distracting the user from the file paths and match details.
How it works in the architecture
- Internal Key: This maps to
Settings\Actions\Classification\DisplayPreference. - Relationship to Metadata: This setting only affects the display of the metadata. It does not change how the classification is actually written to the file (for example, via NTFS Alternate Data Streams or M365 In-Content tagging).
- Console Sync: The classification names and icons themselves are usually defined centrally in the SDP Console under the "Classifications" menu and are then pushed to the agent via this policy.
Recommendations
- For High-Urgency Environments: Use Name and Icon. The visual "pop" of a red icon helps users immediately identify the highest-risk files that need their attention first.
- For Executive/Simple Views: Use Name Only. It keeps the interface looking professional and less like a technical diagnostic tool.
- Consistency is Key: Ensure the "Display Preference" matches whatever your users see in other tools (like the M365/MIP sensitivity labels) to avoid "Classification Confusion."
Summary
The “Classification Display Preference” setting is a Visual Formatting Toggle. It tells the Agent whether to show classification labels as plain text, text with icons, or color-coded highlights, ensuring the user interface aligns with the organization's existing data governance standards.
Display Results
*This is a Windows and Mac Agent setting. Linux Agents are excluded.
The “Display Results” setting is a primary visibility toggle that determines whether the user is permitted to see the specific findings of a scan on their local machine.
What it does
This setting controls the population of the Results Grid (the spreadsheet-like view of matches) within the local Spirion Agent.
- Enabled: Default. After a scan completes, the Agent displays a detailed list of every file, email, or location where sensitive data was found. The user can see the file path, the type of data found (for example, Social Security number, Credit Card number, etc.), and potentially a preview of the match.
- Disabled: The Agent does not show the specific findings to the end-user. The scan may still run in the background, and the results are sent to the central SDP Console, but the local "Results" tab in the Agent remains empty or is hidden entirely.
Why it exists
This setting is used to control Information Privacy and Remediation Workflow:
- Centralized Cleanup: If your organization’s policy is that only the Security Team handles remediation, you don't want the end-user seeing exactly which files contain PII. You "Hide" the results so they are only visible to authorized admins in the console.
- Preventing "Self-Correction" Errors: In some highly regulated environments, showing results to a user might prompt them to try and "hide" or move data before it can be officially audited or quarantined by IT.
- Reducing User Anxiety: Running a scan that finds 50,000 matches on a workstation can be overwhelming for a non-technical employee. Disabling the display allows the scan to gather data for the "Risk Map" without causing unnecessary concern for the user.
- "Discovery-Only" Missions: When the goal of a policy is simply to perform an inventory (for example, "Find out how much PII is on the finance share"), the results display is disabled because no user action is required locally.
How it works in the architecture
- Internal Key: This maps to
Settings\Application\Display\DisplayResults. - Decoupling: Disabling the display does not stop the search. The Agent's engine still performs the full discovery; it simply suppresses the UI from rendering the
Resultobjects. - Console Impact: This setting has zero impact on what is sent to the console. The SDP Console will always receive the findings regardless of whether the local user can see them.
Recommendations
- For "Self-Service" Programs: Always Enable this setting. If you want users to delete their own PII (Shred/Scrub), they must be able to see the results.
- For Stealth Audits: Disable this setting. Use this when you are performing a baseline risk assessment and you don't want the user to know exactly what the agent is discovering.
- For High-Risk "Executive" Scans: Disable this setting. If you are scanning an executive's machine for compliance, you may want to review the results in the console first to avoid showing sensitive corporate documents in the Agent GUI.
Summary
The “Display Results” setting is a UI Visibility Gate. It defines whether the "Findings" are transparent to the end-user for local review and remediation or hidden locally and reserved strictly for central administration in the SDP Console.