
How to Quarantine to a Remote Location Using Spirion Sensitive Data Platform
archTIS Spirion highly recommends that in an Enterprise environment you use Quarantine to protect sensitive data.
Overview
Quarantine is one of the remediation options available in a playbook using Spirion Sensitive Data Platform.
Spirion Support highly recommends the use of quarantine in an Enterprise environment as one of the first steps to protecting sensitive data.
Before You Start
- You need a service account with access to both the Target file server being scanned AND the destination that the quarantine folder would reside.
- The service account needs both read and write permission on both the Target being scanned and the destination
- Support recommends testing in the Agent to confirm that the service account you want to use has proper permissions
- When entering the UNC path for the Windows quarantine file path ensure the Target in the path matches the authentication Target.
- That is, if your authentication target is using IP address, make sure the UNC path in the Windows Quarantine path is also an IP address.
- If the Quarantine folder does not exist, it is created for you.
- The quarantine file path will be preserved as the file path inside the quarantine folder.
- When adding quarantine to a playbook the playbook must still maintain a classification function to be saved
- When adding quarantine to a playbook it does not need to be a decision point of its own. A single decision point can both classify and quarantine. The playbook in this article is for demonstration purposes only.
How to Set Up Quarantine
You set up Quarantine in two parts.
- The first part takes place in the "Application Settings" page (Settings > Application Settings) in the Spirion Sensitive Data Platform console.
- The second part takes place in the workbook.
How to Configure Quarantine Paths on the Application Settings Page
Use the following steps to set up your quarantine paths. Quarantine paths are configured on the Application Settings page:
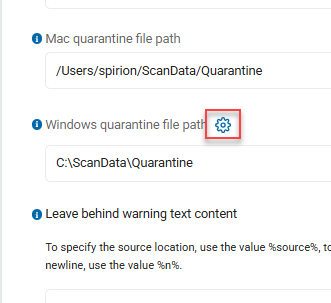
- From the blue navigation menu on the left side of Spirion Sensitive Data Platform, navigate to Settings > Application Settings > Scan Settings > Remediation.
- Enter the path that quarantined documents will reside in.
- Syntax: \\yoursever\quarantine folder
- For details, see the embedded tooltips
- Click the blue gear next to "Windows quarantine file path".
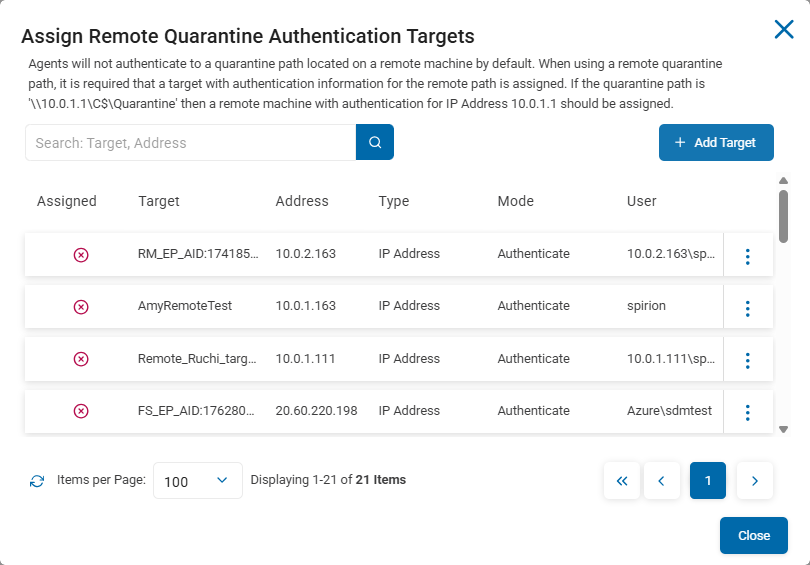
- Navigate to the target that was entered in the path in step 2.
- If the target does not exist, you can select the blue + Add Target button. This enables you to create the Target on the spot.
- Note: If you create the Target on this screen, the Target address must be in the same format as the Windows quarantine path. That is, if you put an address in the Windows Quarantine file path that uses a NetBIOS in the UNC path then the Target created must also use NetBIOS.
- If the target does not exist, you can select the blue + Add Target button. This enables you to create the Target on the spot.
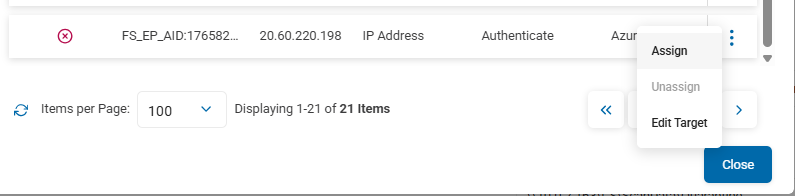
- Click the 3 ellipses in line with the Target name and select Assign. If the assignment is successful, a green check appears next to the Target name.
How to Set Up Manual or Automatic Quarantine Using a Scan Playbook
Once quarantine is set up in the Application Settings it must be added to a playbook to be invoked.
To add the quarantine action to a scan playbook use the following steps:
- Navigate to the decision point in which you wish to add the quarantine function.
- Select Quarantine from the toggle box.
- Check the Automated Action checkbox ONLY IF you want documents to be auto quarantined.
- If you wish to have a human manually review the documents first, leave this box unchecked.