
How to Build a Mac Package (PKG)
Note: As of February of 2026, the latest release of the Endpoint for Mac installer is version 12.6.5.
macOS Support for Intel Scanning and Spirion Sensitive Data Platform Features

*Execute Script Remediation action is still unsupported on Mac agents
Before You Start
- Never upgrade your endpoints (Agents) first.
- Never upgrade your endpoints (Agents) to a version higher than that of the console. Console and Endpoint versions must be the same.
- Always build a new PKG each time you attempt to upgrade.
- Always test a manual install of the PKG on a test machine BEFORE pushing an update through the console.
- If you plan to upgrade many machines, consider staggering your upgrade process by department or in groups/tags to ensure that any issues can be handled in better timing than the chaos of upgrading a large pool of machines at once
- The only supported method for creating an installer package is the Spirion Client Custom PKG Builder in this article.
- Only create a Mac package on a Mac. Do not attempt to create it on a PC or a Linux machine.
- STOP the PKGBuilder application before you attempt to install or execute the client application.
- Multiple Packages: XML files are single-use for package creation. If you want to create multiple packages, then you need multiple copies of these files as these files are altered in the package creation process.
- DO NOT change the name of any of the files when creating the package or the package will not work.
- Spirion Package Builder and Spirion Agent do not work in dark mode. We strongly advise against using dark mode when Spirion is present.
- App Nap: We recommended disabling App Nap, under advanced settings. If your Mac App Naps during a search it will stop the search and then throw an error in the EPS logs.
Key Points about Signing the Package and Certificates
- Signing the package: In most cases, you do not need to sign the package.
- If you are unsure whether your environment requires it, ask your Mac administrator.
- If you don’t have a Mac administrator, you most likely do not need to sign the packages yourself.
- Check your Mac’s system settings, under security, where you’ll find an option to allow only signed packages.
- Most environments don’t have this setting enabled.
- Certificate Requirement: Spirion Sensitive Data Platform customers DO NOT need a certificate since this is handled by the console, communication should be open to Spirion Sensitive Data Platform
- On macOS, the built-in security feature called Gatekeeper restricts the installation of unsigned packages. The standard system setting is configured to only allow software from: identified developers or the App Store.
Support for Package Builder Versions
- Double-check the version of the .pkg builder before starting as different versions of the builder are supported by different endpoint versions.
- If you are unsure which version you need place a ticket into Support.
- Spirion Sensitive Data Platform versions 12.x and later:
- Use Package builder v2.0.4 (requires login to access)
- Spirion Sensitive Data Platform versions 11.3.2 to 11.6.1:
- Use Package builder v2.0
- Package builder 2.0 is not backward compatible at this time
- Spirion Sensitive Data Platform versions 11.3.1 and older:
- Use Package builder 1.0
- Example: You can use package builder v2.0 to upgrade from any version 11.3.1, 10.9 etc. however, you cannot use package builder 2.0 to upgrade with any other version such as upgrading from 10.9 to 11.3.1. To do that you must use package builder 1.0.
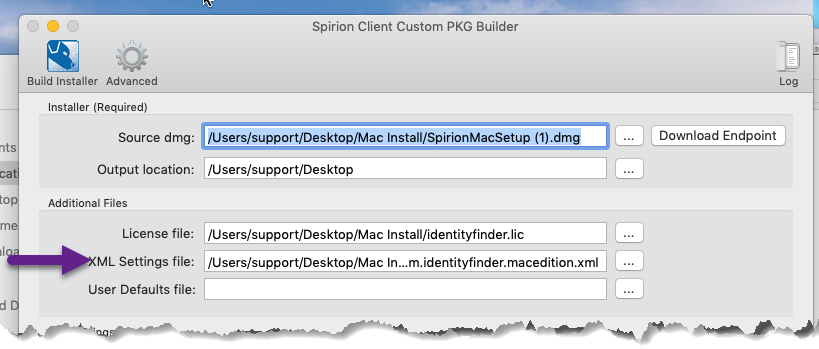
How to Gather the Files Needed to Build the Package
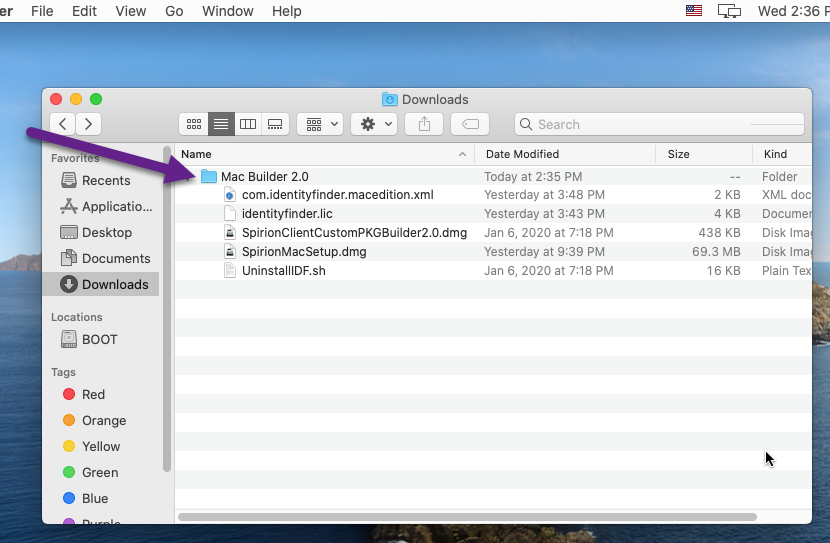
The best method for building a package is to create a folder to gather everything you need into like in the screenshot below (Mac Builder 2.0):
- Create a folder in a convenient place access and name the folder.
- Download the Package Builder.
- See the section "Package Builder Version Support" above.
- Download a copy of your license from the Customer Portal.
- The license should be in the form of indentityfinder.lic
- Do not change the name from this or the package will fail.
- Download the version of the Mac client software you wish to use from the Customer Portal.
- The file will download as Spirionsetup.dmg.
- Do not change the name of this file or the package will fail.
- Download a copy of com.identityfinder.macedition.xml from the console services page located at console-web.(your-URL)-spirion.com/Services
- Consoleserver is the name of the URL address of the console.
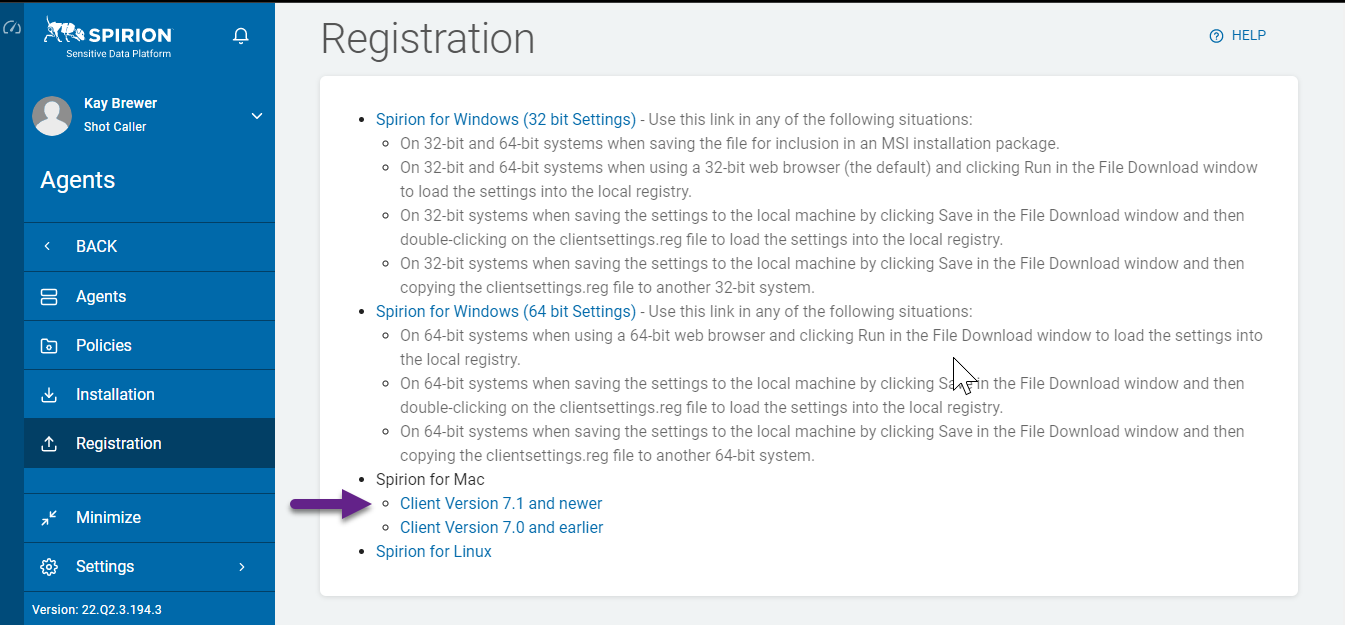
- Click on the appropriate link for Mac version 7.1 and newer.
- If you require HTTPS communication, download and save a copy of your SSL certificate.
- You must save this in a .pem format and name that certificate CA.pem.
- Place the files from Steps 2-5 into the folder created in Step 1.
How to Build the PKG File
Basic Package Instructions
Procedure:
- Open the Package Builder from the Folder created in the section above.
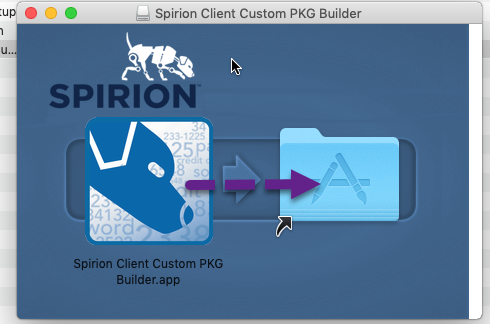
- Agree to the Spirion License Agreement. The package builder goes through the process and a blue screen like the one below pops up.
- Drag the Spirion Client Custom PKG Builder.app file (the picture of Poochie) over to the light blue app folder.
- The app installs and you then open it either from the App pane or the dashboard.
- Open the Package Builder App by going to Go > Applications > Spirion Client…Builder.app.
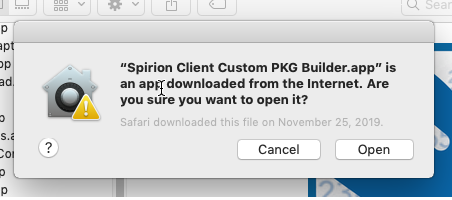
- Click Open if you get a pop-up like the one below.
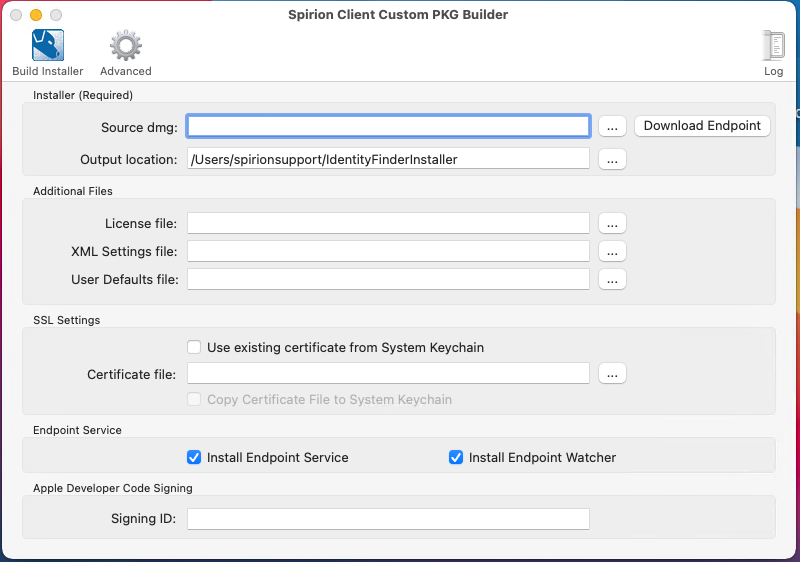
- Load the appropriate files for each of the fields, as described below:
- Source dmg: (Required)
- This is the Spirionsetup.dmg file that you downloaded in Step 4 under "Gathering the Files Needed to Build the Package."
- DO NOT CHANGE THE FILE NAME OR THE INSTALLATION/CREATION WILL FAIL.
- Output location: (Required)
- This is the full path of the output file.
- This file will be created at the end of the package building process.
- It is a ZIP file, therefore, when you test the package on a single install you will need to unzip this.
- The ZIP file that is created is also the file that is loaded into the console. This is addressed later.
- License file: (Required)
- The full path to the identity file finder.lic downloaded in step 3 in the previous section.
- DO NOT CHANGE THE NAME OF THIS FILE OR THE INSTALLATION/ CREATION WILL FAIL.
- XML Settings file: (Required)
- The full path to the file com.identityfinder.macedition.xml settings obtained from the console.
- User Defaults Files: (Not Required)
- The full path to the settings file com.identityfinder.macedition.firstrun.xml. This is covered in the next section.
- Use an existing certificate from System Keychain (checkbox):
- Check this box if you are using an SSL certificate that already exists in the key chain.
- Note: This may not work even if the certificate is in the keychain. We suggest you attach the certificate to make 100% sure it is added to the system. We cover certificate best practices in another section.
- Certificate File (Required for SSL communication):
- NOT needed for Sensitive Data Platform
- Copy Certificates File to System Keychain (checkbox):
- NOT needed for Sensitive Data Platform
- Install Endpoint Service(checkbox)
- Check this box if you want the endpoints to communicate with the console.
- Uncheck this box if you just want a single agent installer.
- Signing ID
- Enter your Apple Developer Code Signing ID if the machines on which the PKG file will be installed requires all installation packages to have a valid digital signature.
- This is all you need for a basic package.
- If you do not need any additional settings, skip down to Advanced Settings.
Advanced Settings
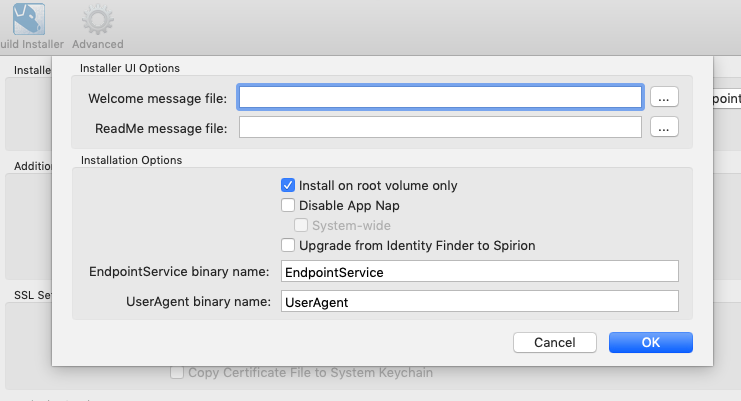
Click the gear at the top of the builder UI to configure additional Advanced settings.
- These settings are not required to build a package and if you do not want or need to set these settings you can skip this section.
- These settings are not commonly set.
- Welcome message file:
- The full path to a custom Welcome message.
- This message will be integrated into the installer GUI and will automatically display when running the installer.
- The welcome message file must be in Rich Text format and named Welcome.rtf.
- ReadMe message file:
- The full path to a custom ReadMe message.
- This message will be integrated into the installer GUI and will automatically display when running the installer.
- The ReadMe message file must be in Rich Text format and named ReadMe.rtf.
- Install on root volume only:
- By default, the application is installed on the root volume.
- If you want to install somewhere else, for example, another partition on your hard drive, unchecking this option will allow you to select another installation location in the installer GUI.
- Disable App Nap:
- This setting is recommended if you are going to be scanning Macs with local system set as the search context.
- App Napp can cause a search to malfunction.
How to Create a User Default File
You may choose to load a FirstRun policy.
- A FirstRun policy enables defaults to be selected when the end-user opens the agent.
- If the Initialization\Configuration\AlwaysUseFirstRun setting is set to: "Always reset settings" (1) or Initialization\Configuration\FirstRun setting is set to “True” in a system policy applied to the endpoint and a User Default policy also exists, the settings in the XML are merged with the settings from a User Default policy (if a setting exists in both locations, the value in the User Default policy is used).
- User Defaults file is not required to build a PKG. Note the following about the User Defaults file:
- Optional
- Enables:
- The inclusion of a system FirstRun configuration file which enables you to set defaults that are different than the application defaults
- The user to change those settings in the UI
- Then resets those custom defaults each time Identity Finder is launched
To create a User Defaults file, perform the following steps:
- Create a User Default Policy with ONLY the settings that you want to be enabled.
- Export the policy definitions as a “Local File” policy type and name it com.identityfinder.macedition.firstrun.xml.
- Open the exported policy file in the XML editor.
- Delete the first link of XML:
<PolicyData Schema=”1.0”> - Delete the last line of the file:
</PolicyData> - Save the file com.identityfinder.macedition.firstrun.xml.
- Open the file com.identityfinder.macedition.xml.
- Edit the file com.identityfinder.macedition.xml to add the following tags directly above the tag which matches the code block below:
</Container>
  <Category Name=”Initialization”>
		<Category Name=”Configuration”>
			<Setting Name=”AlwaysUseFirstRun” Type=”Bit” Restart=”false” Multi=”false”>
				<Value>1</Value>
			</Setting>
			<Setting Name=”FirstRun” Type=”Bit” Restart=”false” Multi=”false”>
				<Value>1</Value>
			</Setting>
		</Category>
	</Category>
9. Save the file com.identityfinder.macedition.xml and add it to the XML Settings file location.
How to Use a Certificate for SSL Communications
If you set your console or endpoints to communicate in HTTPS then you must attach an SSL certificate to the PKG builder.
When you use a Certificate keep these tips in mind.
- Download your certificate to a physical location.
- We recommend that you save the file in the same folder that you are putting your other package building files.
- Name the certificate CA.pem.
- The certificate must be in a .pem format.
How to Whitelist the Spirion macOS Package
When using Software Distribution, Team Identifier and Bundle ID are used to whitelist Spirion Mac OS Package.
Below are the Team Identifier and Bundle ID used to whitelist Spirion.
**IMPORTANT** Use exactly these strings. Do NOT use a comma after "Spirion":
- Team: Spirion LLC
- Bundle ID: com.identityfinder.macedition
How to Sign a Package
Some environments require packages to be signed to be installed on a Mac.
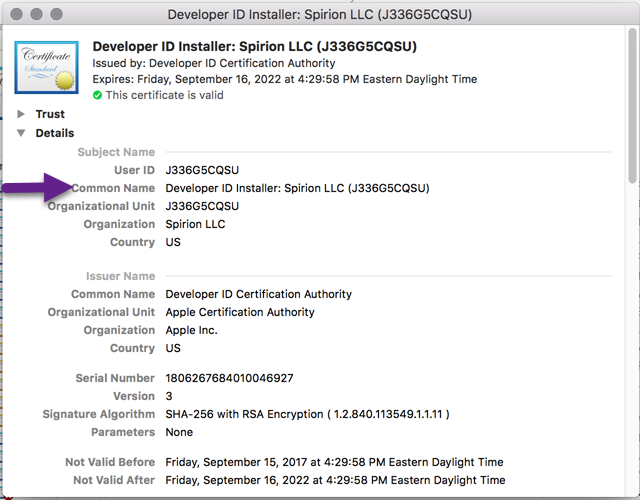
- To sign a package built with the Custom PKG Builder.app, get an installer certificate from Apple:
- Find it here: https://developer.apple.com/developer-id/
- For a guide on how to create the signing certificate:
https://help.apple.com/xcode/mac/current/#/dev154b28f09
- For example, our certificate looks like this, and the Common Name is used to sign the package:
- Then copy the installer certificate Common Name to the Signing ID text field at the bottom of the installer window:
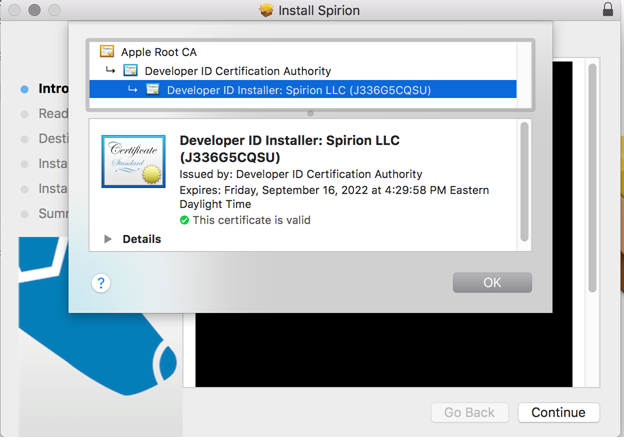
- When the installer is built, it will be signed and have a little lock in the upper right corner.
- When you click on the lock, it shows the certificate signing chain.
- If the app is signed and notarized by Apple, but the client applies their own self-signed certificate, the app likely fails Gatekeeper checks because the signature has been altered.
Here’s a breakdown of why this happens:
How Altering the Signature Breaks Trust
- When an app is signed and notarized by Apple, macOS establishes trust based on the original developer's signature and the notarization stamp.
- If the customer applies their own self-signed certificate, they effectively invalidate the original signature. macOS no longer recognizes the app as being from the trusted, notarized developer.
- This alteration triggers Gatekeeper, which will block the app because the signature no longer matches the one approved during notarization.
Work Around Instructions
- Trusted Internal Certificate:
- If the client wants to sign the app with their own certificate (for example, for internal distribution),
- Use a certificate from a trusted Certificate Authority within their organization
- You may need to distribute this certificate to all client machines to establish trust.
Conclusion
In conclusion, if a client applies their own self-signed certificate to a notarized app, it invalidates the original signature and breaks the notarization, causing Gatekeeper to block the app.
How to Test the Package
It is critical to test the complete package prior to deployment.
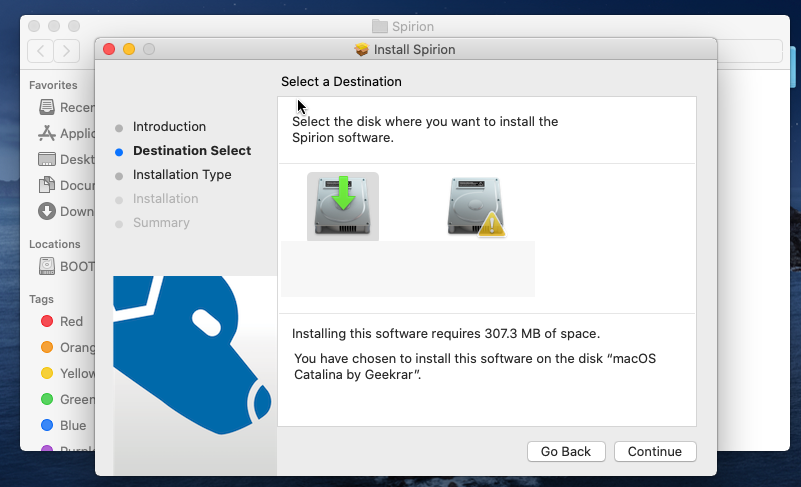
To test the package on a single machine do the following:
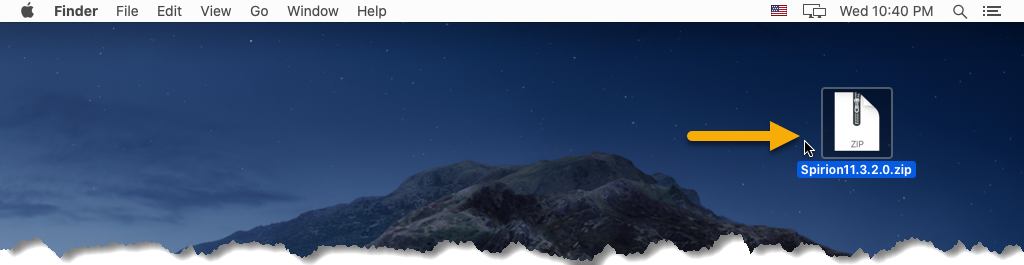
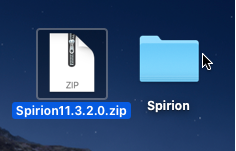
- Extract IdentityFinder.pkg from the zip file created by the PKGBuilder application (double-clicking will do this for you automatically.
- Open the Spirion folder that is created as a result.
- Launch the Spirion.pkg from inside the folder.
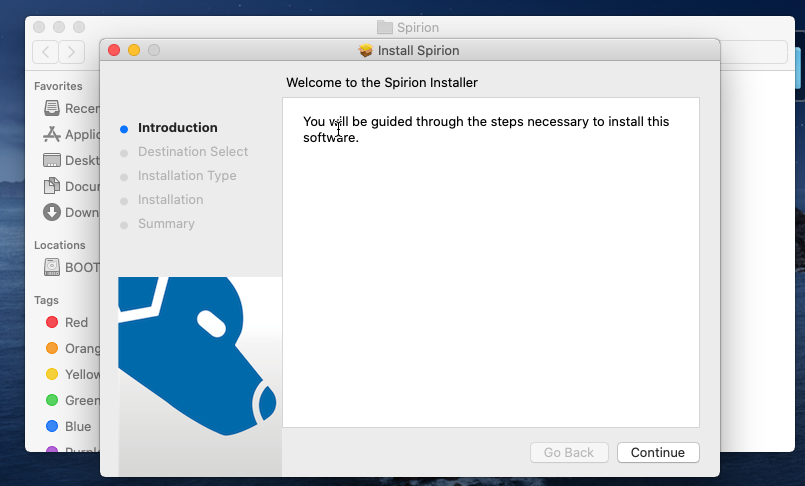
- Click Continue through the introduction screen.
- Select the Drive that you wish to install Spirion on. DO NOT SELECT THE BOOT DRIVE.
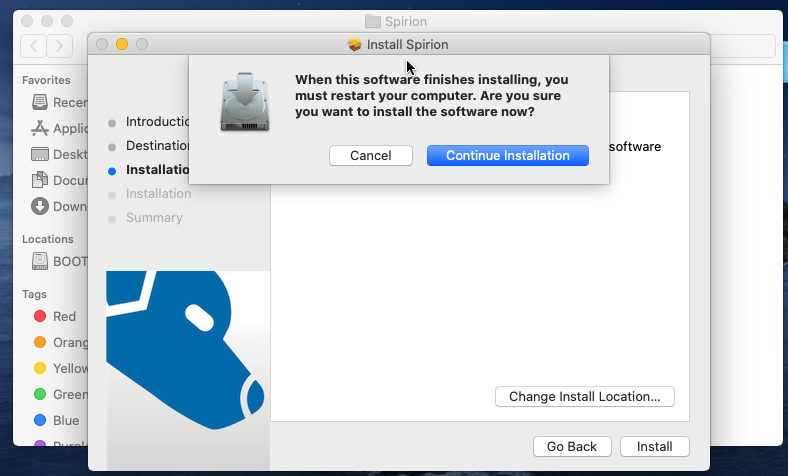
- Click Install.
- If you are using package builder 2.0, a drop-down appears alerting you to reboot after installation.
- This is required for the package to function correctly and cannot be circumvented.
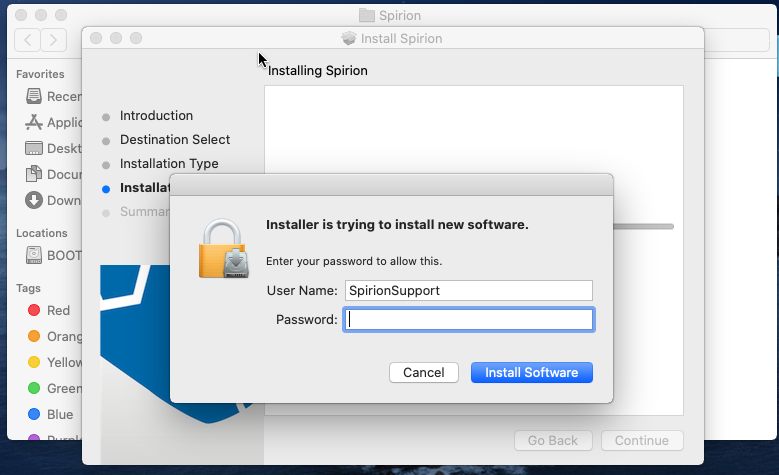
- Enter your Mac's admin credentials if prompted.
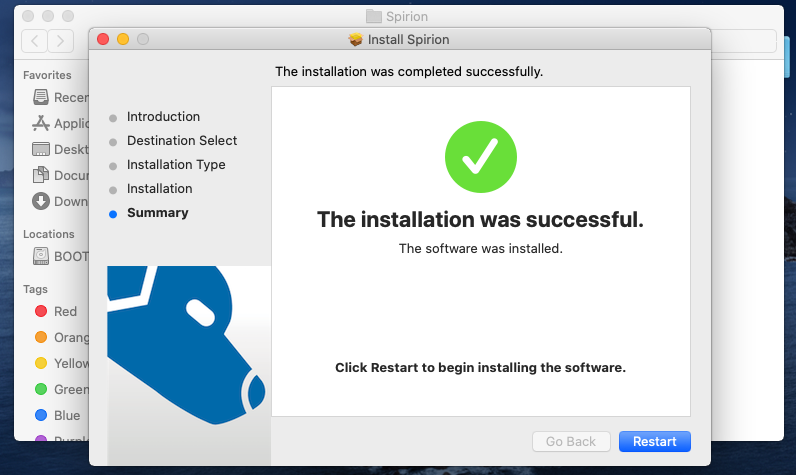
- Wait for the installation to finish.
- Reboot your machine.
- Check your console to ensure that the installation worked.
- The endpoint shows up in the status tab of the console.
- If you see the endpoint in this tab your package is ready to deploy.
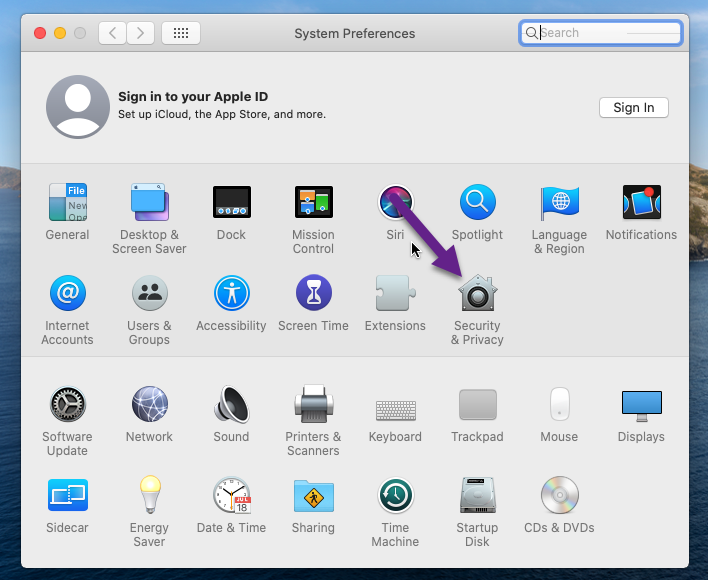
How to Set Permissions in System Preferences
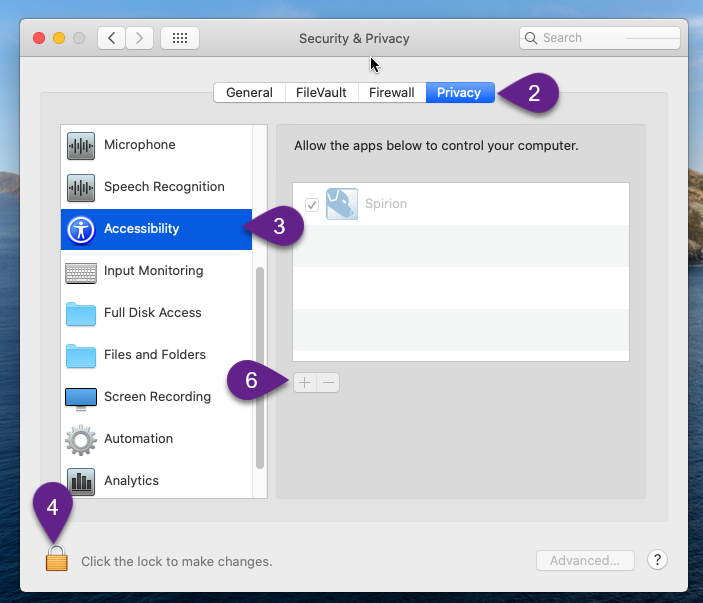
In order for Mac searches to run effectively, you need to grant Spirion Full Disk access and Accessibility access in System Preferences.
- Navigate to Apple>System Preferences > Security and Privacy.
- In the Security & Privacy pane click Privacy.
- Click Accessibility.
- Click the padlock to unlock adding programs to accessibility.
- Enter your Administrative credentials.
- Click the + button.
- Navigate to Spirion under apps and add it to Accessibility.
- Repeat steps 3 - 7 for Full Disk Access.
- For more information see this article here.
How to Uninstall the Spirion Package From Mac
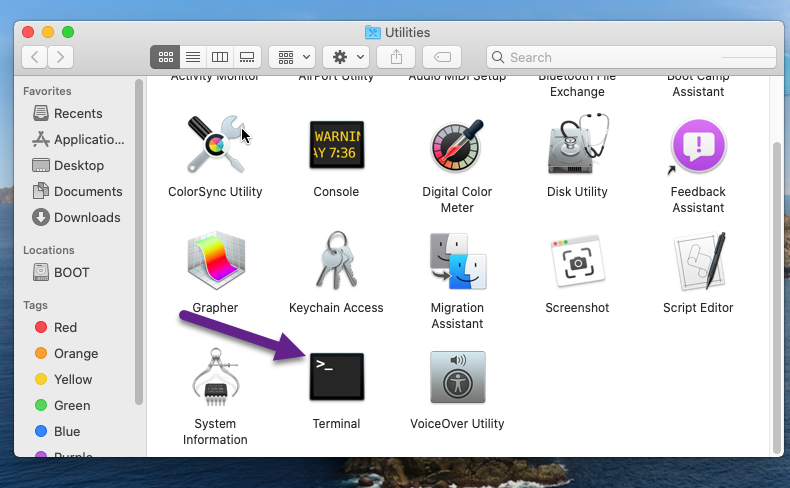
If it is necessary to completely uninstall the application, download the script UninstallIDF.sh and perform the following steps:
- Copy the UninstallIDF.sh script to the desktop of the macOS system on which the uninstall is to be performed.
- Open Terminal.
- Run the following command script inside of a Terminal instance:
cd~/Desktop
chmod ugo+x UninstallIDF.sh
./UninstallIDF.sh -p
Additionally, there are several command-line switches available to use with the uninstall script, as follows:
-h: Display a list of valid switches-s: Execute silently-y: Automatically answer "Yes" to the "Preserve user prefs? (Yes/No)" prompt-n: Automatically answer "No" to the "Preserve user prefs? (Yes/No)" prompt-p: Prompt for an administrator password (required to remove system resources and perform a full uninstall)
How to Troubleshoot a Bad Package
- There may be errors when attempting to build or install the PKG.
- This section addresses common errors encountered as well as steps to perform if the PKG does not build or install properly.
What to do in the Event of a PKG Build Failure
To address issues identified during the building of a PKG file, it is necessary to review the build errors.
- To review the errors, look in the Log window of the PKGBuilder.
- If the log window is not displayed, click the Log button on the toolbar.
The error(s) preventing the build from completing are usually be displayed toward the bottom of the log and include the words error, fail, or failure.
- The most common errors are due to incorrect permissions on the supporting files.
- For example, if the PKGBuilder is unable to read the license file for inclusion in the PKG, an Internet search of the error text will usually explain the issue.
- If you are unable to resolve the errors on your own:
- Save the contents of the Log window to a text file by selecting the File menu and then selecting Save Log.
- Take a screenshot of any errors that are displayed in a dialog by PKGBuilder or macOS.
- Request assistance from the Support Team by opening a support ticket.
- Attach the log text file and screenshot(s), if applicable to the support ticket.
What to do in the Event of a PKG Signing Error
If you receive an "Expired Certificate" error while building the PKG:
- Verify the expiration date on your installer certificate
- You may need to check the expiration date of your Apple Worldwide Developer Relations certificate, which is an intermediary certificate in the chain
If you experience this issue, take the following steps to correct it:
- Open Keychain Access.
- Show the expired certificate by going to View > Show Expired Certificates,
- Navigate to the System Keychain and delete the expired WWDR certificate.
- Download the new WWDR certificate here
- Import it into your keychain.
Note the following:
- The DMG file that Spirion distributes is signed by Spirion
- Once you build a PKG using the Spirion custom installer for Mac (PKG Package) the resulting package is not signed
- Sign the package using your developer ID/certificate
Signing ID
- The Signing ID field in the PKG Builder requires a valid installer Signing ID, which you can get from Apple.
- If you enter an invalid installer Signing ID the build fails
- If you do not have a valid Signing ID, leave that field blank
More Information
- The following article has further details on how to sign the PKG:
https://support.spirion.com/hc/en-us/articles/115000019832#build
What to do in the Event of a PKG Installation Failure
To address issues identified during a PKG installation, it is necessary to review the installation errors.
To review the errors, perform the following steps:
- Open a Terminal window
- Execute the following command:
open /var/log - When the Finder window opens, locate the file install.log
- Double-click on install.log to view its contents.
- The error(s) preventing the package from installing will usually be displayed toward the bottom of the log and include the words error, fail, or failure.
- The most common errors are due to incorrect permissions on the folders necessary for installation.
- Typically, an Internet search of the error text explains the issue.
- If the package was created only using PKGBuilder, no other edits were made, and you are unable to resolve the errors on your own:
- Take a screenshot of any errors that are displayed during the installation process
- Post the PKG on a publicly facing web site where the Spirion support team can access it for reference, if necessary
- Request assistance from the Support Team by opening a support ticket.
- Include the link for the Support Team to download the PKG file and attach the install.log text file and screenshot(s), if applicable to the support ticket.
Note: If any edits were made to the PKG file outside of the PKGBuilder application, the installer package is not supported, and our Support Team cannot assist with troubleshooting.
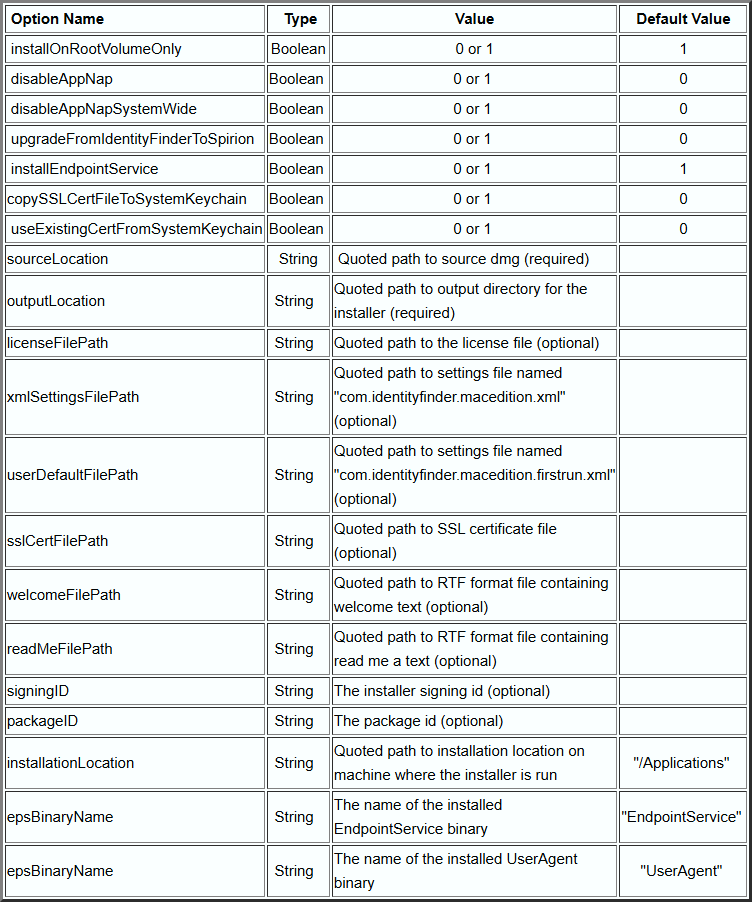
Command Line Interface Reference
All the functions and settings available via the GUI are also available via a command-line interface.
Refer to the GUI section(s) above for descriptions of each setting.
"/Applications/Identity Finder Client Custom PKG Builder.app/Contents/MacOS/Identity Finder Client Custom PKG Builder"
-sourceLocation "/Users/macuser/Downloads/IdentityFinderMacSetup.dmg"
-outputLocation "/Users/macuser/IdentityFinderInstaller"
[-licenseFilePath "/Users/macuser/Downloads/identityfinder.lic"]
[-xmlSettingsFilePath "/Users/macuser/Downloads/com.identityfinder.macedition.xml"]
[-useExistingCertFromSystemKeychain 1]
[-sslCertFilePath “/Users/macuser/Downloads/CA.pem”]
[-copySSLCertFileToSystemKeychain 1]
[-installEndpointService 0]
[-signingID "Acme Development, LLC"]
[-welcomeFilePath "/Users/macuser/Downloads/Welcome.rtf"]
[-readMeFilePath "/Users/macuser/Downloads/ReadMe.rtf"]
[-installOnRootVolumeOnly 0]
[-disableAppNap 1]
- For example, to create an installer with the specified license, XML configuration file from console, and signingID and including the endpoint service, use this command line:
"/Applications/Identity Finder Client Custom PKG Builder.app/Contents/MacOS/Identity Finder Client Custom PKG Builder" -sourceLocation "/Users/macuser/Downloads/IdentityFinderMacSetup.dmg" -outputLocation "/Users/macuser/IdentityFinderInstaller" -licenseFilePath "/Users/macuser/Downloads/identityfinder.lic" -xmlSettingsFilePath "/Users/macuser/Downloads/com.identityfinder.macedition.xml" -signingID "Acme Development, LLC"Notes for Command Line Installation Use
- All file paths share the following characteristics:
- Case sensitive
- Must be enclosed within quotes (" ")
- Must be full absolute paths
- The only required switches are:
-sourceLocationand-outputLocation - This is the same as when using the UI
- If a full path is not provided to the
-outputLocationswitch, the output file is created in the folder: /Users/USERNAME/IdentityFinderInstaller. - When using the PKGBuilder the Endpoint service is installed by default and therefore the service is installed if the switch
-installEndpointServiceis not specified. - Omitting an optional switch with a 0 or 1 as its parameter is equivalent to leaving that option as its default as shown within the GUI.
- For example, omitting
-copySSLCertFileToSystemKeychain 1leaves the value as 0 or "unchecked" in the UI. - Similarly, specifying
-disableAppNap 1sets the switch-disableAppNapto on and App Nap is disabled on the machine where the installer is run - Omitting the switch sets it to off and App Nap is not modified.
- For example, omitting
- The installer build process is logged to standard output.
Useful Locations on Your macOS Machine
User/Library/ApplicationSupport/Preferences/IdentityFinder
- Contains plist and XML files
Users/Shared/.identityfinder/Application/\{04964656e-7469-7479-2046-696e6465720\}
- Contains logs
- Contains custom folders
- Contains admin data
- Contains mcdata
- Contains search history folder
- Contains temp folder
User/Library/ApplicationSupport/IdentityFinder
- Contains endpoint agent needed for permissions
- Contains user agent needed for permissions
- Contains watcher needed for permissions
- Contains the license file (.lic) that must be changed if the license file cannot be updated