How to Add a Cloud Target
How to Add a Cloud Target
Use the following steps to add a new cloud Target:
- From the left side navigation menu select Data Asset Inventory > Data Assets and Targets.
- The "Data Assets and Targets" page opens.
- Select the TARGETS tab at the top of the page.
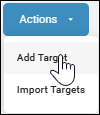
- In the upper right corner of the page, click the blue Actions button and select "Add Target" from the sub-menu that appears.
- The "Add New Target" pop-up window opens.
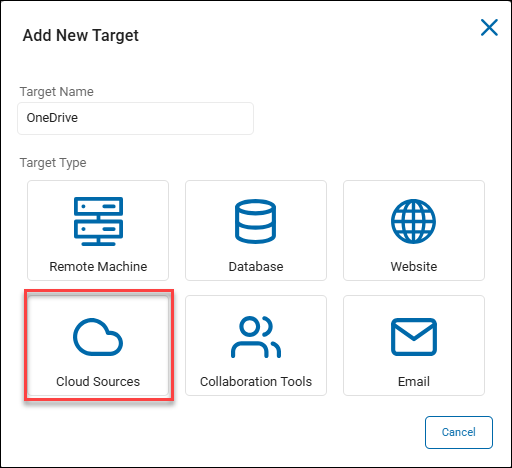
- Enter the name of the Target in the "Target Name" field. Make the name descriptive by including identifiers such as the Cloud source name, location, department, status, and/or date.
- Click the Cloud Sources tile to proceed or Cancel to discard.
- Enter the name of the Target in the "Target Name" field. Make the name descriptive by including identifiers such as the Cloud source name, location, department, status, and/or date.
- The "Select a Cloud Source to Configure" pop-up window appears.
- Click the tile of the Cloud source you wish to add as a Target:
- Dropbox
- OneDrive for Business
- Google Drive
- Box
- Amazon S3
How to Add a Dropbox Target
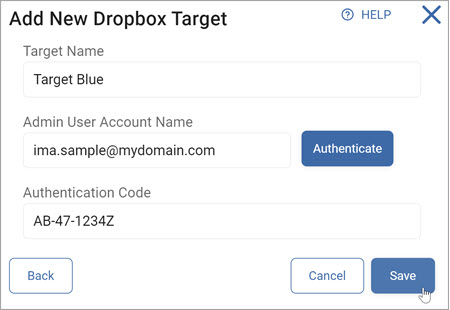
Use the following steps to add a Dropbox Target:
- In the "Add New Dropbox Target" pop-up window enter the following information:
- Target Name: Type the Target name
- Admin User Account Name: Type the admin user account name and click Authenticate
- Authentication Code: Enter the code
- At the bottom of the window click the Save button to save your changes, the Cancel button to discard, or the Back button to return to the previous screen.
How to Add a OneDrive for Business Target
The following high-level steps must be performed to add a OneDrive for Business Target:
- Create the Necessary User Accounts
- Configure either of the following:
- Spirion Hosted Authentication
- Self Hosted Authentication
- Adjust the Service Account
- Create an Azure App (Optional)
Note: For OneDrive Targets, archTIS Spirion added the ability to authenticate using an (user configured) Azure app. Note this requires Agents version 13.5 or later. If you attempt to use this method with Agents earlier than v13.5, an EPS failure occurs requiring the reboot of the machine or manual intervention.
When creating a new scan, you are notified of the agent v13.5 requirement if you are attempting to scan a OneDrive Target: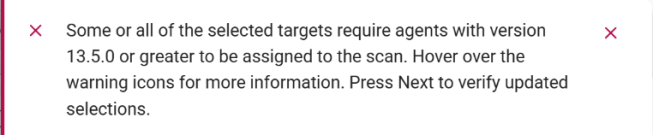
If you assign agents to a scan that are pre-13.5, you receive the following message which prevents the scan from being run:
Note: Sensitive Data Platform cannot scan shared user folders in Microsoft OneDrive. This is due to limitations of the Microsoft Graph API.
Create the Necessary User Accounts
To authenticate Cloud Storage scans for OneDrive for Business, archTIS Spirion recommends you create the following accounts and user roles:
- A service account with the SharePoint Admin role
- The Global Admin role (temporarily)*
*The reason for temporary Global Admin role is the initial authorization process creates a “Spirion Azure App” our system uses to connect to the tenant. Once this App is created, the Global Admin role can be removed.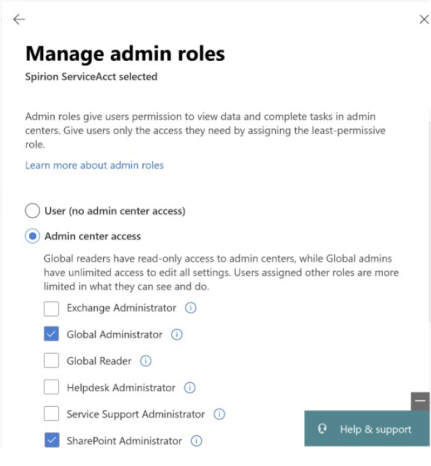
Use the following steps to add a OneDrive for Business Target:
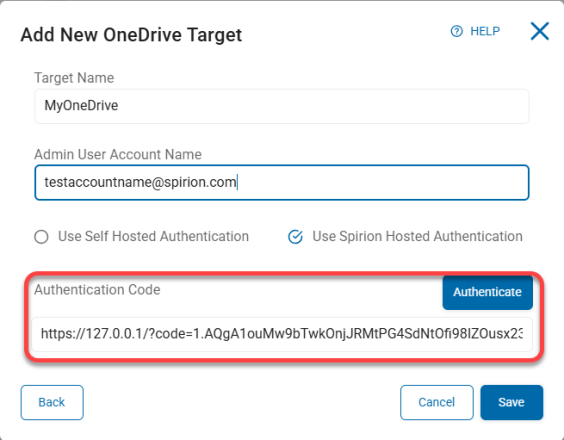
- In the "Add New OneDrive Target" pop-up window enter the following information:
- Target Name: Enter a descriptive Target name in the "Target Name" field.
- Admin User Account Name: Enter the admin user account name and click the blue Authenticate button.
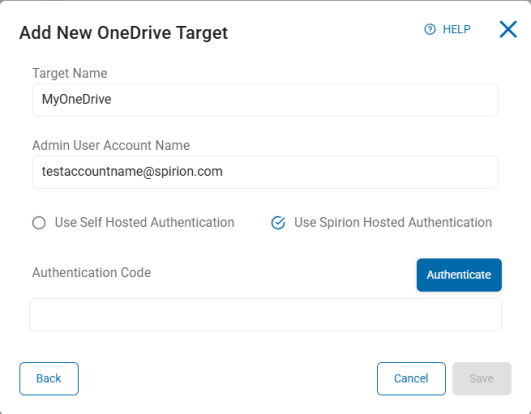
- Spirion Hosted Authentication
- Select (check) the "Use Spirion Hosted Authentication" radio button.
Note: Depending on how your tenant is configured in Azure Active Directory, it’s possible this step needs either: - A higher-level permissioned user (Global Admin, Cloud Application Admin)
- Consent requests which may need to be approved by a specified user within the tenant
- This takes you to the Microsoft (Office 365) login page where you enter the same Admin user account from the previous step and complete the login process.
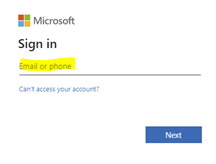
- You are asked to authorize claims to create the “Spirion Azure App”.
- Accept the claims. The Spirion Azure App is created. The browser page is redirected to a loopback page with the URL “127.0.0.1/code=xxxx”
- Select and copy the entire URL.
- Paste the URL into the Authentication Code field. See the image below.
- Select (check) the "Use Spirion Hosted Authentication" radio button.
- Self Hosted Authentication
- Select (check) the "Use Self Hosted Authentication" radio button.
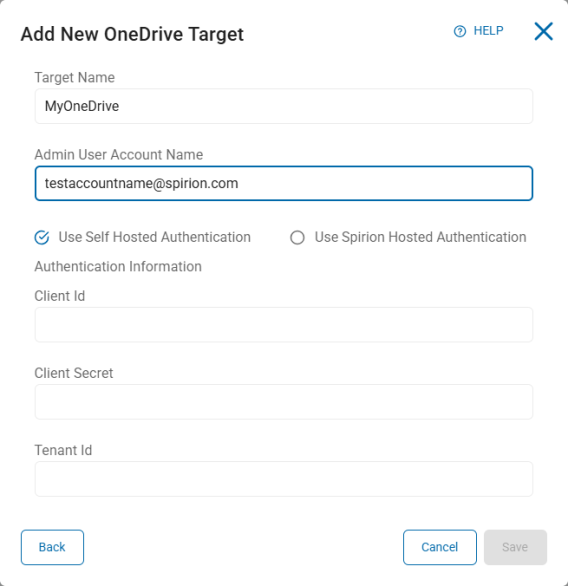
- Enter the following information from your Azure App. If you do not have an Azure App, see "How to Create an Azure App (Optional)" below:
- Client ID – Enter your Microsoft Client ID
- Client Secret – Enter your Microsoft Client Secret
- Tenant ID – Enter your Microsoft Tenant ID
- To confirm your Azure App has the necessary permissions, see "How to Add API Permissions to Your Azure App" below.
- Click the Save button at the bottom of the window to create the Target, the Cancel button to discard your changes, or the Back button to return to the previous screen.
- Select (check) the "Use Self Hosted Authentication" radio button.
- This completes the authentication process.
- Your OneDrive Target is now successfully created.
- To access the Target, from the left side navigation menu, select Data Asset Inventory > Data Assets and Targets, and select the TARGETS tab at the top of the page. Search for your Target by its name.
- Proceed to "Adjust the Service Account" below.
How to Adjust the Service Account
- The Spirion Azure App is now created (if you selected Spirion Hosted Authentication).
- Remove the Global Admin role from the service account
How to Create an Azure App (Optional)
If you do not have an Azure App, use the following instructions to create the app and record the information you need to create your OneDrive for Business Target.
How to Create a New App Registration
Procedure:
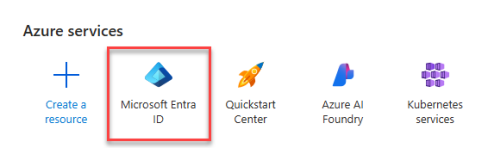
- Log in to the Azure Portal
- Search for and select Microsoft Entra ID
- Select App Registrations under Manage on the left side menu. (Alternatively, click "Add application registration" under Quick Actions at the bottom of the page)
- Click New registration
- Select one of the first two radio buttons based on your needs:
- Accounts in this organizational directory only (YourDev only - Single tenant)
- Accounts in any organizational directory (Any Microsoft Entra ID tenant - Multitenant)
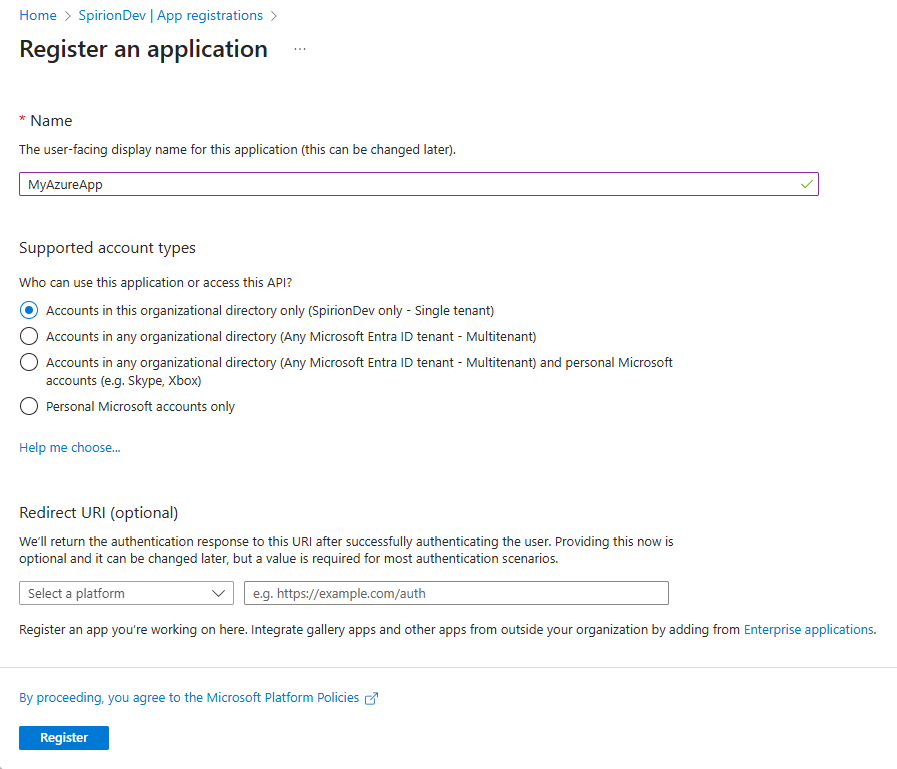
Note: Redirect URI is not required
- Click Register at the bottom of the page.
Note the IDs
Record the following information:
- Application (client) ID
- Directory (tenant) ID
How to Create Client Secret Value and ID
Procedure:
- From the left side menu, under Manage, click Certificates & secrets
- Click New client secret.
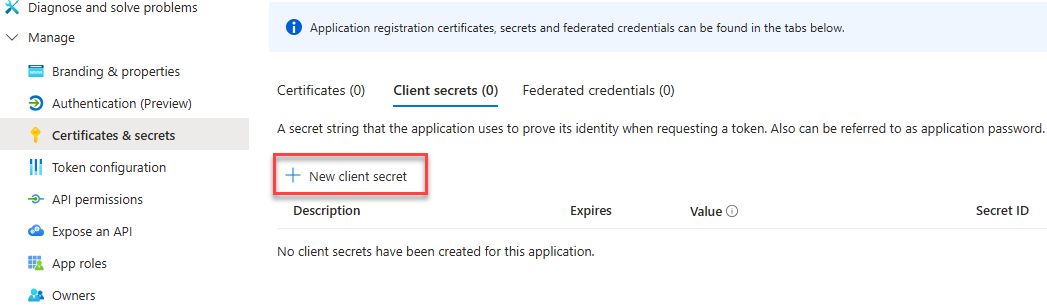
- Enter an appropriate name and record the name.
- Record your Client Secret Value and Secret ID.
NOTE: You will not have access to your client secret again.
How to Add API Permissions to Your Azure App
Use the following procedure to add the required API permissions to your Azure App (see "Required Azure App API Permissions" below):
- One the left side menu, under Manage, select API Permissions
- Click Add a permission
- Select Microsoft Graph at the top of the collection of APIs.
- Select Application Permissions
- In the Select permissions search field type the name of each permission to find it in the list and then select it. See below.
- Click the Add permissions button at the bottom of the pane.
- Repeat this process for each required permission.
- Grant Admin consent to the permission, if necessary.
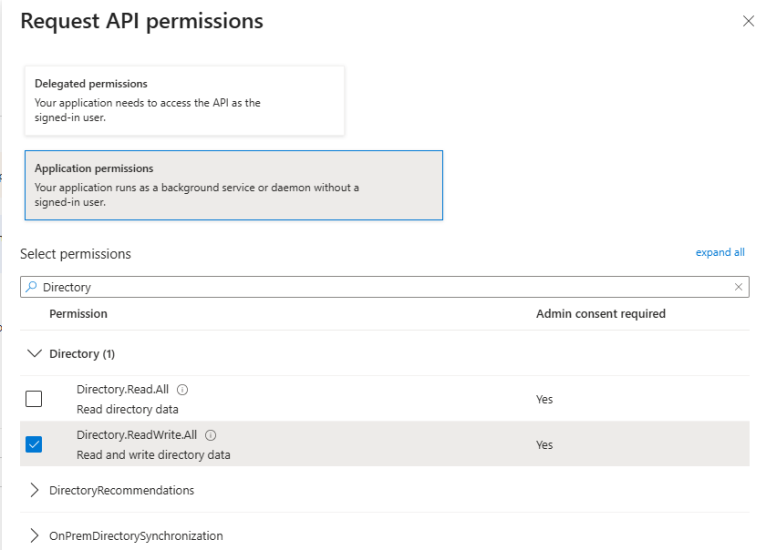
Required Azure App API Permissions
Ensure the following Microsoft Graph permissions are enabled for your new Azure App.
- Directory.ReadWrite.All
- Type: Application
- Admin consent required: Yes
- Description: Enables the app to read and write data in the organization directory accessible to the service account. Does not permit user or group deletion.
- Files.ReadWrite.All
- Type: Application
- Admin consent required: Yes
- Description: Enables the app to read, create, update, and delete all files the service account user can access.
- Sites.ReadWrite.All
- Type: Application
- Admin consent required: Yes
- Description: Enables the app to edit or delete documents and list items in all site collections accessible to the service account.
- Sites.Selected
- Type: Application
- Admin consent required: Yes
- Description: Enables app-only access to specific SharePoint Online sites, rather than the entire tenant.
- User.Read
- Type: Delegated
- Admin consent required: No
- Description: Enables the app to read basic company information of users.
- User.ReadWrite.All
- Type: Application
- Admin consent required: Yes
- Description: Enables the app to read and write all properties of user profiles.
- User.ReadWrite.CrossCloud
- Type: Application
- Admin consent required: Yes
- Description: Enables the app to read and update external cloud user profiles without a signed-in user.
- UserAuthenticationMethod.ReadWrite.All
- Type: Application
- Admin consent required: Yes
- Description: Enables an app to read and write authentication methods like phone numbers and Authenticator settings, but not passwords or sign-in.
How to Add a Google Drive Target
To add a Google Drive Target:
- First, configure Google Drive
- Second, configure a Google Drive Target to scan in Sensitive Data Platform
How to Set Up Google Drive
- Create a Project in Google Cloud Platform
- Create a Service Account
- Generate a P12 Key
- Record OAuth 2 Client ID
- Enable Domain-Wide Delegation in Google Admin Console
- Enable Required APIs
- Configure OAuth Consent Screen
- Add Scopes to the OAuth Consent Screen
- Verify Configuration
Create a Project in Google Cloud Platform
Procedure:
- Go to the Google Cloud Console and sign in.
- Select the Google domain you want to scan.
- Click New Project.
- Enter a project name and confirm that the organization is correct.
- Click Create.
- Once the project is created, click Select Project.
Create a Service Account
- Under your project (for example, “Spirion”), go to APIs & Services → Credentials.
- Click Create Credentials → Service Account.
- Enter a name for the service account and an optional description.
- Click Done (no additional access setup is required on the next two screens).
Generate a P12 Key
Procedure:
- From the Credentials page, click your newly created service account.
- Select the Keys tab at the top.
- Click Add Key → Create New Key.
- Choose P12 as the key type.
- Download the P12 key file and note the private key password.
- You will use both later when configuring your Google Drive target in the Sensitive Data Platform console. See P12 Key Download
Record OAuth 2 Client ID
Procedure:
- Back in Credentials, click Manage Service Accounts.
- Locate your service account and make note of the OAuth 2 Client ID.
- You’ll use this ID later when setting up API access.
Enable Domain-Wide Delegation in Google Admin Console
Procedure:
- Log in to the Google Workspace Admin Console.
- Go to Access and Data Control → API Controls (under Security).
- Select Manage Domain-Wide Delegation.
- Click Add New to create a new API client.
- Enter the OAuth Client ID you recorded earlier.
- In the OAuth Scopes section, add the following scopes (one per line):
- Save your changes.
- Click Edit on the new API client to verify that the scopes were added correctly.
Enable Required APIs
Procedure:
- In Google Console Platform, go to APIs & Services → Library.
- Search for and enable the following APIs:
- Admin SDK API
- Google Drive API
- Gmail API
- Each API should show a status of Enabled once complete.
Configure OAuth Consent Screen
Procedure:
- Go back to APIs & Services → OAuth consent screen. Note: If you have not set up the Google Auth Platform you will be redirected to set it up.
- Select Internal as the user type.
- Fill in the following fields:
- App Name
- Support Email
- Ensure the correct Authorized Domain is listed.
- Add Developer Contact Information.
- Click Save and Continue.
Add Scopes to the OAuth Consent Screen
Procedure
- Click Add or Remove Scopes and add the following (you will want to enter these into the manual field):
- Save your changes.
Verify Configuration
- Your configuration should now display all added scopes and enabled APIs.
- Once verified, your setup is complete — you can now configure Spirion to connect to your Google Drive or Gmail target.
Configure a Google Drive Target
- Target Name: Enter a Target name.
- Admin User Account Name: Enter the admin user account name.
- Service Account Email or Unique ID: Enter the service account email address.
- Key Data File: Click the upload icon (
 ) to locate the key data file on your local computer.
 - Key Data File Password: Enter the password associated with your key data file.
- Private Key Id: Enter the private key identification number.
- Project Id: Enter the Google project ID.
- Click Save to save, Cancel to discard, or Back to return to the previous screen.
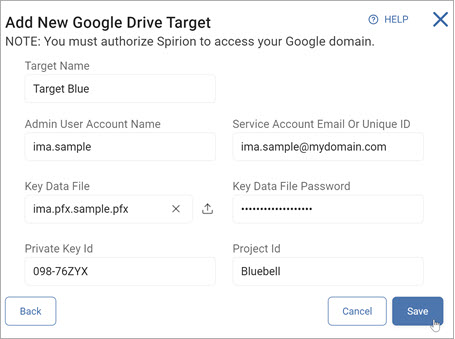
Note: You must authorize Spirion to access your Google domain.
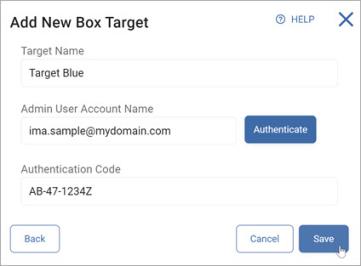
Box
To add a box Target:
- Target Name: Enter the Target name.
- Admin User Account Name: Enter the admin user account name and click Authenticate.
- Authentication Code: Enter the code.
- Click Save to save, Cancel to discard, or Back to return to the previous screen.
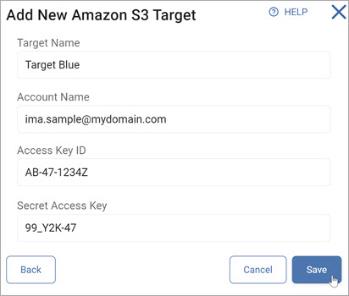
Amazon S3

To add an Amazon S3 Target:
- Target Name: Type the Target name.
- Account Name: Type the Account name.
- Access Key ID: Type your Access Key ID.
- Secret Access Key: Type your Secret Access Key.
- Click Save to authenticate and save, Cancel to discard, or Back to return to the previous screen.