
Data Assets and Targets - Overview
Overview
The Data Assets and Targets page is the "Inventory Management" hub of the Spirion Sensitive Data Platform. It serves as the central location where you define where Spirion should look for sensitive data.
The Role of the Data Assets and Targets Page
In the Spirion ecosystem, a Target is any system or repository (for example, a file share, a database, an M365 tenant, or a specific workstation) that you want to scan.
This page enables you to:
- Centralize Scope: Manage all your disparate data sources (on-prem and cloud) in one view.
- Configure Authentication: Store the credentials, tokens, or OAuth consents needed for Spirion agents to access those systems safely.
- Enable Repeatability: Once a target is defined here, it can be reused across multiple scan schedules and playbooks without re-entering configuration details.
Assets
- Locations, physical or cloud, that contain Targets.
- Examples
- A SQL Server hosted on-premise at your business
- A Dropbox account you maintain.
- Assets can contain single or multiple Targets
Targets
- Any data location(s) within an Asset that Sensitive Data Platform can scan for sensitive data.
- They can be in a “physical” box that can be scanned or a cloud Asset with data.
Examples of Assets and Targets
- An SQL server (Asset) with multiple SQL Databases hosted on it (Targets)
- A SharePoint Online instance (Asset) with multiple sites (Targets)
- A Workstation (Asset and single Target), or a Azure Data lake (Asset that can’t be scanned)
See the sections below for more information:
How to Access and View Data Assets and Targets
Procedure:
- From the left side navigation menu, click Data Asset Inventory.

- Click Data Assets and Targets.

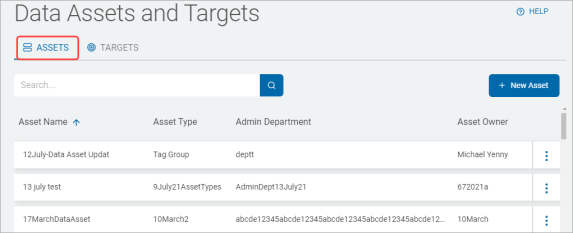
On the Data Assets and Targets screen there are two tabs, Assets and Targets.
Assets tab
The Assets tab on the "Data Assets and Targets" page serves as your high-level data asset inventory. While the "Targets" tab focuses on the specific, scannable locations (like a single database or a specific folder), the Assets tab focuses on the "Parent" systems or physical/cloud containers that house those Targets.
The Assets tab is your "Business Inventory." It doesn't just tell you what is being scanned; it tells you who owns it, where it lives, and how much total risk it brings to the organization. Use this tab to drive accountability and ensure your scanning program covers all your critical business systems.
Key Distinction: Asset vs. Target
To use this page effectively, remember this mental model:
- Asset (The Container): A SQL Server. You manage Ownership and Location here.
- Target (The Content): A specific Database on that server. You manage Scanning and Credentials on the Targets tab.
The Role of the Assets Tab
The Assets tab is designed for Governance and Ownership. It enables you to manage your data landscape at a macro level.
- Inventory Management: It tracks the "containers" of your data, such as a SQL Server, a SharePoint Online instance, or a Dropbox account.
- Ownership & Accountability: It is the primary place where you assign administrative metadata, such as who owns the system and which department is responsible for it.
- Risk Aggregation: It provides a rolled-up view of risk across all targets within that asset.
Assets Table
The table on the Assets tab provides the business context needed to manage your data protection program. Here is how to interpret the key columns:
- Asset Name - Name of the asset (parent system), for example,
Corporate_SQL_Server_01 - Asset Type - Categorization: Tells you the nature of the container (for example, SQL Server, SharePoint Online, Workstation).
- Cloud Sources - Cloud sources such as: Google Drive, OneDrive, etc.
- Collaboration - Collaboration tools such as: SharePoint and Bitbucket
- Database - Databases such as: Oracle, Snowflake, SQL, etc.
- Email - Email sources such as Exchange, Gmail, etc.
- Files & Folders - For asset types such as a File servers or the files and folders on a workstation, laptop, desktop, etc.
- Tag Group - Defines the asset as a Tag group
- Websites - Defines the asset as a website
- Admin Department - Accountability: Identifies which department (for example, Finance, HR, IT) is responsible for the security and compliance of this asset.
- Asset Owner - Point of Contact: The specific individual who has authority over the data within this asset. This is who you contact when a high-risk finding is discovered.
- Hosting Location - Geography/Infrastructure: Indicates where the asset physically or logically resides (for example, On-Premise, Azure, AWS). This is vital for data residency compliance (like GDPR).
- Status - Operational Health: Shows the current state of the asset connection. Active or Inactive.
- SDV3 Risk - Prioritization: A rolled-up risk score based on all findings within the asset's child targets. This helps you identify your "highest-risk systems" at a glance. See Detailed Scoring Breakdown: Value, Volume, Vulnerability.
- More options 3 vertical dots - The options here enable you to change the values of the settings above.
- Manage Data Asset
- View Asset Details
- Delete Data Asset
The Asset information in the table is automatically populated by the Scan history.
Use "Asset Details" for Deep Dives
If you see a high SDV3 Risk score in the Assets table, you can click the "More Options" (three dots) and select View Asset Details. This opens a deeper view with two critical tabs:
- Data Content: Shows exactly which targets within that asset are driving the risk and what data types were found.
- Coverage & Data Types: Shows your "Scan Gap"—it tells you which data types you haven't scanned for yet across that asset's targets.
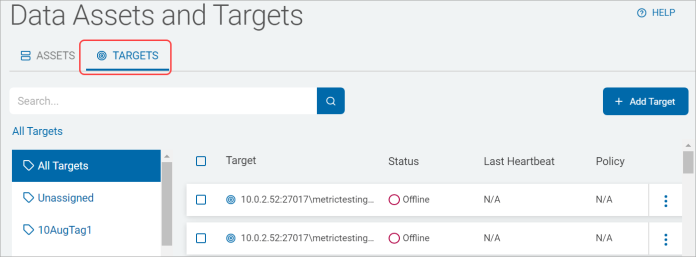
Targets
The Targets tab on the Data Assets and Targets page is the "Operational Control" center for your scanning scope. While the "Assets" tab focuses on the parent systems and ownership, the Targets tab is where you manage the specific, scannable locations and their technical health.
The Targets tab is your "Technical Inventory." It tells you if your "Mission Control" (the Console) can actually talk to the "Field" (your data). By monitoring the Status and SDV3 Risk columns, you can ensure your discovery program is technically sound and focused on the areas of highest risk.
The Role of the Targets Tab
The Targets tab is where you define exactly where SDP should look for data and how it should gain access.
- Scope Definition: It lists the individual scannable units (e.g., a specific SQL database, a SharePoint site, or a file share path).
- Technical Configuration: It is the primary place where you configure the connection details and credentials needed for an agent to "reach into" that specific location.
- Health & Connectivity: It provides real-time feedback on whether the platform can successfully communicate with and authenticate to each target.
The Targets tab displays two sections:
- List of Targets:
- This column displays all available Targets.
- If applicable, click the (>) icon next to a Target in the list to expand the parent Target and view the child Target(s).
- Why it's useful: This enables you to see the hierarchy of your data. For example, you can expand a "SharePoint Online" asset to see all the individual "Site Collections" (Targets) underneath it.
- Table with the following column headings:
- Target - Your Agents and Targets are listed in alphabetical order.
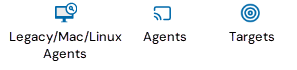
- Icons:
- Legacy/Mac/Linux Agents are indicated by the icon shown at the far left, below.
- Windows Agents (v13.0 and later) are indicated by the middle icon.
- Targets are indicated by the right icon.
- Status - Current status of the Agent:
- Offline
- N/A (not applicable, shown for all Targets)
- Scanning
- Last Heartbeat - The last time the Agent (Target) sent a signal indicating it was active/ready.
- Policy - Shows which agent policy is currently applied to this Agent (Target) - ensuring it has the right performance and search settings.
- Version - Version of the Agent being used to scan this specific Target type.
- SDV3 Risk - The risk score for this specific target. This allows you to distinguish between a high-risk database and a low-risk file share, even if they belong to the same parent Asset. Only Targets assigned to a data asset with scan results since the assignment display a value; otherwise, N/A is displayed.
- More options (3 vertical dots) - View Target Details, Assign a Policy to an Agent, Manage Agent Tags, Gather Data, or Manage Permissions.
Recommendation: "Slice Your Scope"
One of the most important best practices for this page is segmentation. Instead of creating one giant target for "All File Shares," create smaller, logical Targets based on department or risk level (for example, Finance_Shares, Engineering_Repos).
Why this helps you:
- Faster Troubleshooting: If one share has a permission issue, it won't stop the scans for the others.
- Granular Reporting: You can report on the "Risk Score" of specific business units rather than just the company as a whole.
- Optimized Performance: Smaller targets enables Spirion's Search History feature to work more efficiently, making your incremental rescans much faster.
Summary
The Data Assets and Targets page is your "Mission Map." The table doesn't just list your systems; it provides the operational intelligence you need to ensure your discovery program is healthy, authorized, and providing complete coverage across your entire environment.