
How to Use the Scans Dashboard
Overview
The Scans Dashboard is the central management hub for all data discovery and classification activities within the Spirion Sensitive Data Platform.
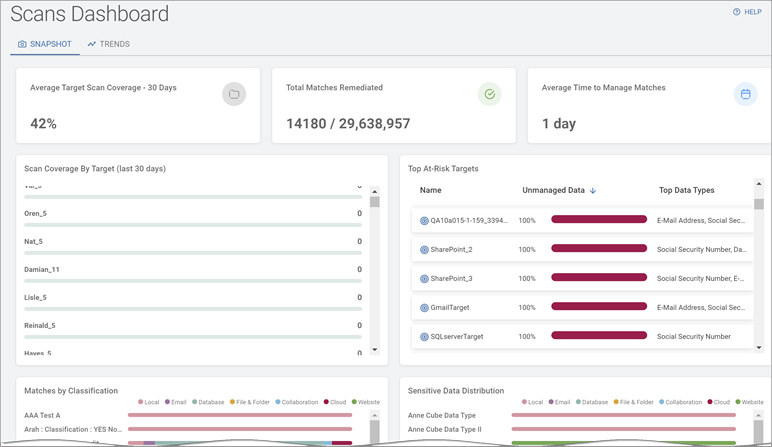
The Scans Dashboard includes the following categories of reports (displayed within tiles in the Spirion Sensitive Data Platform user interface):
- SNAPSHOT view
- Remediated matches
- Average Time to Manage Matches
- Top At-Risk Targets
- Matches sorted by classification
- Sensitive Data Distribution
- TRENDS view
- Match Status
- Managed Action Activity
- Aging Report for Unmanaged Sensitive Data
See below for more information:
SNAPSHOT View

Average Target Scan Coverage - 30 days
The Average Target Scan Coverage - 30 Days widget is an operational health metric in the Spirion dashboard that measures the "freshness" and completeness of your scanning program.
Here is a breakdown of what this metric represents:
1. The Percentage
This number represents the portion of your total defined Targets (endpoints, file shares, databases, cloud repositories, etc.) that have been successfully scanned at least once within the last 30 days.
- In this example: Only 24% of the environment has been scanned recently. This indicates a significant "coverage gap," meaning 76% of the known environment has not been checked for sensitive data in the last month.
2. The "30 Days" Timeframe
This is the "look-back" window. Spirion uses this timeframe to define what counts as "current" or "active" coverage.
- If an asset was scanned 31 days ago, it is no longer counted in this percentage.
- This timeframe is used to ensure that security teams are maintaining a continuous scanning cadence rather than just performing one-off "spring cleaning" scans.
3. The Folder Icon
The icon in the top right indicates that this specific metric is focused on File-based Targets (like local drives, network shares, and cloud storage).
Summary of Use
This widget is primarily used by Security Operations (SecOps) Managers to:
- Identify Blind Spots: A low percentage (like the 24% shown here) warns the admin that they lack visibility into the majority of their environment.
- Monitor Scan Health: If this number drops suddenly, it may indicate that scheduled scans are failing, agents are offline, or credentials for a major file share have expired.
- Audit Readiness: Auditors often look for proof that an organization is scanning its environment on a regular, recurring basis. This widget provides a quick "at-a-glance" proof of that cadence.
The Goal: For a healthy security program, you typically want to see this number as close to 100% as possible, indicating that every target in your inventory is being scanned at least once every 30 days.
- Percent (%) of all valid Targets in the Data Asset Inventory (DAI) that have been scanned in the past 30 days.
- This number should be as close to 100% as possible.
Total Matches Remediated (out of total matches)
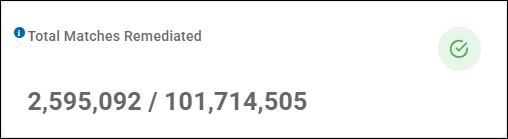
The Total Matches Remediated widget is a key performance indicator (KPI) in the Scans dashboard that measures the progress of your data security efforts by comparing the amount of data secured against the total amount of sensitive data discovered.
Based on the example image above, here is a breakdown of the widget's components:
1. The Numbers (example: 2,595,092 / 101,714,505)
This represents a ratio of Remediated Matches to Total Matches.
- The First Number (2,595,092): This is the total count of individual sensitive data matches that have been successfully remediated.
- The Second Number (101,714,505): This is the total count of all sensitive data matches discovered across the entire environment.
- Effectiveness: In this example the organization has remediated approximately 2.5% of its total sensitive data footprint.
- The gap between these two numbers should be as small as possible.
- Ideally, these numbers match (for example: 10,000/10,000)
2. What "Remediated" Means
A match is considered "Remediated" when a specific action has been taken to reduce its risk. This typically includes the following:
- Shredding/Deleting: The file containing the sensitive data was permanently removed.
- Redacting: Some or all of the data (for example, the middle digits of an SSN) was masked or removed.
- Quarantining/Moving: The file was moved to a more secure, restricted location.
- Compensating Controls: A manual or automated "Playbook" was run to mark the data as managed under an existing security control.
3. The Green Checkmark Icon
The icon in the top right serves as a visual indicator of the Remediation category. Green is used to signify "positive action" or "risk reduction."
Summary of Use
This widget is primarily used by Compliance Officers and Security Managers to:
- Show ROI: It provides a concrete number to prove that the security team is actively reducing the organization's data footprint.
- Track Progress: By watching the first number grow relative to the second, stakeholders can see the "velocity" of their remediation program.
- Identify Gaps: If the second number (Total Matches) is growing much faster than the first, it indicates that the organization is creating or discovering sensitive data faster than it can secure that data, signaling a need for more automated remediation playbooks.
Average Time to Manage Matches (in days)
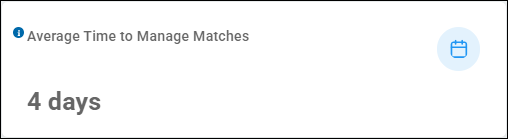
The Average Time to Manage Matches widget is an operational efficiency metric in the Spirion dashboard that measures the speed of your remediation workflow.
It tracks the average duration between the moment a sensitive data match is first discovered and the moment it is "managed."
Here is a breakdown of the widget:
1. The Number
This represents the Mean Time to Remediate (MTTR) for sensitive data findings.
- In the example image above, on average, it takes the organization 4 days to take action (quarantined, redacted, deleted, etc.) on a sensitive data match once it has been identified by a scan.
- This is a very strong metric, suggesting a highly responsive security team or a high degree of automated remediation playbooks.
- This number should be as low as possible given your environment and Agent count.
- For Large organizations with thousands of Agents:
- Approximately 1 week is recommended.
- A value of 1 month or more is considered high risk.
- For Small organizations with 10-20 Agents:
- 1-2 days is recommended.
- A value of 1 week or more is considered high risk.
- Your goal is to keep this number as low as possible.
- This number should trend lower over time.
2. What "Managing Matches" Means
A match is considered "managed" when a definitive action is taken on it within the Spirion platform. This includes:
- Remediation Actions: Shredding, redacting, encrypting, or quarantining the file.
- Workflow Actions: Marking a match as "Ignore" (if it's a false positive), "White-listed," or "Approved" (if the data is supposed to be there for a business reason).
- Playbook Execution: Running an automated or manual playbook that applies a security control to the finding.
3. The Calendar Icon
- The icon in the top right serves as a visual indicator that this is a time-based metric.
- It helps distinguish this widget from volume-based metrics (like total match counts).
Summary of Use
This widget is primarily used by Security Operations (SecOps) Managers and Compliance Officers to:
- Measure SLA Compliance: Many organizations have internal policies requiring sensitive data to be addressed within a specific window (e.g., 7, 14, or 30 days). This widget provides instant proof of whether those SLAs are being met.
- Evaluate Automation: If an organization implements automated remediation playbooks, they expect to see this number drop significantly.
- Identify Bottlenecks: If this number begins to climb (e.g., from 4 days to 20 days), it indicates that the security team is overwhelmed by the volume of findings and may need more resources or better automation.
Scan Coverage By Target (last 30 days)
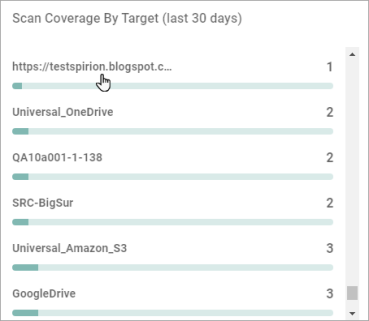
The Scan Coverage By Target (last 30 days) widget is a detailed operational list that shows the scanning status of individual assets within your environment over the last month. It provides a granular view of which specific Targets do not have proper coverage.
- The scan count for Targets displays in ascending order in the grid.
- Click a Target - or its scan count - to display the Target Details screen.
Here is a breakdown of the widget's components:
1. The Labels (Target Names)
Each row represents a specific Target defined in the Spirion console. These can include:
- Endpoints: Individual workstations or servers (for example,
QA10A001-1-138,WIN11POV2). - Cloud/Network Shares: Centralized storage locations (for example,
Azure File Share Demo). - Databases: Structured data sources (for example,
CONFODBC).
2. The Numbers (Scan Count)
The number on the far right of each row indicates how many times that specific Target has been successfully scanned within the last 30 days.
- 0: Indicates the Target has not been scanned at all in the last 30 days. This is a "coverage gap" that requires attention.
- 1 (or higher): Indicates the Target is being actively monitored according to its schedule.
3. The Progress Bars and Colors
The horizontal bars provide a quick visual status of the Target's coverage:
- Light Grey/Empty Bars: Correspond to a scan count of 0. These represent assets that are currently "dark" or unscanned.
- Teal/Filled Bars: Correspond to a scan count of 1 or more. These represent assets that have current, valid scan data.
Summary of Use
This widget is primarily used by Security Administrators for Troubleshooting and Compliance Verification:
- Identifying Failures: If a critical server (such as
QA10A001in the example) shows a 0, the admin knows they need to check the following: - Is the Agent is offline?
- Was the scan was cancelled?
- Is there is a credential issue?
- Verifying Cadence: It ensures that Targets are being scanned at the expected frequency.
- For example, if a policy requires weekly scans, an admin would expect to see a count of at least 4 in this 30-day view.
- Prioritizing Cleanup: The scroll bar on the right enables admins to quickly scan through their entire inventory to find and address all Targets with 0 coverage.
Top At-Risk Targets
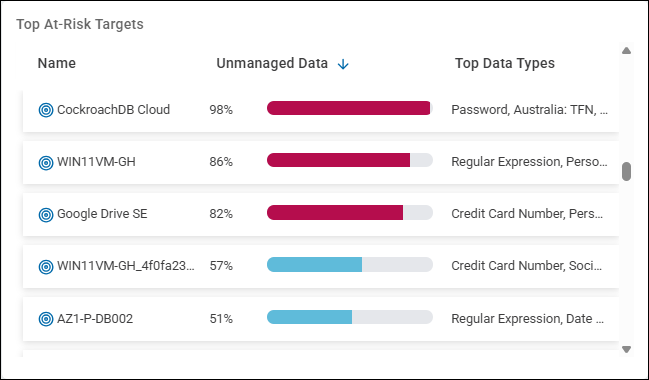
The Top At-Risk Targets widget is a prioritized list that identifies which specific assets in your environment have the highest percentage of Unmanaged Data. This widget acts as a "hit list" for security teams, showing exactly where the most sensitive, unsecured information is concentrated.
Based on the image provided, here is a breakdown of the widget's components:
1. Name (The Target)
This column identifies the specific asset or repository being scanned. In the example, the top targets include:
- CockroachDB Cloud: A cloud database.
- WIN11VM-GH: A Windows 11 virtual machine.
- Google Drive SE: A cloud storage repository.
2. Unmanaged Data (The Risk Metric)
This is the core metric of the widget.
Targets with dark red, filled or nearly filled bars contain the most Unmanaged sensitive data and are MOST AT-RISK!
- Unmanaged data in Spirion Sensitive Data Platform is sensitive data that has NOT been remediated in the following ways to lessen or eliminate the risk to your organization:
- Quarantined - The file is moved from its original, insecure location to a secure, restricted "Quarantine" folder. A placeholder file is often left behind to notify the user that the file was moved for security reasons.
- Redacted - The sensitive portion of the data is masked or removed while leaving the rest of the file intact. For example, a Credit Card number
4111-2222-3333-4444might be changed toXXXX-XXXX-XXXX-4444. - Shredded - The file containing the sensitive data is permanently and securely deleted from the storage location. Spirion uses a secure wipe process that overwrites the data to ensure it cannot be recovered by forensic tools.
- Classified - A metadata tag or label is applied to the file to identify its sensitivity level (for example, "Confidential," "Internal," or "PII"). This is often used to trigger downstream security controls like DLP or encryption.
- Script (executed against the data) - An automated action where Spirion triggers an external custom script (PowerShell, Bash, etc.) to handle the finding. This is used for advanced remediation, such as moving data into a specific database or alerting a third-party SIEM.
- Permissions (Access restricted) - The file's permissions (ACLs) are modified to limit access. This typically involves removing "Everyone" or "Authenticated Users" permissions and restricting access only to the data owner or a specific security group.
- Ignored - The specific match is marked as "safe" or "not a risk" for that specific location. It will no longer show up as an active finding in reports, but the file remains in place. This is often used for false positives or data that has a valid business reason to exist in that spot.
- Globally Ignored - Similar to "Ignored," but the exclusion is applied across the entire organization. If the same string of data (e.g., a corporate test credit card number) is found anywhere else in the environment, it will be automatically ignored.
- User Action taken on data - Indicates that the remediation was performed by an end-user rather than a central administrator. This typically occurs when using Spirion’s distributed remediation features, where users are prompted to clean up their own data.
- MIP Label applied to data - A specific type of classification where a Microsoft Information Protection (formerly Azure Information Protection) label is applied to the document. This integrates Spirion findings directly with the Microsoft 365 security ecosystem.
- Data that has received the following actions is still considered Unmanaged:
- No Action - No action is taken.
- Assigned - When a match or a set of results is Assigned, it means a specific user or administrator has been designated as the "owner" responsible for reviewing and remediating that finding.
- Notified - When a match is Notified, it means an automated or manual alert has been sent to a stakeholder (usually the data owner or the end-user) informing them that sensitive data was found in their area of responsibility.
- See How to Add a New Scan Playbook/Select Action for more details about these actions.
- The Percentage: A higher percentage (like the 98% for CockroachDB Cloud in the example above) indicates that almost all sensitive data found on that asset is currently "at risk" because no protective action has been taken.
- The Color Bars:
- Red Bars: Indicate a high percentage of unmanaged data (typically above 75-80%). These are critical priorities.
- Blue Bars: Indicate a moderate percentage of unmanaged data (typically around 50%). These are secondary priorities.
3. Top Data Types
This column provides context by listing the most prevalent or highest-weighted sensitive data types found on that Target.
- In the example above, for the Target CockroachDB Cloud, the risk is driven by Passwords and Australia: TFN (Tax File Numbers).
- For the Target Google Drive SE, the risk is driven by Credit Card Numbers.
- Knowing the data type helps an Admin decide which remediation playbook to run (for example, a different response is needed for a password than for a credit card number).
Summary of Use
This widget is used by Security Administrators to drive their daily remediation workflow.
- Prioritization: Instead of looking at millions of total matches, the admin can focus on the top 5 Targets that are the most "unmanaged."
- Risk Reduction: By running playbooks on the top item (CockroachDB Cloud), the admin can significantly reduce the organization's total risk score in a single session.
- Monitoring: If a Target stays at the top of this list for several weeks, it indicates a breakdown in the remediation process for that specific asset or department.
Target Sort
Targets are sorted by the following:
- Name - The name of the Target
- Unmanaged Data (percentage) - What percent of the sensitive data on the Target sources (databases, servers, cloud locations, etc.) is Unmanaged data. Unmanaged data is more vulnerable to breaches, malware, and other security threats.
- Top Data Types - The 3 most discovered types of Unmanaged data. For example, social security numbers, e-mail addresses, credit card numbers, etc.
Sort your Targets as follows:
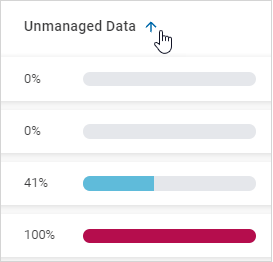
- Click the arrow to sort by ascending values, lowest value first, at the top.
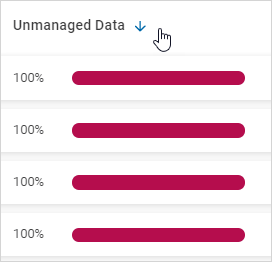
- Click the down arrow to sort by descending values, highest value first, at the top.
Matches by Classification
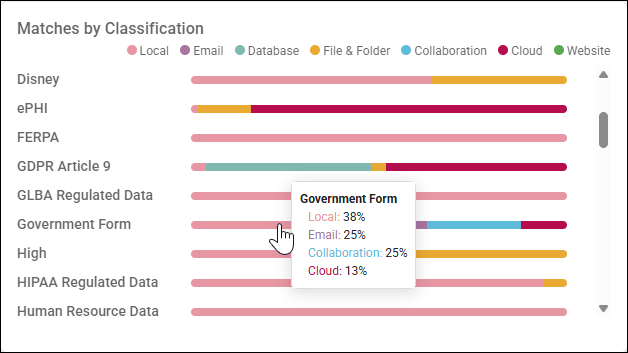
The Matches by Classification widget is a stacked bar chart that provides a breakdown of where different categories of sensitive data are located across your environment.
It maps your organization's Classifications (the "What") to the Target Types (the "Where").
Based on the example image above, here is a breakdown of the widget's components:
1. The Y-Axis (Classifications)
The labels on the left represent the Classification Labels applied to the data.
These are often aligned with regulatory frameworks or internal data sensitivity levels:
- Regulatory/Legal: GDPR Article 9, GLBA Regulated Data, HIPAA Regulated Data, FERPA.
- Internal/Custom: Disney, Government Form, Human Resource Data, High.
- Sensitive Content: ePHI (Electronic Protected Health Information).
2. The Stacked Bars (Target Types)
Each horizontal bar represents 100% of the matches for that specific classification.
The bar is divided into colored segments based on the Target Type where the data was found.
- Pink (Local): Data found on local endpoint drives (laptops/desktops).
- Purple (Email): Data found in email systems (Exchange, O365, Gmail).
- Teal (Database): Data found in structured databases (SQL, Oracle, etc.).
- Yellow (File & Folder): Data found on network file shares.
- Light Blue (Collaboration): Data found in tools like SharePoint, Teams, or Slack.
- Dark Red (Cloud): Data found in cloud storage (GDrive, OneDrive, Azure).
- Green (Website): Data found on web-based targets.
3. The Interactive Tooltip
When you hover over a bar (as shown with the Government Form label), a tooltip appears providing the exact percentage breakdown:
- Local: 38%
- Email: 25%
- Collaboration: 25%
- Cloud: 13%
Summary of Use
This widget is primarily used by Data Governance and Privacy Officers to:
- Identify Policy Violations:
- For example, if "Human Resource Data" (which should only be in a secure HR system) shows a large pink segment, it tells the admin that employees are saving HR files to their local laptops.
- Assess Exposure:
- It helps determine which platforms are the most "cluttered" with regulated data.
- If "GDPR Article 9" data is heavily concentrated in "Email," the organization may need to implement stricter email retention or encryption policies.
- Prioritize Remediation:
- It enables teams to focus on the most inappropriate locations first
- For example, "Why is there ePHI in our Cloud storage?"
- Example: In the screenshot above, the data classification "Government Form" is found in the following 4 different locations within the scanned environment:
- Local sources: 38% (Local file servers or the files and folders on a workstation, laptop, desktop, etc.)
- Email sources: 25% (Exchange, Exchange Online, Gmail)
- Collaboration sources: 25% (SharePoint, SharePoint Online, Bitbucket)
- Cloud sources: 13% (box, Dropbox, Google Drive, OneDrive, S3, etc.)
Sensitive Data Distribution
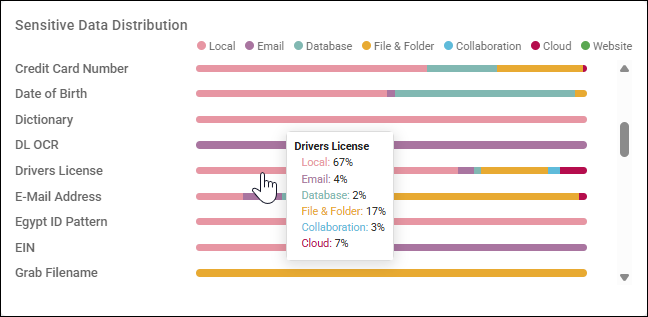
The Sensitive Data Distribution widget is a stacked bar chart that provides a breakdown of where specific Data Types are located across your environment.
It maps the "What" (the type of sensitive information) to the "Where" (the storage platform).
Based on the example image above, here is a breakdown of the widget's components:
1. The Y-Axis (Data Types)
The labels on the left represent the specific Data Types Spirion is configured to find. These include:
- Standard Types: Credit Card Number, Date of Birth, Drivers License, E-Mail Address.
- Custom/Regional Types: Egypt ID Pattern, EIN (Employer Identification Number).
- Technical Types: DL OCR (Drivers License found via Optical Character Recognition), Dictionary, Grab Filename.
2. The Stacked Bars (Target Types)
Each horizontal bar represents 100% of the matches for that specific data type. The bar is divided into colored segments based on the Target Type where the data was found.
- Pink (Local): Data found on local endpoint drives (laptops/desktops).
- Purple (Email): Data found in email systems (Exchange, O365, Gmail).
- Teal (Database): Data found in structured databases (SQL, Oracle, etc.).
- Yellow (File & Folder): Data found on network file shares.
- Light Blue (Collaboration): Data found in tools like SharePoint, Teams, or Slack.
- Dark Red (Cloud): Data found in cloud storage (GDrive, OneDrive, Azure).
- Green (Website): Data found on web-based targets.
3. The Interactive Tooltip
When you hover over a bar (as shown with the Drivers License label), a tooltip appears providing the exact percentage breakdown for that data type:
- Local: Local file servers or the files and folders on a workstation, laptop, desktop, etc. (In the example above, 67% - the majority of Drivers Licenses are on local machines)
- File & Folder: Remote file servers or the files and folders on a workstation, laptop, desktop, etc. (17% in the example)
- Cloud: box, Dropbox, Google Drive, OneDrive, S3, etc. (7% in the example)
- Email: Exchange, Exchange Online, Gmail (4% in the example)
- Collaboration: SharePoint, SharePoint Online, Bitbucket (3% in the example)
- Database: Oracle, MSSQL, PostgreSQL, Snowflake, etc. (2% in the example)
- Website: web site of your choosing
Summary of Use
This widget is primarily used by Security Analysts and Privacy Officers to:
- Identify Risky Storage Patterns:
- For example, if "Credit Card Numbers" show a large pink segment, it indicates that employees are storing PCI data on their local laptops, which is a major compliance risk.
- For another example, Bank Account Numbers are found exclusively in the Files and Folders on remote machines. Consider the following:
- This may be expected behavior (you may wish to keep this data out of cloud sources).
- You may wish to confirm this data has been redacted/quarantined or similar remediation action taken to ensure it is secure
- You may wish to drill down and discover the distribution among local machines - is this data on one machine or several? Are these machines secure? Do they use proper password strength, etc.?
- Tailor Remediation Strategies:
- If "E-Mail Addresses" are mostly in "File & Folder" (yellow), the team might focus on cleaning up old network shares.
- If they are in "Email" (purple), they might focus on mailbox retention policies.
- Monitor Data Sprawl:
- It helps visualize how sensitive data is migrating across the organization
- For example, moving from local drives to cloud storage
TRENDS View
Match Status
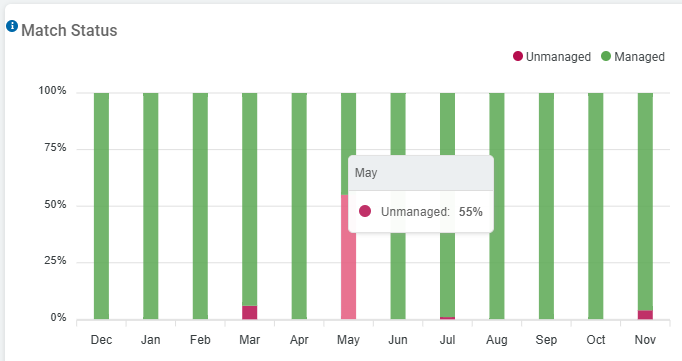
The Match Status bar graph is a trend visualization in the Spirion dashboard that tracks the ratio of Managed vs. Unmanaged sensitive data matches over time.
It provides a high-level view of the organization's remediation effectiveness.
Based on the image provided, here is a breakdown of the graph's components:
1. The Axes
- X-Axis (Horizontal): Represents Time, shown in monthly increments (e.g., Dec, Jan, Feb, through Nov). This allows you to see historical trends over a full year.
- Y-Axis (Vertical): Represents the Percentage (%) of total matches. Each bar is a "stacked" representation of 100% of the data found in that month.
2. The Colors and Statuses
- Green (Managed): This segment represents sensitive data matches that have been successfully addressed. In Spirion, "Managed" means a remediation action has been taken such as the following:
- Access Restricted
- Classified
- Quarantined
- Redacted
- Shredded
- Script Executed
- Ignored
- Globally Ignored
- User Action taken on data
- MIP Label applied to data
- Red/Pink (Unmanaged): This segment represents sensitive data matches that have been discovered but have not yet had any action taken on them. These represent the organization's active risk.
- Unmanaged data is sensitive data that has been not acted upon (no action) or else has been acted upon in the following ways:
- Assigned
- Notified
- More information about Managed vs Unmanaged data
3. Key Observations from this Example Image
- High Efficiency: For most of the year (Dec–Feb and June–Oct), the bars are almost entirely green. This indicates that the organization is remediating data nearly as fast as it is being found.
- The May Spike: In May, there is a significant spike where 55% of the data is Unmanaged (as shown in the tooltip). This typically indicates a large new scan was performed that discovered a high volume of data that the team hasn't had time to remediate yet.
- Minor Spikes (March, July, Nov): Small red segments in these months suggest that new data was discovered but was likely addressed quickly, as the following months return to being almost entirely green.
- Impact: An environment with a large amount of unmanaged data is at greater risk of data breach, malware, data loss and other security threats than an environment with managed data.
Summary of Use
This graph is primarily used by Security Managers and Compliance Officers to:
- Monitor Remediation Velocity: It shows whether the team is keeping up with the volume of new data being discovered.
- Identify Resource Gaps: A month with a large red segment (like May) might indicate that the team was overwhelmed or that automated remediation playbooks were disabled.
- Prove Compliance: A consistently green graph is visual proof for auditors that the organization has a "tight" process for securing sensitive data shortly after discovery.
- The Match Status vertical stacked bar graph displays what percent (%) of sensitive data matches are Managed vs Unmanaged over time (by month).
Managed Action Activity
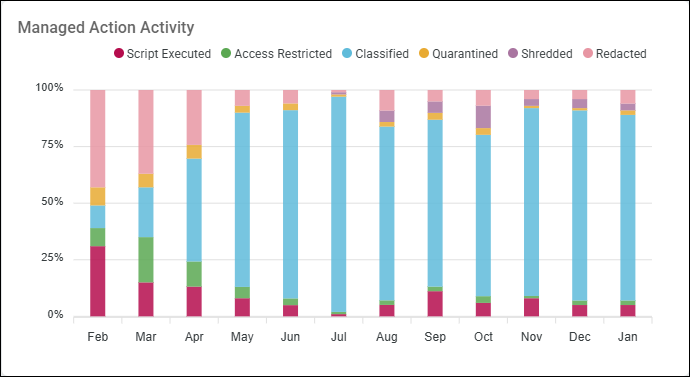
The Managed Action Activity bar graph is a trend visualization in the Spirion dashboard that provides a breakdown of the specific remediation methods used to secure sensitive data over time.
It shows not just that data was managed, but how it was managed.
- Managed actions displayed here include:
- Access Restricted
- Classified
- Quarantined
- Redacted
- Shredded
- Script Executed
- Ignored
- Globally Ignored
- User Action taken on data
- MIP Label applied to data
Based on the example image above, here is a breakdown of the graph's components:
1. The Axes
- X-Axis (Horizontal): Represents Time, shown in monthly increments (e.g., Aug through July).
- Y-Axis (Vertical): Represents the Percentage (%) of total managed actions. Each bar is a "stacked" representation of 100% of the remediation activity for that month.
2. The Colors and Action Types
The legend at the top defines the different remediation actions taken by the Spirion platform:
- Pink (Classified): The most dominant action in this image. This means the data was labeled or tagged (for example, applying a "Confidential" tag to a file).
- Purple (Script Executed): Indicates that a custom script (like a PowerShell or Bash script) was triggered as part of a playbook to handle the data. The tooltip shows that in September, this accounted for 11% of all actions.
- Blue (Redacted): The sensitive portion of the data was masked (e.g., replacing digits in a Credit Card number with 'X').
- Yellow (Quarantined): The file was moved to a secure, restricted location.
- Green (Access Restricted): Permissions on the file or folder were modified to limit who can see the data.
- Dark Red (Shredded): The file was permanently and securely deleted.
3. Key Observations from this Image
- Classification-Heavy Strategy: The vast majority of the organization's activity is "Classified" (pink). This suggests a strategy focused on data visibility and labeling rather than destructive actions like shredding.
- Consistency: The mix of actions remains relatively stable month-over-month, indicating a consistent application of automated remediation playbooks.
- October Shredding Spike: In October, there is a visible increase in "Shredded" (dark red) actions compared to other months, suggesting a specific cleanup project or a high volume of temporary files being deleted.
Summary of Use
This graph is primarily used by Security Operations (SecOps) and Compliance Managers to:
- Audit Remediation Methods: It provides proof to auditors of exactly how the organization is securing its data (e.g., "We shredded 5% and classified 80%").
- Verify Playbook Performance: If a new "Quarantine" playbook is deployed, admins expect to see the yellow segment grow in the following months.
- Balance Risk vs. Productivity: If "Shredded" actions are too high, it might indicate that the security policy is too aggressive and could be deleting useful business data. Conversely, if "Classified" is the only action, it might indicate that the organization isn't doing enough to actually remove risk.
Aging Report for Unmanaged Sensitive Data
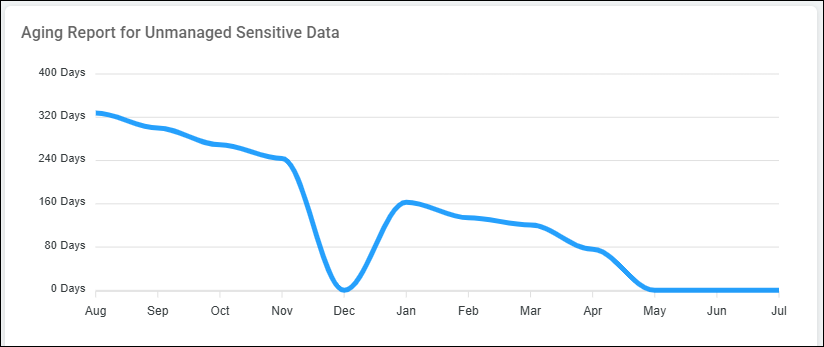
The Aging Report for Unmanaged Sensitive Data is a trend graph in the Spirion dashboard that tracks the average age of sensitive data findings that have not yet been remediated or brought under a compensating control.
This report is a critical metric for measuring the speed and efficiency of your data security program.
About Unmanaged Data
- Unmanaged data is vulnerable, exposed sensitive data
- Unmanaged data is at greater risk of security breach
- Unmanaged data is sensitive data that either has been not acted upon (No action) or else has been acted upon in the following ways:
- Assigned
- Notified
- Sensitive data classified as Unmanaged MUST BE addressed in a timely fashion. The older your unmanaged sensitive data, the greater the risk to your organization!
- More information about Unmanaged vs Managed data
1. The Axes
- X-Axis (Horizontal): Represents Time, typically shown in monthly increments (for example, Aug through July).
- Y-Axis (Vertical): Represents the Average Age in Days.
- In this image, the scale ranges from 0 to 400 days.
- This measures how long, on average, a piece of sensitive data has been sitting "unmanaged" since it was first discovered.
2. The Trend Line
- The Blue Line: Represents the average "dwell time" of sensitive data in your environment.
- Downward Slopes: Indicate that the team is successfully closing out old findings (remediating them), which brings the average age down.
- Upward Slopes: Indicate that existing findings are getting older without being addressed, or that new scans have discovered data that has been sitting on a drive for a long time.
3. Key Observations from the Example Image (above)
- Initial High Age (Aug - Nov): The report starts with an average age of over 320 days.
- This suggests that when the program started, there was a large backlog of "stale" sensitive data that had been sitting unmanaged for nearly a year.
- The December Drop: There is a dramatic drop to 0 days in December.
- This usually indicates a massive remediation event where the oldest backlog was cleared out, or a reset in how the data is being tracked.
- The January Spike: The age climbs back up to about 160 days in January.
- This often happens when a new scan of a previously unscanned "legacy" server occurs, bringing "old" data into the report for the first time.
- Current Status (May - July): The line has flattened at 0 days.
- This is the "ideal state," indicating that the organization is now remediating sensitive data as soon as it is found, leaving no "unmanaged" data to age.
Summary of Use
This graph is typically used for Compliance and Operational Oversight.
- SLA Tracking: Many organizations have internal Service Level Agreements (SLAs) stating that sensitive data must be remediated within 30, 60, or 90 days.
- This graph proves whether those SLAs are being met.
- Risk Reduction: The longer sensitive data sits unmanaged, the higher the risk of a breach.
- A low average age indicates a "tight" security operation that identifies and secures data quickly.
Dashboard Refresh Interval
The Dashboard is designed to refresh its data charts automatically after a job (scan) run completes.
- Automatic Refresh: Under normal conditions, data should refresh once a scan job is finished to reflect the new results.
- Manual Override: If the charts are not updating as expected, administrators often use a manual refresh via the API:
/api/Maintenance/RefreshChartCache
Troubleshooting Refresh Issues
- Ensure the database table CachedDashboardCharts has updated
- Issues can be caused by backend service delays or issues with the log svc-resultsprocessing.