How to Manage the Permissions of a Tag
This article describes how to manage the user and role permissions contained in the Tags on the Tag Management page.
Overview
- The Tag Management page is used to create, organize, and maintain metadata tags that group and classify network Targets, endpoints, and assets.
How to Manage Tag Permissions
To manage the permissions of a Tag:
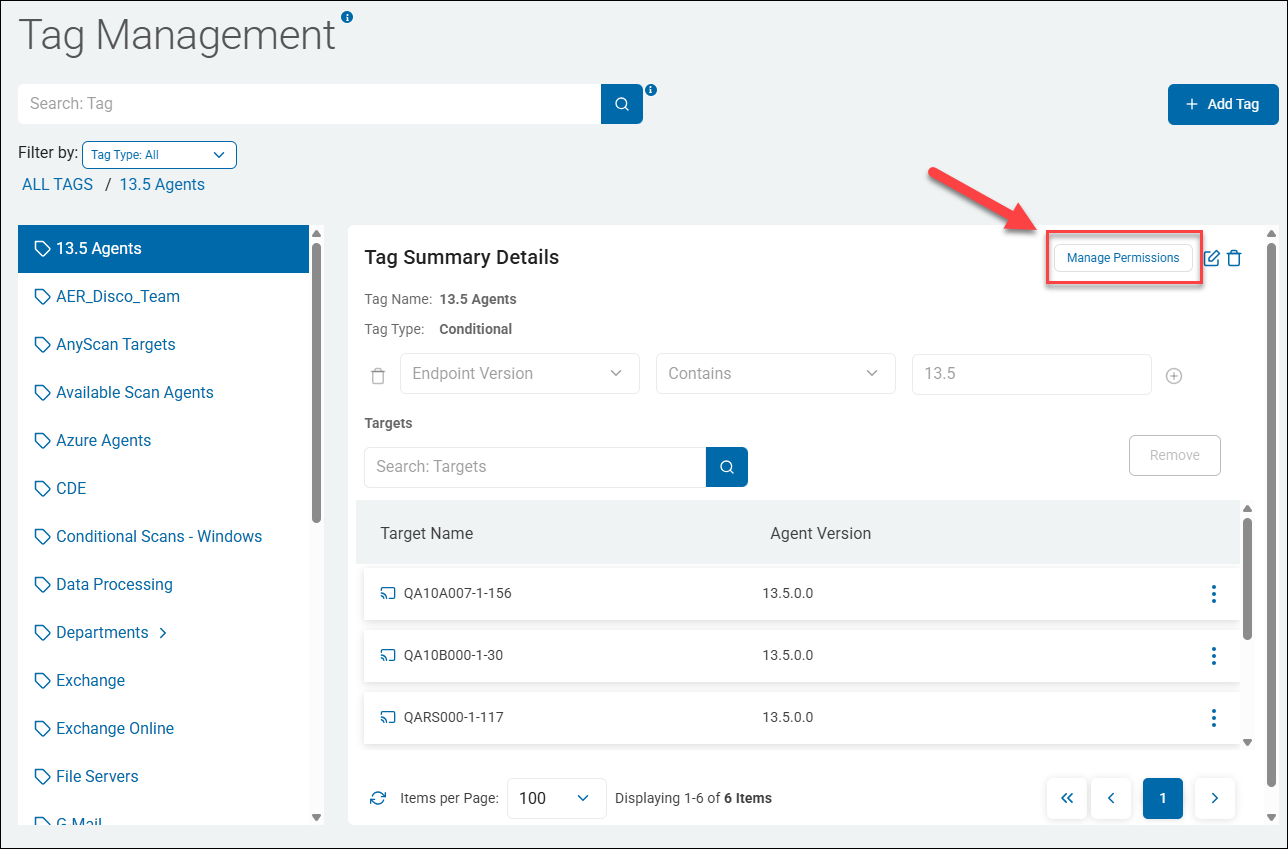
- Navigate to the the Tag Management page. Select Data Asset Inventory > Tag Management.
- From the the Tag list, locate and select the Tag whose permissions you want to manage.
- In the Tag Summary Details section, click Manage Permissions.
- To change the permissions of a specific user, see "How to Change a User's Tag Permissions" below.
- To change the permissions of a specific role, see "How to Change a Role's Tag Permissions" below.
How to Change a User's Tag Permissions
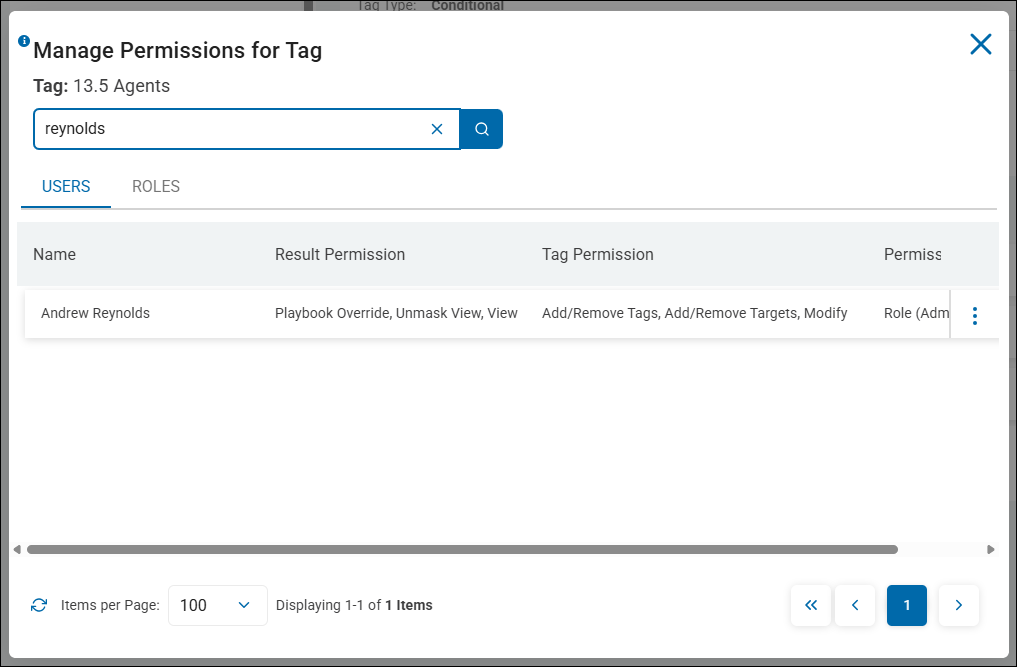
The USERS tab shows a table which outlines the access permissions granted to users for that specific Tag:
- Name
- Displays the individual user's name (for example, Kay Brewer, KayTest Test, Kris Gainsforth, Luis Valles).
- Result Permission
- Specifies the permissions the user has over scan and discovery findings associated with the Tag.
- Tag Permission
- Defines administrative capabilities directly on the Tag and its assigned Targets.
- Permission Level
- Shows the origin or assignment context through which the user received these permissions (for example,
Role (Admin),Role (Buzz-Manage Sc...)).
- Shows the origin or assignment context through which the user received these permissions (for example,
- Actions Menu (
⋮) - An options icon on the far right of each row providing contextual actions (such as editing or overriding permissions for that specific user).
Procedure:
- From the "Manage Permission for a Tag" window select the USERS tab.
- Search for the user whose permissions for the Tag you want to change.
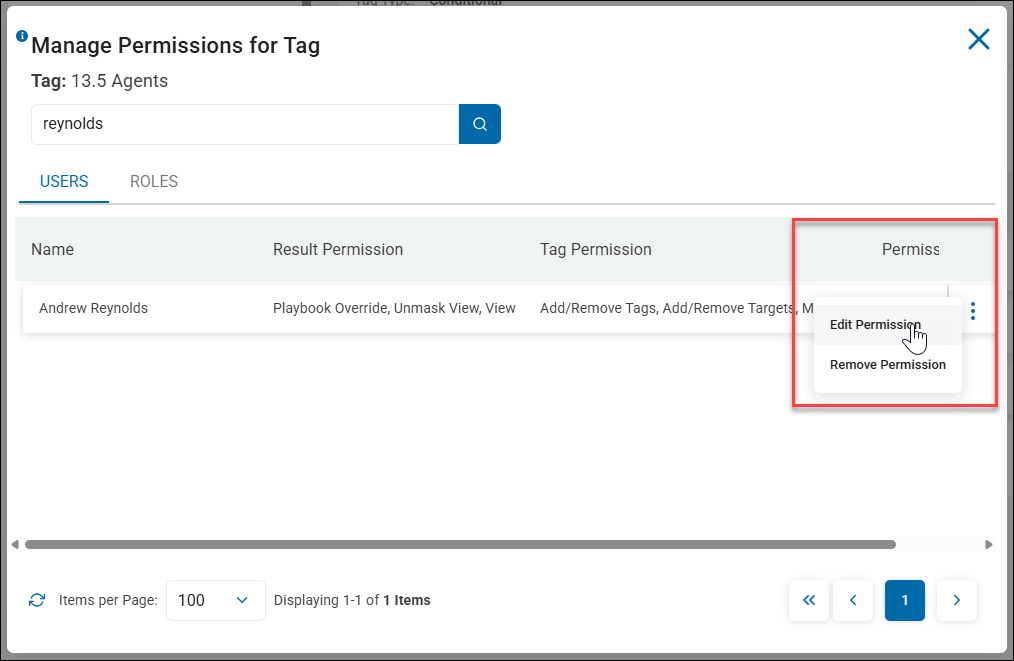
- Click Edit Permission from the more options menu.
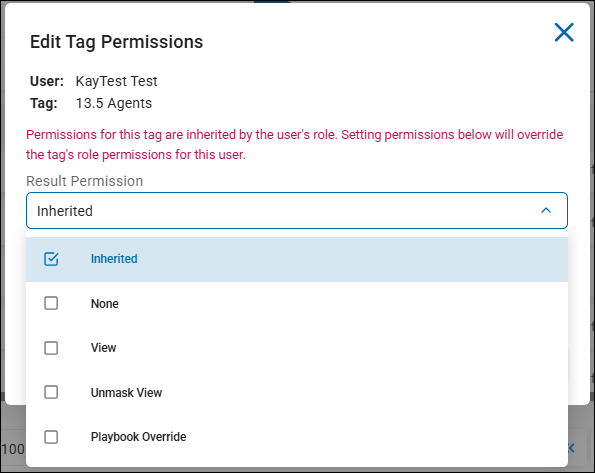
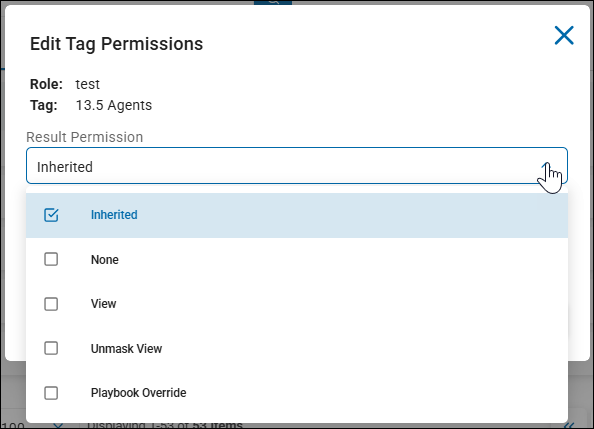
- On the Edit Tag Permissions pop-up window, select any of the following options from the Result Permission drop-down list.
- Inherited: Available on child Tags only (not root/top-level Tags). The Tag inherits result permissions from its parent Tag.
- None: The user has no access to view any results associated with this Tag. Important! Setting Result Permission to "None" automatically forces Tag Permission to "None" as well — the user effectively cannot see or interact with the Tag at all.
- View: Grants the user the ability to view sensitive data from the Tag's results, typically in a masked format.
- Unmask View: Grants the user the ability to view the unmasked (plaintext) version of sensitive data. Selecting this automatically includes "View" as well.
- Playbook Override: Enables the user to override playbook actions on results associated with this Tag
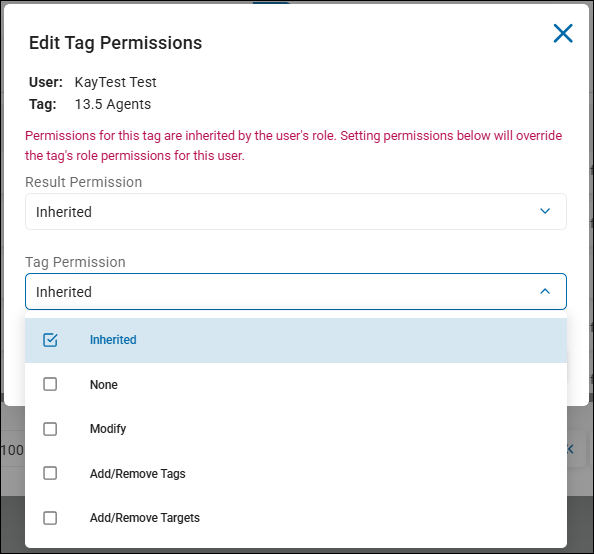
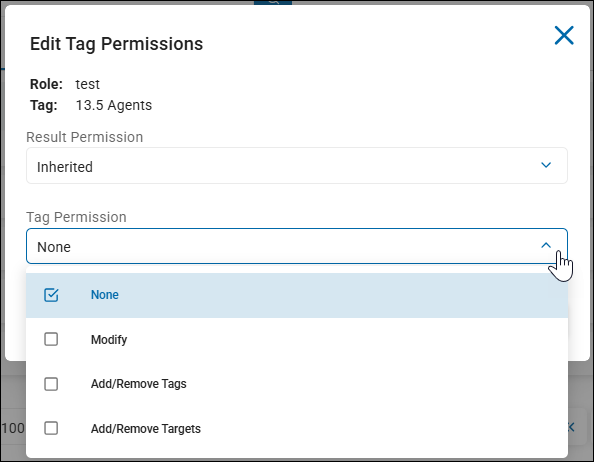
- Select any of the following options from the Tag Permission drop-down list.
- Inherited: Default for child tags only (not available on root/top-level tags). The Tag inherits its permissions from its parent Tag.
- None: Default for root Tags. The user has no permissions to act on the Tag. The user can only view the Tag (if the Result Permission allows it) but cannot edit, delete, manage permissions, add/remove child Tags, or add/remove Targets.
- Modify: Enables the user to edit, delete, or manage permissions for the Tag.
- Add/Remove Tags - Enables the user to add or remove child Tags within this Tag (that is, create nested Tags or remove existing child Tags from the Tag hierarchy).
- Add/Remove Targets - Enables the user to add or remove Targets from the Tag (controls the "remove" options and assignment of scan Targets to the Tag).
- Click the Confirm button to save or Cancel button to discard.
How to Change a Role's Tag Permissions
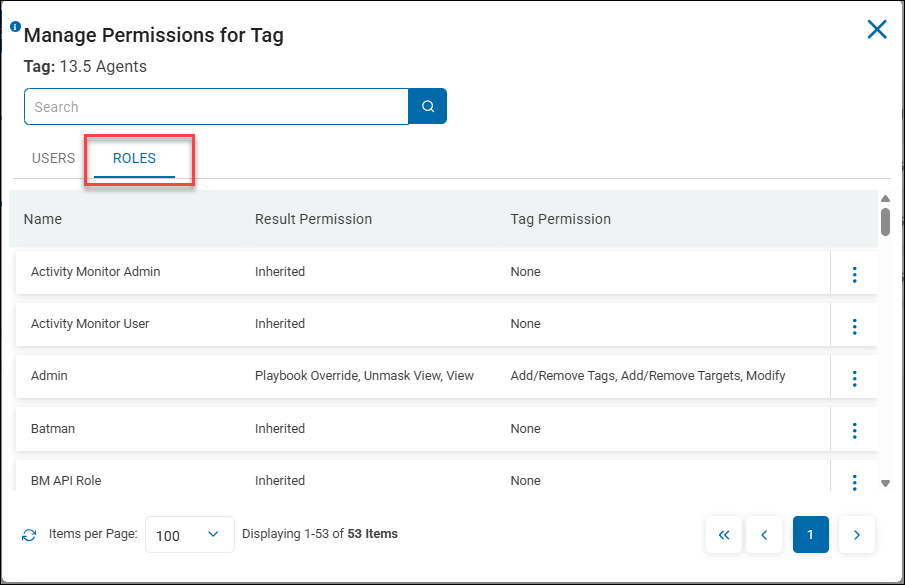
The ROLE tab shows a table which outlines the access permissions granted to user roles for that specific Tag:
- Name
- Lists the configured security roles in the platform.
- Examples:
- Activity Monitor Admin
- Activity Monitor User
- Admin
- Compliance Admin
- Data Privacy User
- General User
- Result Permission
- Specifies what actions users assigned to the role can perform on search and discovery results associated with this Tag.
- Tag Permission
- Details the management and administrative privileges granted to the role over the Tag and associated Targets.
- Actions Menu (
⋮) - A three-dot menu icon on the far right of each row for editing or overriding specific role-level permissions.
Procedure:
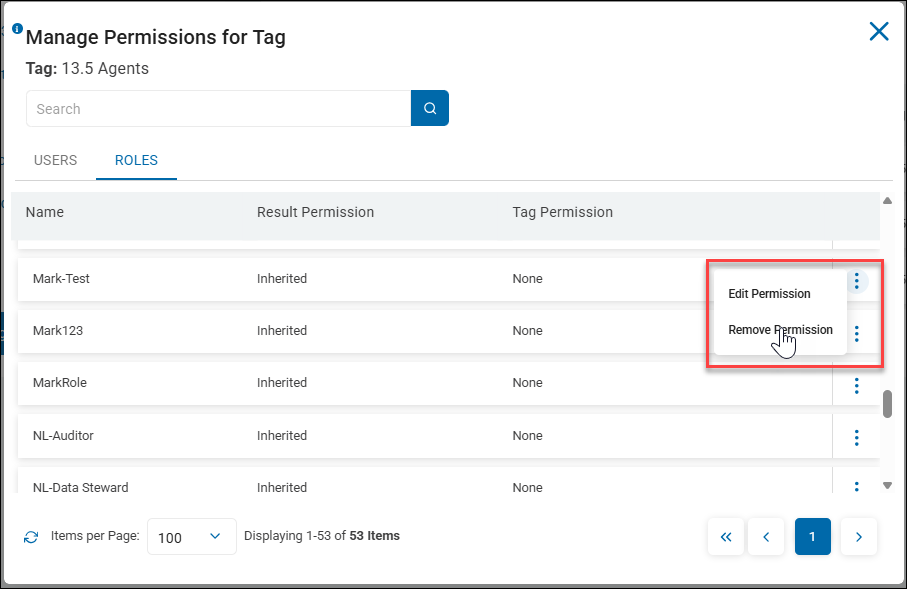
- On the "Manage Permissions for a Tag" page select the ROLES tab.
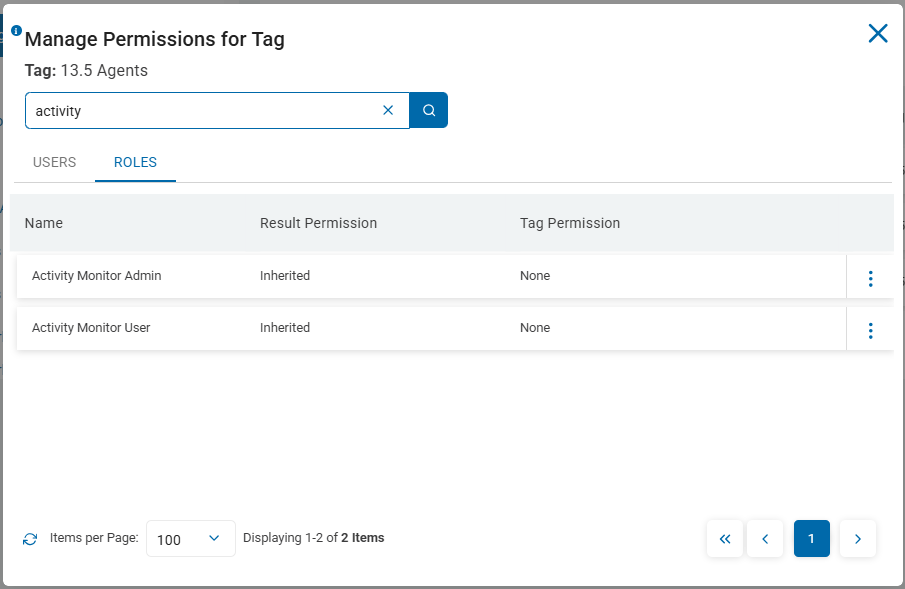
- Search the user role for which you want to edit the Tag permission.
- Click Edit Permission from the options menu at the end of the row for the role you are editing.
- On the Edit Tag Permissions pop-up window, select any of the following options from the Result Permission drop-down list:
- Inherited: Available on child Tags only (not root/top-level Tags). The Tag inherits result permissions from its parent Tag.
- None: The role has no access to view any results associated with this Tag. Important! Setting Result Permission to "None" automatically forces Tag Permission to "None" as well — the role effectively cannot see or interact with the Tag at all.
- View: Grants the role the ability to view sensitive data from the Tag's results, typically in a masked format.
- Unmask View: Grants the role the ability to view the unmasked (plaintext) version of sensitive data. Selecting this automatically includes "View" as well.
- Playbook Override: Enables the role to override playbook actions on results associated with this Tag.
- On the Edit Tag Permissions pop-up window, select any of the following options from the Tag Permission drop-down list:
These options can be combined:
- For example, rows with full explicit permissions may have all three actionable permissions set together: Add/Remove Tags, Add/Remove Targets, and Modify.
- The "Inherited" and "None" options are mutually exclusive with the other 3, as they represent either delegation to the parent or a blanked-out permission state. - None: Default for root Tags. The role has no permissions to act on the Tag. The role can only view the Tag (if the Result Permission allows it) but cannot edit, delete, manage permissions, add/remove child Tags, or add/remove Targets.
- Modify: Enables the role to edit, delete, or manage permissions for the Tag.
- Add/Remove Tags - Enables the role to add or remove child Tags within this Tag (that is, create nested Tags or remove existing child Tags from the Tag hierarchy).
- Add/Remove Targets - Enables the role to add or remove Targets from the Tag (controls the "remove" options and assignment of scan Targets to the Tag).
- Click Confirm to save or Cancel to discard.
How to Remove Permissions from a Tag
To remove a Tag Permission:
- In the Tag list, locate a tag you want to remove.
- In the Tag Summary Details section, click Manage Permissions.
- On the Manage Permissions for Tag pop-up window, remove permissions for a specific user, user role, or both by using the following topics.
How to Remove Tag Permissions from a User
Use the following steps to remove permissions from a specific user.
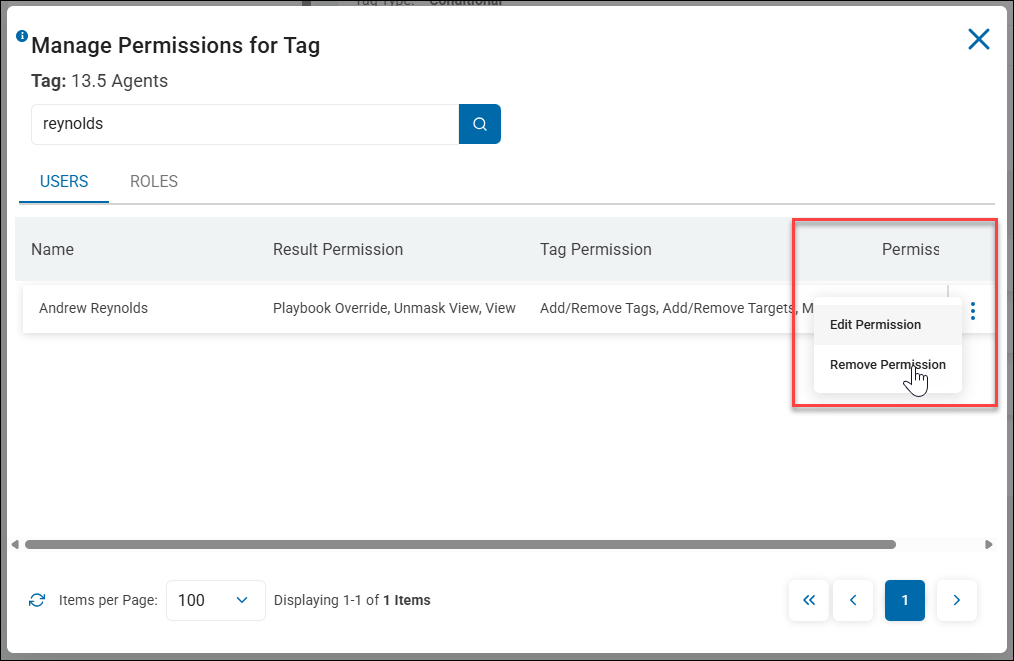
- Search the user for which you want to remove the Tag permission.
- Click Remove Permission from the more options menu.
- On the Remove User Permissions pop-up window, click Confirm to revert the user permissions to its default state or else click Cancel.
How to Remove Tag Permissions from a Role
Use the following steps to remove the permissions from a role. All users who are members of the role will no longer have the permissions that are removed.
- Search the user role for which you want to remove the Tag permission.
- Click Remove Permission from the more options menu.
- On the Remove Role Permissions pop-up window, click Confirm to revert the user role permissions to its default state or else click Cancel.