How to Configure Single Sign-On (SSO) Using Microsoft Entra
Before You Start
- This guide configures Spirion Sensitive Data Platform to provide Single Sign On via Microsoft Entra*
- At this time, only SAML 2.0 is supported
Required Settings
- When filling out user mapping, the Id, Username, and Email boxes display a red asterisk which indicates these are required fields.
- Contact email, first name, and last name are also required fields.
Objectidentifier
- The objectidentifier does not need to be created as an attribute or claim.
- The claim automatically exists. (Entra Only)
- Claims between Entra and the Sensitive Data Platform console must match exactly, or they will not work.
* Microsoft Entra ID is a cloud-based identity and access management service that provides authentication, authorization, and security for users, devices, applications, and resources. It was formerly known as Azure Active Directory (Azure AD) and is used by organizations to manage access to services like Microsoft 365, Azure, and third-party applications.
How to Set Up Single Sign On in Spirion Sensitive Data Platform
Enable the Module
Procedure:
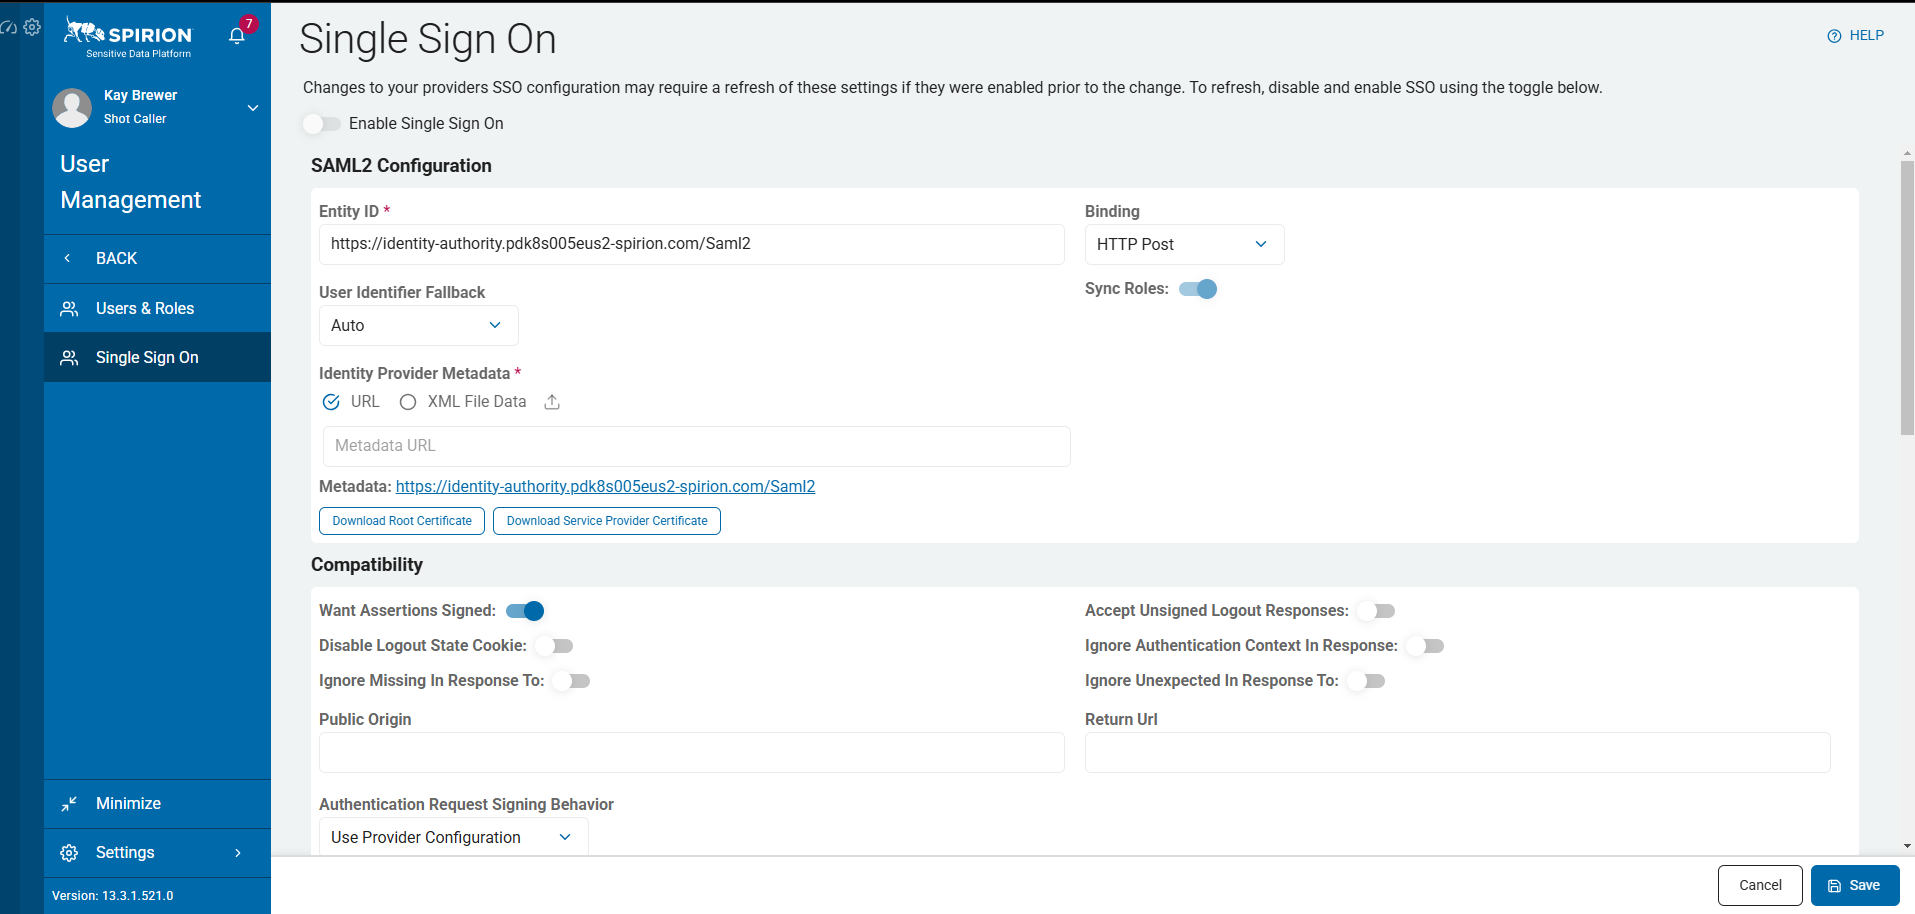
- Navigate to Settings > User Management > Single Sign On
- Leave the Enable Single Sign On slider to the left (grey) to the very end.
- This setting enables/disables SSO functionality.
- We recommend leaving this setting disabled until all settings are configured.
- Select the blue Edit button on the bottom right of the screen to begin filling in boxes.
How to Set up your Microsoft Entra ID
Procedure:
- Navigate to your Azure portal: https://portal.azure.com
- Select Microsoft Entra ID from the Home screen.
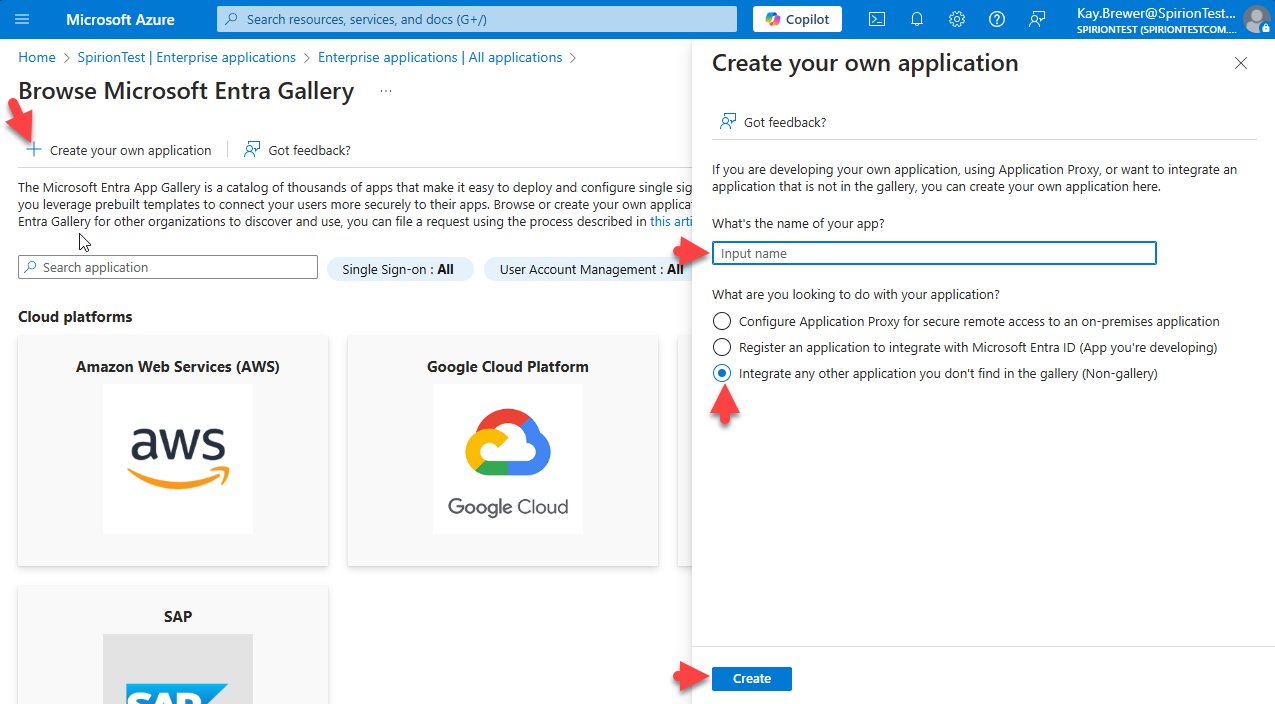
- Navigate to Enterprise Applications.
- Click New Application.
- Click the + Create your own application link at the top of the page.
- Give the App a name and select the radio button "Integrate any other application you don’t find in the gallery (Non-gallery)".
- Click the blue Create button at the bottom of the page.
Note: If you do not have a box that says set up single sign on in the Overview page of the app you just created then the app was not configured correctly, and you will need to go back and do the process again.
How to Get Started With a Custom App
While it does not matter what order you set up the custom app.
Spirion recommends doing each step below in order - step 1, then step 2.
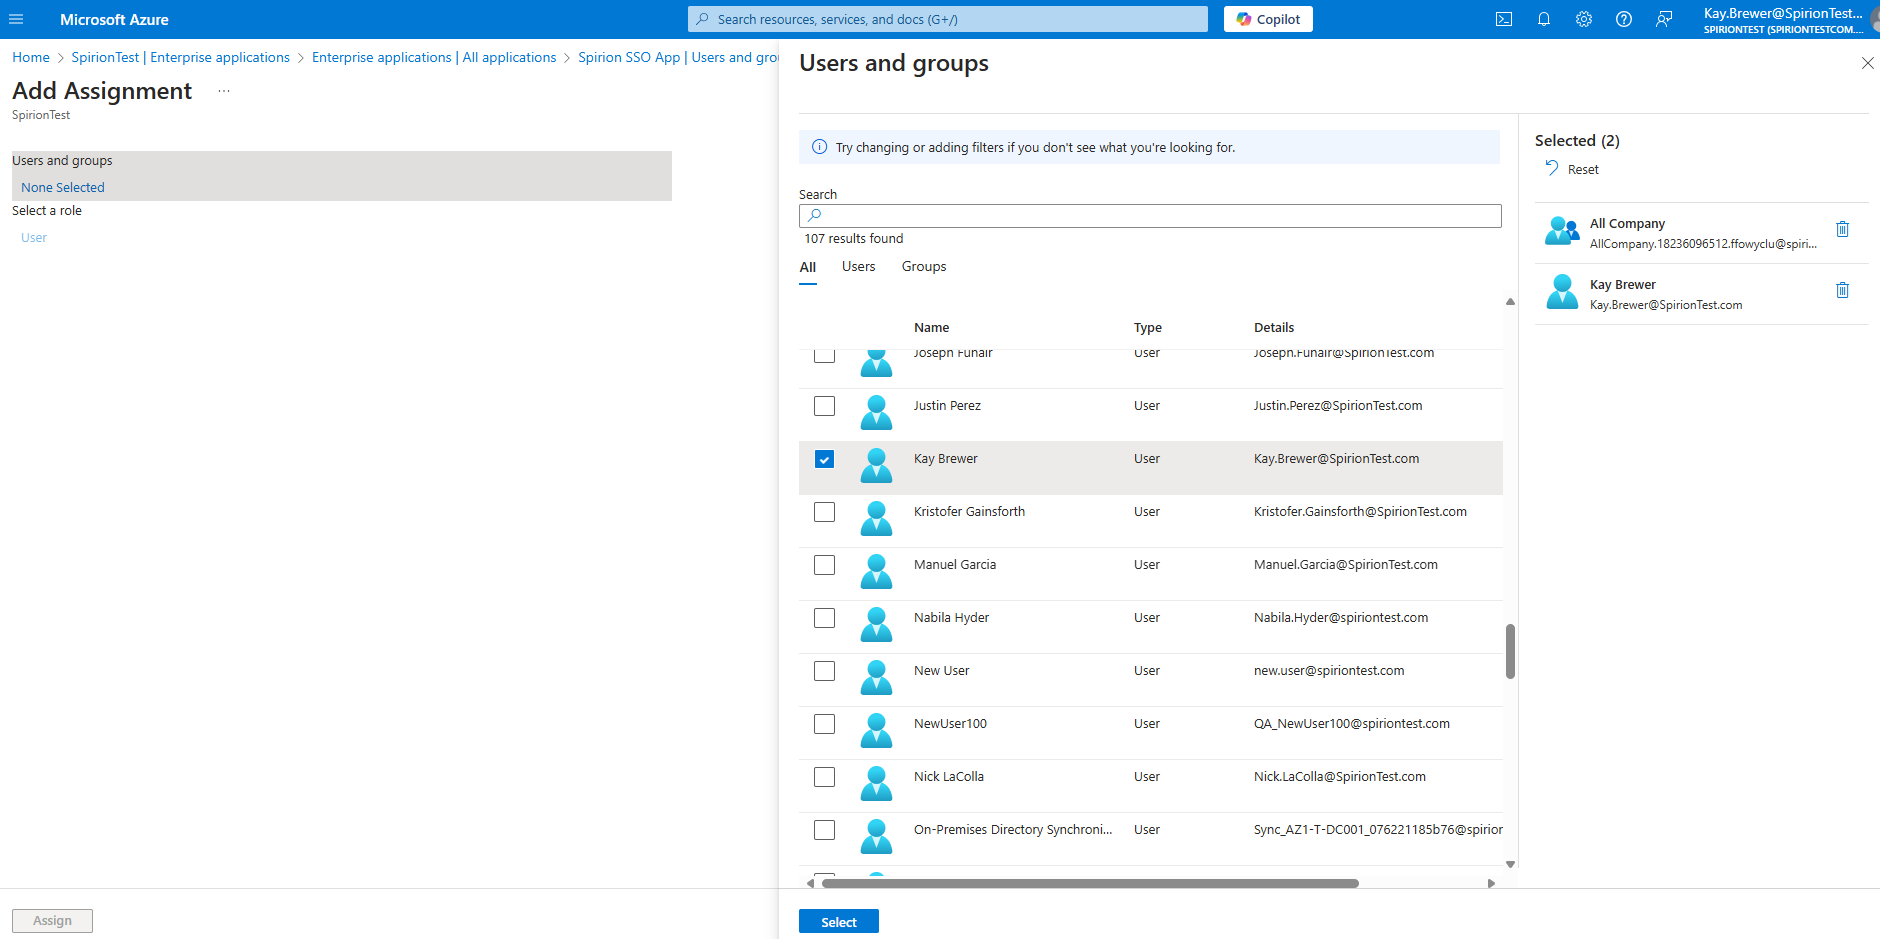
- Assign Users and Groups
- When Single Sign On is activated, these are the Users and Groups from your Active Directory that have access.
- We recommend using Groups.
To add a Group or a User:- Select the link + Add user/group.
- Click “None Selected”.
- Check the boxes of the groups you want to add to the application.
- Click the blue Select box at the bottom of the page.
- Click Assign to finish.
- Set up Single Sign On
- Navigate back to Overview on the left-hand side of the Spirion Enterprise Application.
- Click “2. Set up Single Sign On”.
- Select SAML.
- Click the Edit pencil in the first box called “basic SAML Configuration”
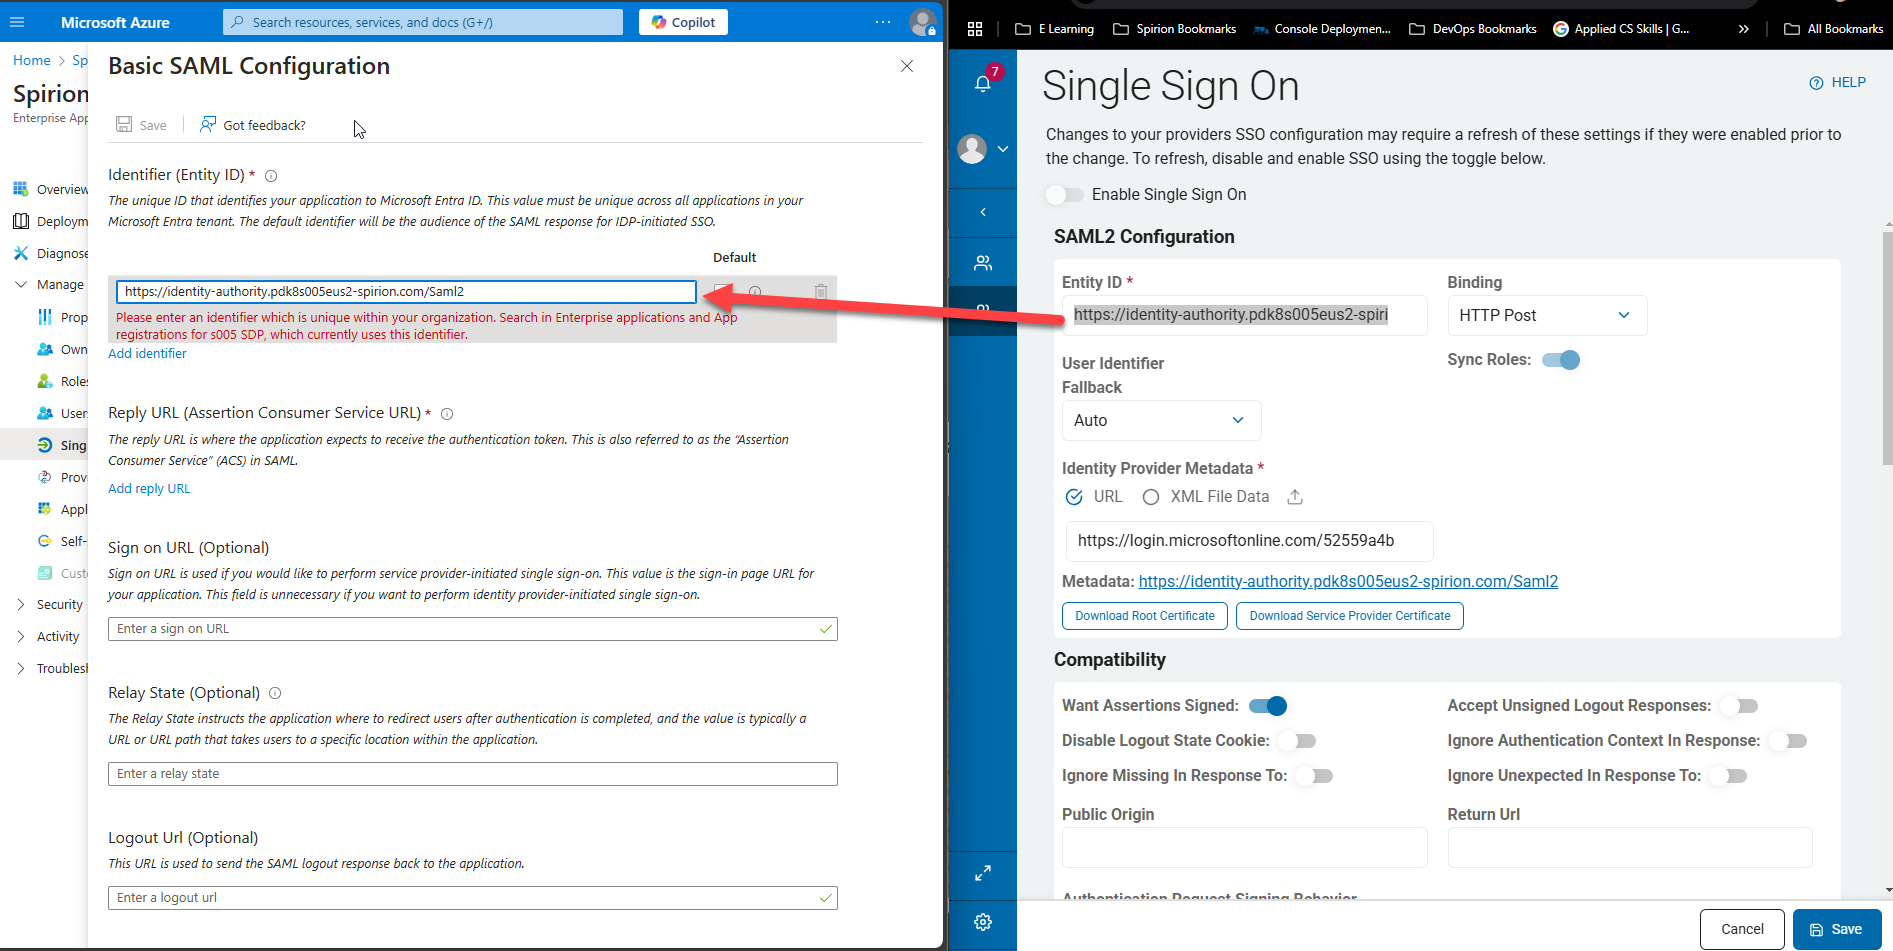
- Select Add an Identifier.
- In the enter an identifier box paste the URL from the box on the Spirion Console labeled Entity ID.
- In the enter an identifier box paste the URL from the box on the Spirion Console labeled Entity ID.
- Reply URL
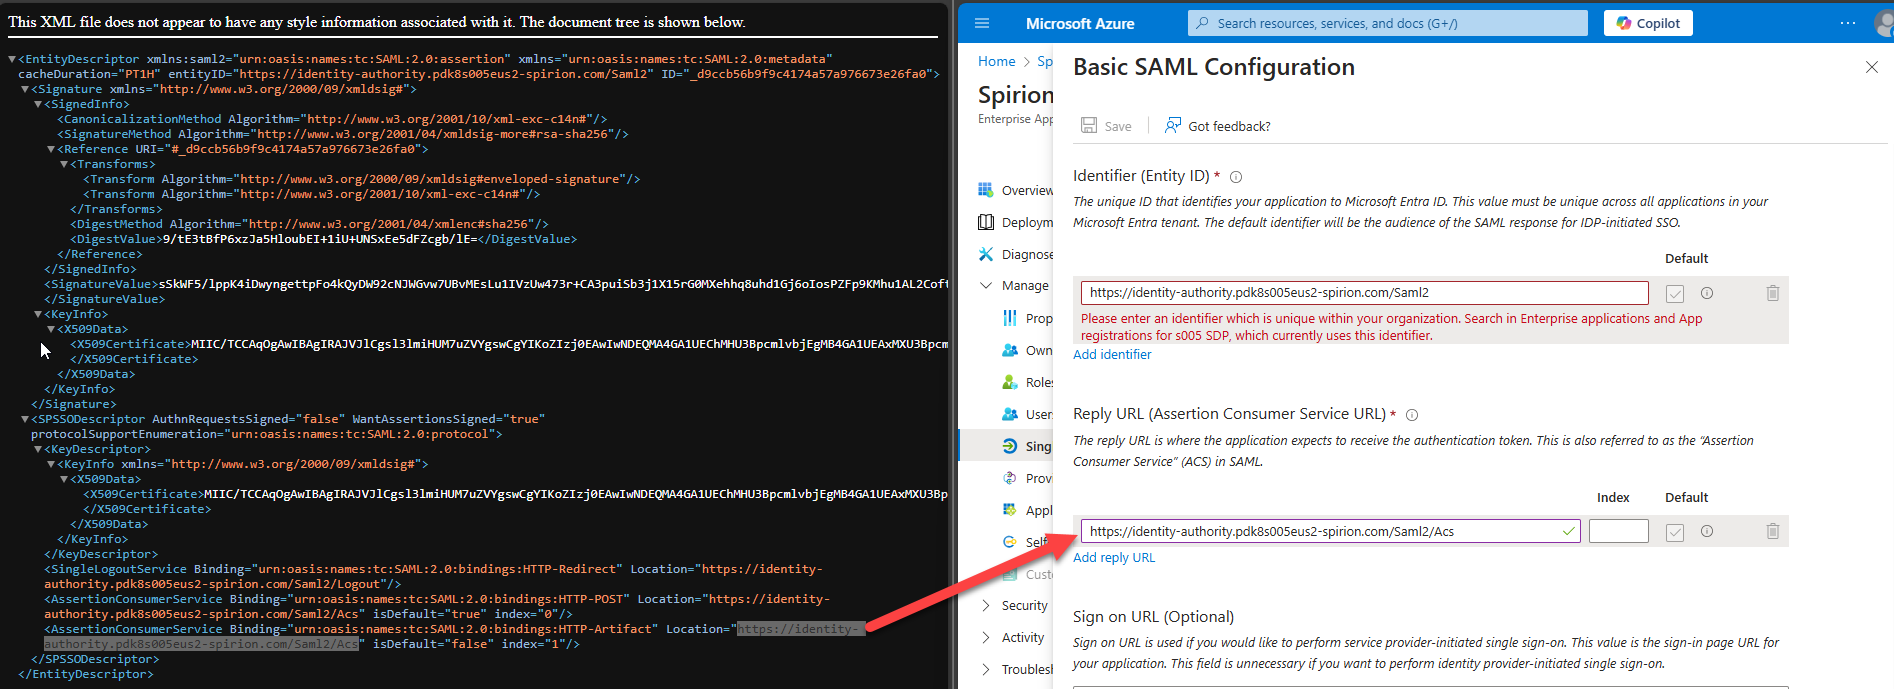
- Click Add reply URL.
- On the Spirion console click the blue URL next to Metadata: in the SAML2 Configuration section.
- Download the file and open it in a browser
- Copy the URL at the end of the file that is in line with AssertionConsumerService binding.
- Paste this URL into the Add reply URL field.
- The value in the Index box must be 0.
- Logout URL
- The logout URL is optional however, you can find this in the XML file in the steps above.
- The URL can then be copied and pasted into the field.
- Select Add an Identifier.
- Select the Save at the top of the page "Basic SAML Configuration" in Microsoft Azure to save these changes and update the app.
- This takes you back to the SAML-based Sign-on page.
- Copy the App Federation Metadata URL from box 3, labeled SAML Certificates and paste the copied URL into the box in the Spirion Console above the Metadata link.

How to Map Microsoft Entra Data to Spirion Sensitive Data Platform SSO
The Data Mapping part of this guide requires attention to detail.
- This guide represents the default configuration.
- Your organization's experience may vary.
Procedure:
- Click the blue edit pencil on the SAML-based Sign-on page in box 2 of "Attributes & Claims."
- These fields must be matched to the boxes on the Data Mapping section of the Spirion Console.
- Note: Claims must match exactly between Entra and the Spirion Sensitive Data Platform console or they will fail.
- Note: The objectidentifier does not need to be created as an attribute or claim. The claim automatically exists. (Entra Only)
- These fields must be matched to the boxes on the Data Mapping section of the Spirion Console.
- Fields in Spirion Sensitive Data Platform Console:
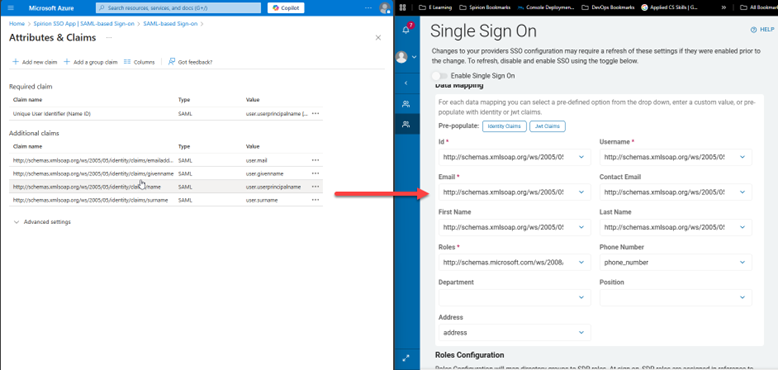
| Fields in Spirion Sensitive Data Platform Console | Matching SAML Claim |
|---|---|
| Id | http://schemas.microsoft.com/ws/2008/06/identity/claims/objectidentifier |
| Username | http://schemas.xmlsoap.org/ws/2005/05/identity/claims/nameidentifier |
| http://schemas.xmlsoap.org/ws/2005/05/identity/claims/emailaddress | |
| First Name | http://schemas.xmlsoap.org/ws/2005/05/identity/claims/givenname |
| Last Name | http://schemas.xmlsoap.org/ws/2005/05/identity/claims/surname |
| Roles | http://schemas.microsoft.com/ws/2008/06/identity/claims/groups |
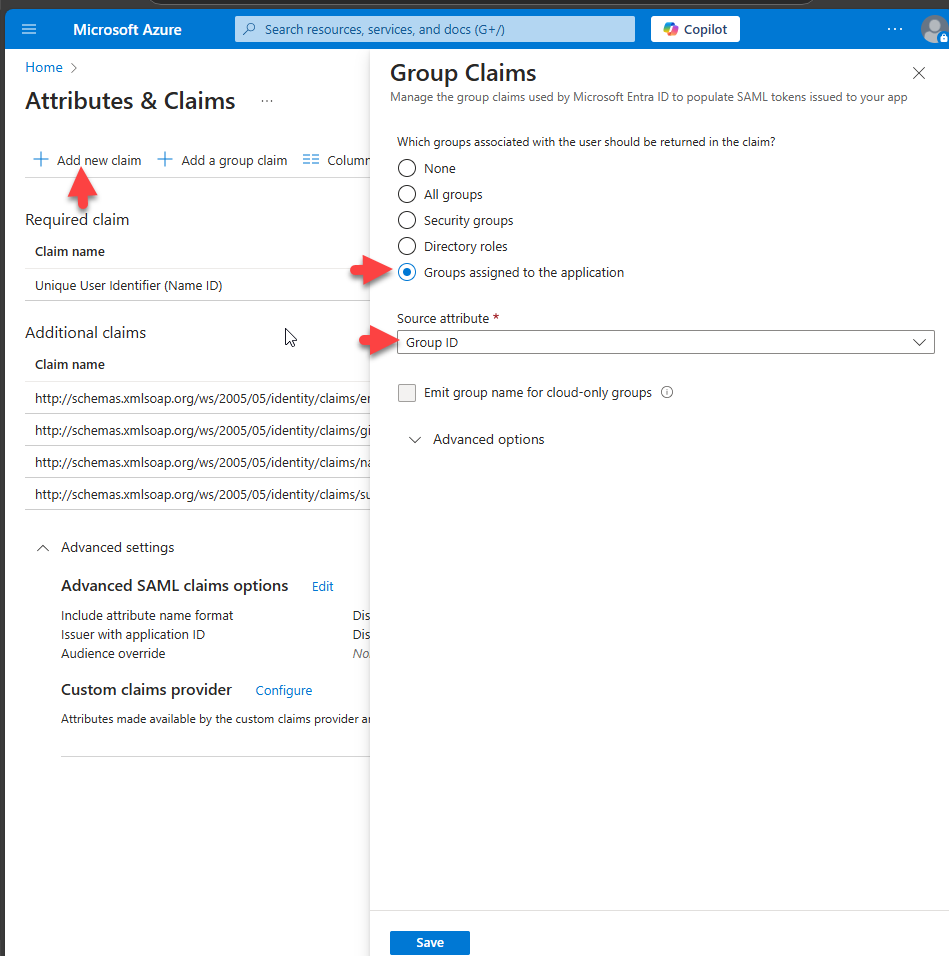
- Roles – Required. This is a claim you must create.
- Not provided by default.
- Click the link + Add new claim at the top of the "Attributes and Claims" Azure page.
- Select the radio button Groups assigned to the application.
- Fill in the Source attribute box.
- In this example Group ID is used.
- Click the blue Save button at the bottom of the page.
- Back in the Spirion Sensitive Data Platform console select the claims/groups toggle box.
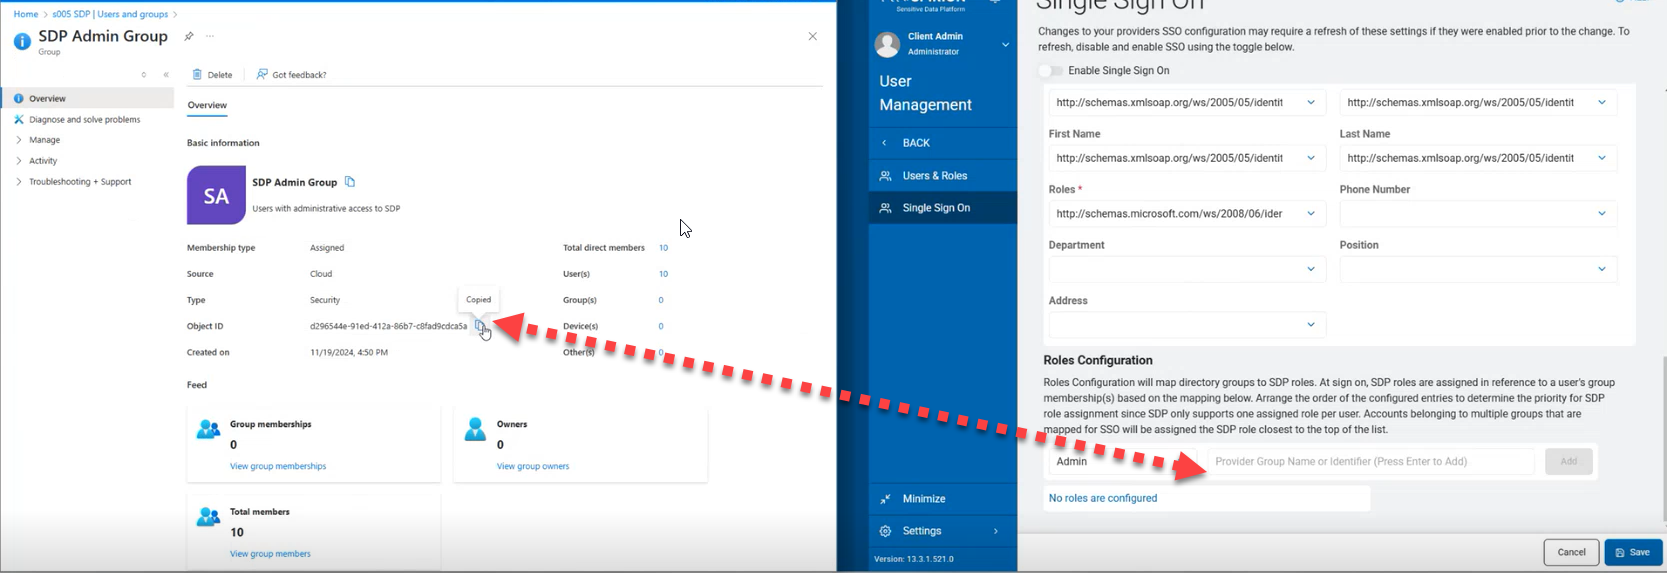
How to Map Entra Directory Groups to Spirion Roles
The Roles Configuration section of the Single Sign On page maps directory groups from Microsoft to Spirion Sensitive Data Platform Roles.
To configure this section, get the Group ID from the Azure Application page and paste it into the Spirion Console in line with the Group permissions required.
Procedure:
- Navigate back to the enterprise app that you created for this project.
- Select Users and Groups.
- Select the Group you wish to add to the Spirion Console on this screen.
- Copy the Object ID from the Group page.
- Paste the Object ID into the box in the Spirion Sensitive Data Platform console under Roles Configuration and assign it a role in the drop-down box.
- Select the blue Save button at the bottom of the screen when finished.
- Toggle the blue Enable Single Sign On button at the top of the Single Sign On page.
- Test a user to make sure that the implementation is complete.